Provident Home Design

Decor, DIY, and Interior Design

  • HOME
  • ABOUT
    • About PHD
    • Contact Me
  • DIY PROJECTS
  • DESIGN 101
  • PAINT
  • HOME TOUR
  • DESIGN INSPO
  • DECOR TIPS

DIY Cobblestone Boot/Shoe Tray

Hello!  I hope you’ve had a good week!!  This week in Ohio the weather has gotten wet and chilly.  I can definitely tell Fall is here and that Winter is coming!

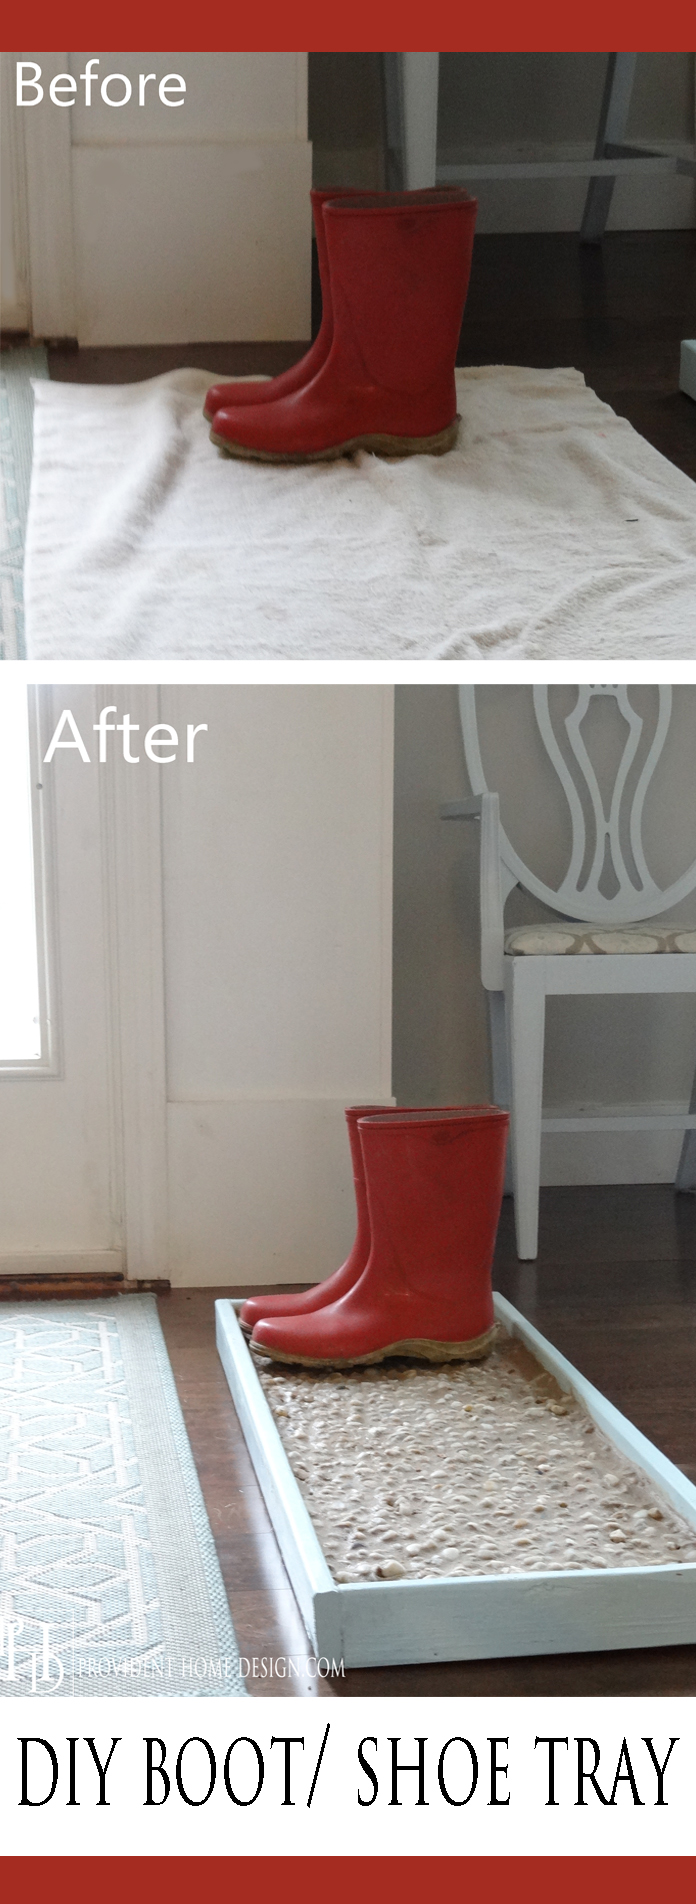
In the past I have laid down an old towel by the door to protect the floors from wet boots and shoes during the Fall and Winter months.
DIY Boot Tray Before

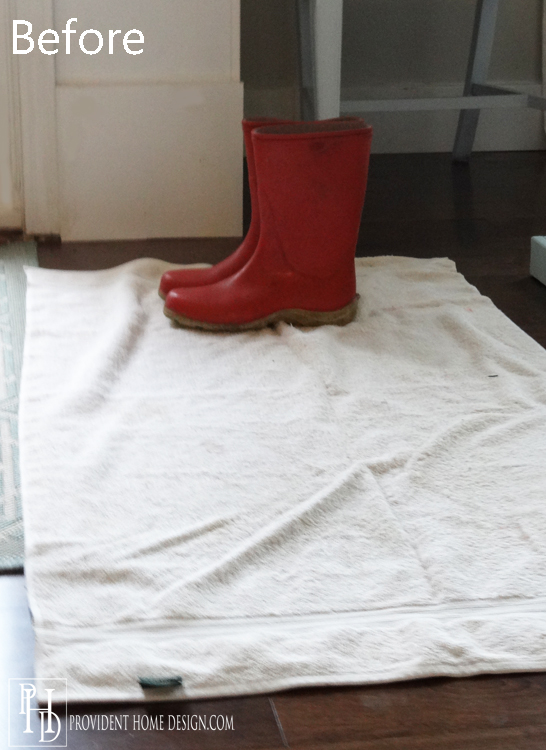
Our past couple of winters have been so snowy  that I’ve had the towel down by the door for weeks at a time.

I’ll be very frank, it drives me nuts!  It ends up looking so messy and dingy and makes the dreary Winter feel even more dreary.

So I was motivated this week to find a solution to contain the wet boots and shoes in a more attractive, upbeat way.

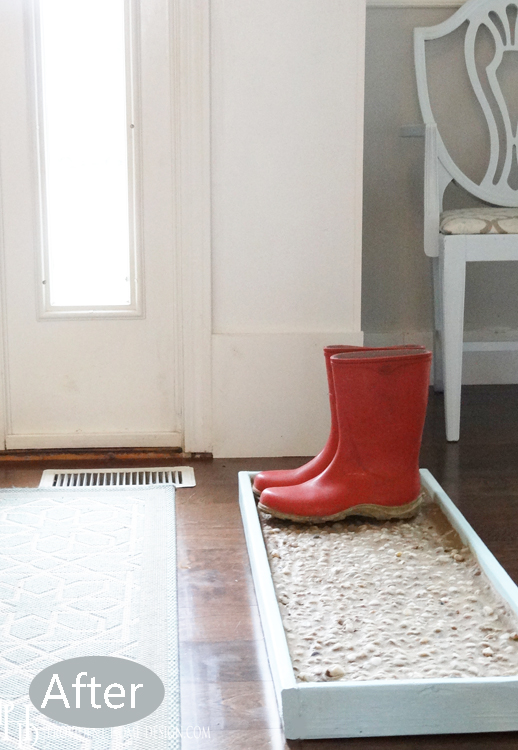
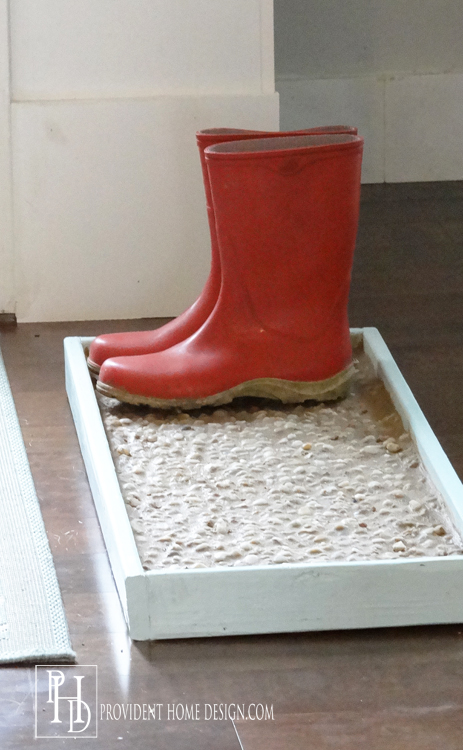
Here is my solution below, a DIY Cobblestone Boot/Shoe Tray.

DIY Boot Tray After


How to make a grouted boot tray


DIY Grouted Boot Tray
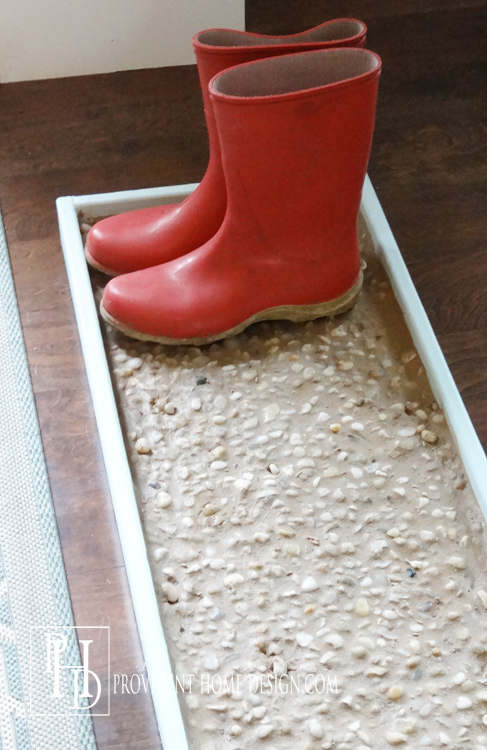
I’m sure I looked pretty silly taking the picture above as I was lying stomach down on the floor with  the camera out in front of me!:-)

This project is super inexpensive and can be done to the degree of difficulty you are comfortable.

READY to learn??  Here we go!

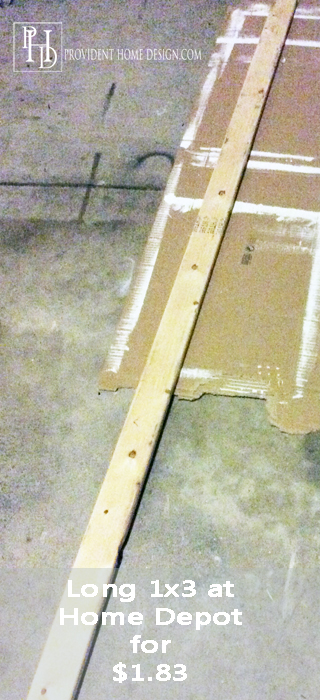
I bought an 8 ft.  1 x 3 piece of low grade pine for $1.83 at Home Depot (i’m sure Lowe’s has it too).  If you take your measurements there they will cut it for you.

Long 1x3

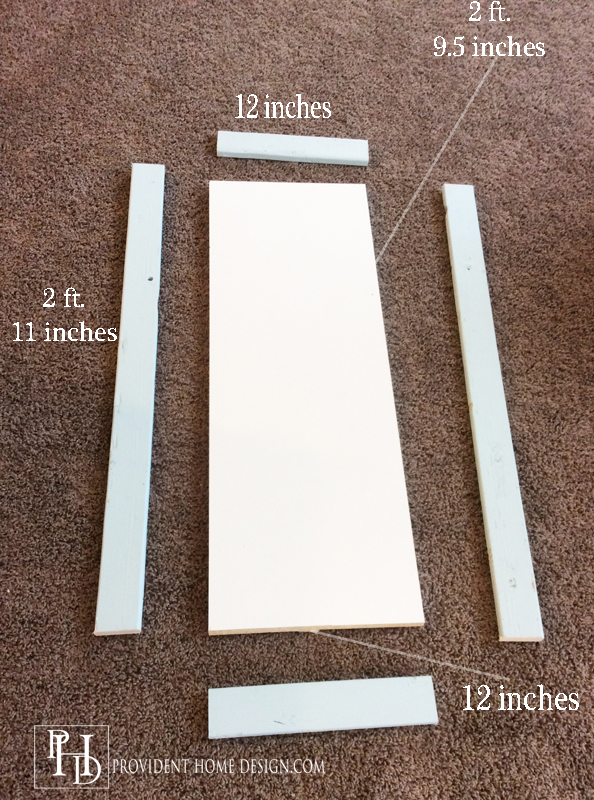
The measurements I used are in the photo below.  The white rectangle is a piece of melamine I had left over from another project.  You could use melamine or plywood just make sure that it is 3/4 or an inch thick.

Boot Tray Tutorial


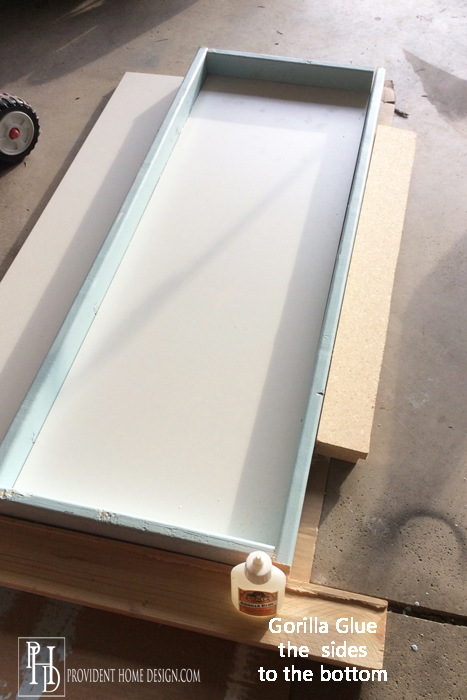
Next I used Gorilla glue along the bottom of the  wood sides and pushed them up against the sides of the white melamine.  I placed wood supports around it to keep the sides in place and let it dry for 24 hours (as shown below).

Note:  If you would rather nail in the sides to the melamine you can.

How to make a boot tray

Next, the outdoor garden area at Home Depot carries a bag of cobble stone for only $3.50 (I still have lots left so you can make multiple if you’d like).

Cobble Stone

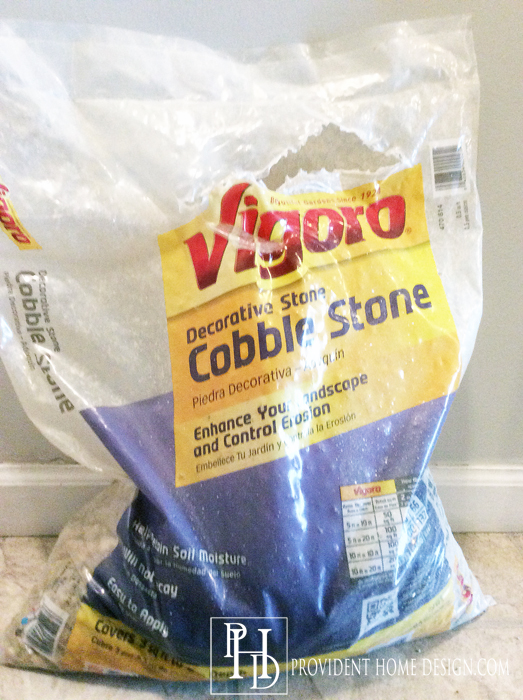
If you don’t have children, have older children, or if you have young children who are extremely self disciplined then you could just wash off the cobblestones (they will need to be washed) and pour them in the tray and be done.

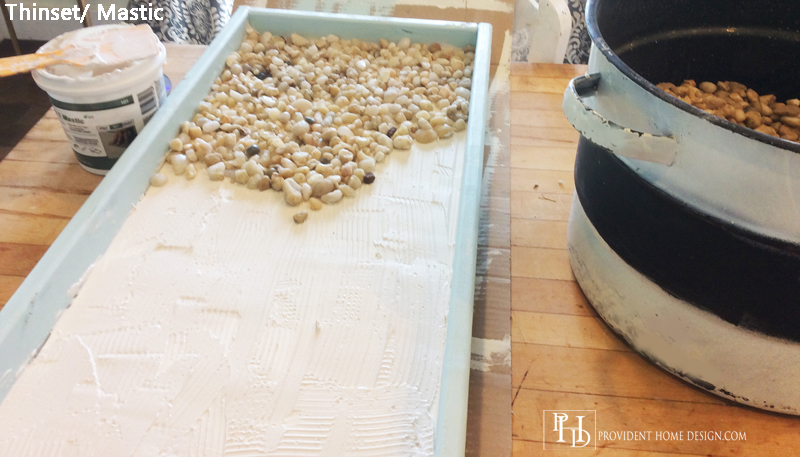
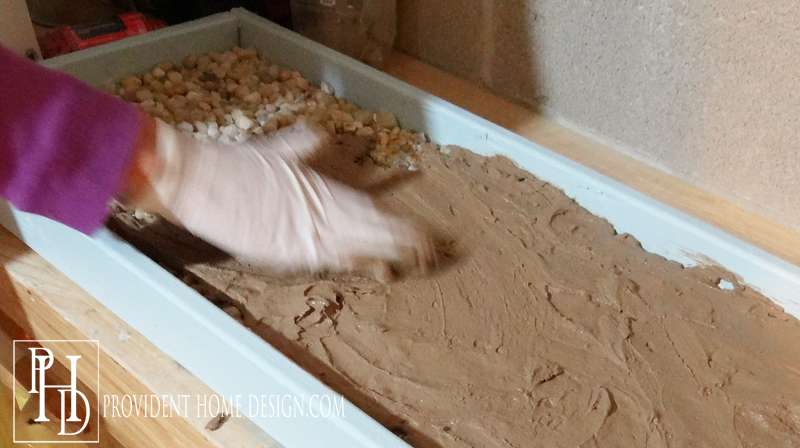
But if you have young children like I do and don’t want to find stones all over all over your home then I suggest you put down a generous layer of thinset/mastic (the same kind you use for installing a backsplash).

Below you can see that I put down the thinset (my layer was too thin I should of put more) and started placing the cobble stones on top.

DIY Boot Tray

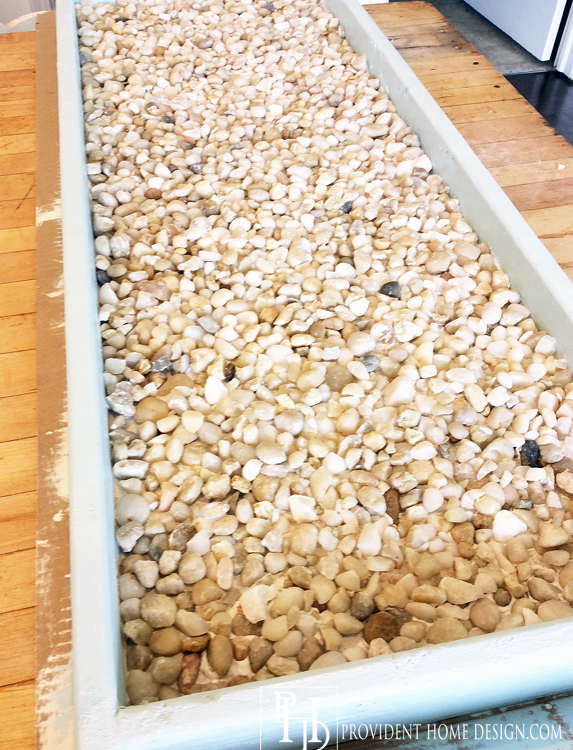
This is what it looked like with all of the cobble stones laid over the thinset.  At this point you can let it dry and be done with it . Or if you want even more reinforcement and permanence to the stones you can add grout like did.

DIY Pebble Boot Tray

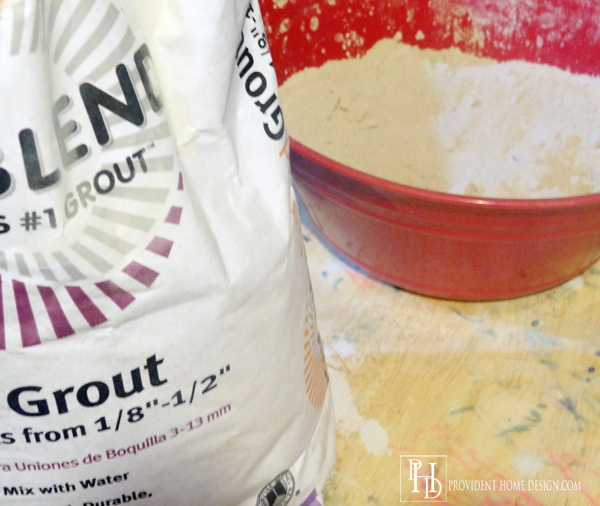
Pour the grout (I used tan) in a bucket and add the appropriate amount of water like you do with grouting a backsplash.

Mixing Grout

Grouting is indeed as messy as it looks in the photos.  I use a rubber glove over my hand to spread the grout over all of the stones.

Putting on Grout

When you finish spreading the grout let it sit for about 15 minutes or so and then with a large wet sponge start wiping away the grout.  You will want a bucket of water next to you as you wipe off the grout because the sponge will get super messy and will need to be cleaned regularly.

When the  grout it wiped off the stone it will look something like the photo below.  Let it dry.

How to make a cobblestone boot tray

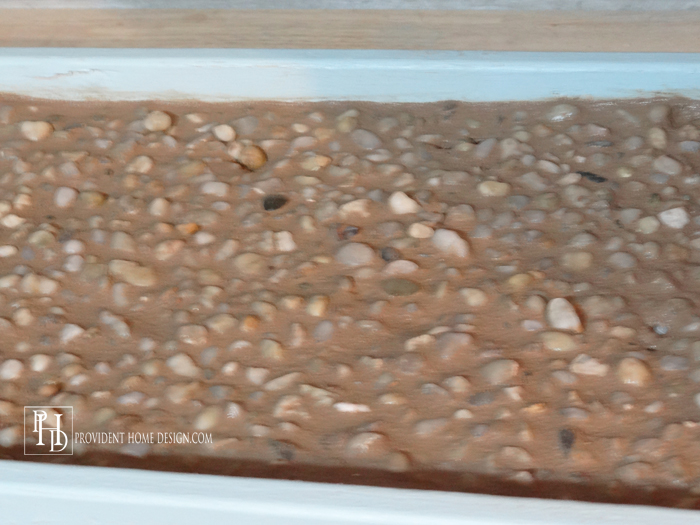
After you let it dry the grout will lighten up a bit as shown below.

DIY Cobblestone Boot Tray

That’s it!  I expect his to last for a very long time and am hoping it will help the dreary months ahead not be quite as dreary!

Cobblestone Boot Tray

Have a wonderful rest of your weekend and as always let me know if you have any questions (and remember there are no dumb questions)!:-)

Signature

[jetpack_subscription_form]

Follow me on Pinterest and Instagram for more decorating ideas and inspiration!

DIY Boot Tray--No More Using Towels!

Related Posts From the Blog:

  • Going CoastalGoing Coastal
  • Tool Time with Tamara- How to Use a Jig SawTool Time with Tamara- How to Use a Jig Saw
  • Design 101- Knowing the Best Furniture Layout for a Room (without Moving Your Furniture)!Design 101- Knowing the Best Furniture Layout for a Room (without Moving Your Furniture)!
  • Favorite Interior Designers Series – Martha O’Hara InteriorsFavorite Interior Designers Series – Martha O’Hara Interiors
  • New Build- Kitchen RevealNew Build- Kitchen Reveal
  • Stair Runner Reveal and TutorialStair Runner Reveal and Tutorial
  • ORC Week 2 & Decorative Storage SolutionORC Week 2 & Decorative Storage Solution
  • Design 101-Masculine vs. FeminineDesign 101-Masculine vs. Feminine

before and afters// decorating// DIY// flooring// holiday// inspiration// tutorials// woodwork14 Comments

« Awesome Free App for Choosing Color Palettes
Project ADHD and The One Room Challenge »

Comments

  1. Chani M says

    Friday, October 9, 2015 at 4:32 pm

    I love this! I’m curious how many pairs of shoes/boots you think could fit on the tray?

    Reply
    • Tamara says

      Friday, October 9, 2015 at 5:16 pm

      Hi, Chani! 2 pairs of adult shoes plus 4 pairs of kids shoes fit nicely on the one I made. You can adjust the measurements for your needs which is the great thing about DIY!:-)

      Reply
      • MamaJay says

        Sunday, January 31, 2016 at 8:26 pm

        I think I would take the largest boots we ever wore in bad weather and line them up to see just how much room I would need. Some of our men wear some bulky winter boots. I would also be checking what width I would need at that time too. We are a family of adults plus you may have company coming in during bad weather.

        Reply
  2. Cheryl says

    Friday, November 6, 2015 at 3:15 pm

    Hi, I think this is a great Idea!! Question: do you have to clean it at all? If so how often?

    Reply
    • Cheryl says

      Friday, November 6, 2015 at 4:04 pm

      I answered my own question after reading the instructions again! lol

      Reply
      • Tamara says

        Friday, November 6, 2015 at 8:31 pm

        Lol, glad it makes sense now, Cheryl.:-)

        Reply
  3. Crystal says

    Saturday, November 14, 2015 at 11:35 am

    If I don’t grout it, how do u deal with the water leaking into the gravel? Won’t it damage the wood, etc? Thank you 🙂

    Reply
    • Tamara says

      Saturday, November 14, 2015 at 12:03 pm

      That’s a good question, Crystal. I think if you don’t grout it then it would be wise to put a clear outdoor protectant finish on the wood like this one, http://www.homedepot.com/p/Varathane-1-qt-Clear-Satin-Water-Based-Outdoor-Spar-Urethane-2-Pack-250241H/202057149. That should protect the wood and paint from water damage! Thanks for your question!:-)

      Reply
      • Crystal says

        Saturday, November 14, 2015 at 12:11 pm

        Ok, thank you! I was wondering too if I could use a thin plastic storage tote, as long as the weight of the gravel wouldn’t damage it. Hmmm It would just be for about two pairs of shoes. Do you think that Might work?

        Reply
        • Tamara says

          Saturday, November 14, 2015 at 2:32 pm

          Hmmm, hard to say. I think it good maybe work–it just couldn’t be too thin.

          Reply
          • Crystal says

            Saturday, November 14, 2015 at 2:49 pm

            Ok, thanks so much!

Leave a Reply Cancel reply

Your email address will not be published. Required fields are marked *

Hello and Welcome!! My name is Tamara and this is where I share my tips and tricks to creating a beautiful home! If you are new, feel free to start HERE.

More Blog Inspiration:-)

  • Icon Caroline on Design

    Close preview

    Loading...
  • Icon Centsational Girl

    Close preview

    Loading...
  • Icon Decorating Delirium

    Close preview

    Loading...
  • Icon Lauren Liess

    Close preview

    Loading...
  • Icon Life on Virginia Street

    Close preview

    Loading...
  • Icon Remodelaholic

    Close preview

    Loading...
  • Icon The Creativity Exchange

    Close preview

    Loading...
  • Icon Thrifty Decor Chick

    Close preview

    Loading...

Categories


Disclosure & Privacy Policy

You might also like

The Final Before & After of our Current Home

The Final Before & After of our Current Home

New Build Update-Paint, Lighting, and Floors oh My!

New Build Update-Paint, Lighting, and Floors oh My!

New Home Update

New Home Update

New Build Update- Cabinets are in!

New Build Update- Cabinets are in!

House Update–We Have Walls!

House Update–We Have Walls!

Join Me on Instagram!

[instagram-feed num=9 cols=9 showbutton=false]

Privacy

Copyright © 2022 · Savory theme by Restored 316