Provident Home Design

Decor, DIY, and Interior Design

  • HOME
  • ABOUT
    • About PHD
    • Contact Me
  • DIY PROJECTS
  • DESIGN 101
  • PAINT
  • HOME TOUR
  • DESIGN INSPO
  • DECOR TIPS

GET NOTIFIED VIA EMAIL WHEN THERE'S A NEW POST!

How to Add Woodwork Above the Mantle/Fireplace

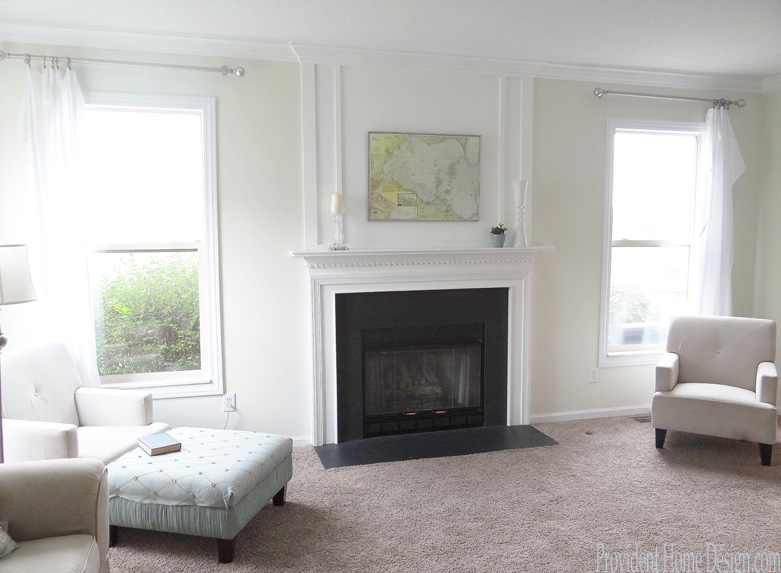
With it now being September and the Fall season on the brink my mind has naturally shifted to  mantles and fireplaces.  I want to share an easy DIY that has made a huge impact on the aesthetics of our mantle and  family room.

ESD Homes via Houzz

It all started back a few years ago before we bought our house.  At the time we were planning on building a house and we were in the process of making all kinds of selections for the new home.

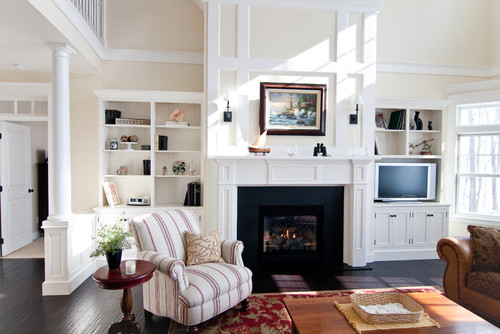
One of the options for the fireplace mantle was having woodwork trimmed out above the mantle.  The photo below is what the builder’s sales rep showed me to demonstrate what it would look like.

woodwork

Um, yes please we’ll take that option is what I had told her.  I loved it!  All the white molding looked beautiful and really made the fireplace/mantle the focal point of the room.

So when we didn’t end up building (long story, you can read all about it here) I was left with an unfulfilled hope of having a white fireplace with white woodwork above it! 🙁

Nevertheless, I was determined to get the look of these mantles!

Brighton Homes via Houzz


Brainerd Kitchen & Bath Fixtures Traditional Cabinetry LLC via Houzz


 via Houzz


Taste Design Inc via Houzz


And my determination paid off (so can yours)!  Here is our fireplace and mantle when we bought the house.


The Before
Family Room Fireplace


and here it is now, the After!
Wood Trim Above Mantle After
DSC00220
how to decorate with hierlooms


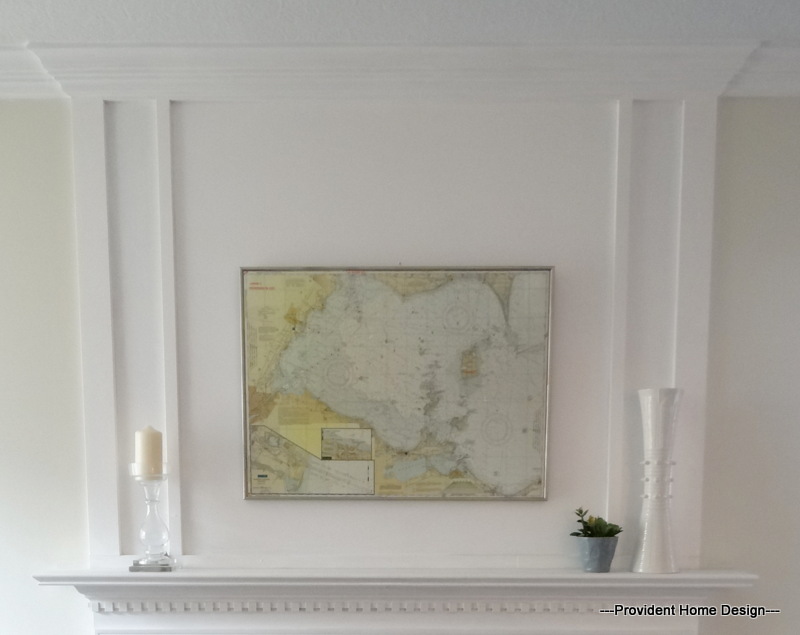
Believe it or not this is a pretty easy and inexpensive DIY.  Here are the steps I took to get this dramatic change.

Above Mantle

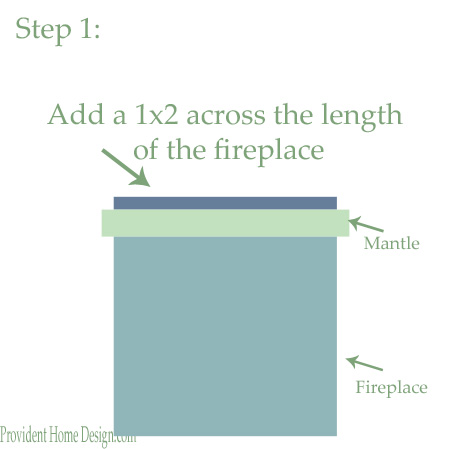
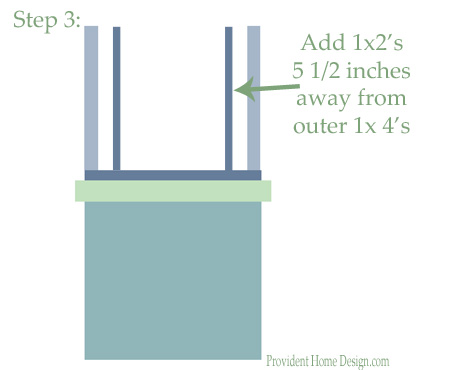
Note:  Be sure to line it up with the width of the fireplace not the mantle.  Use 1 1/2 inch finishing nails.  If you don’t use a nail gun be sure to drill pilot holes through the wood before nailing.
Wood Work Above Mantle Step 2
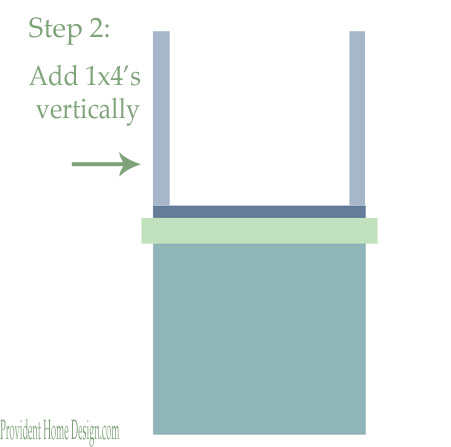
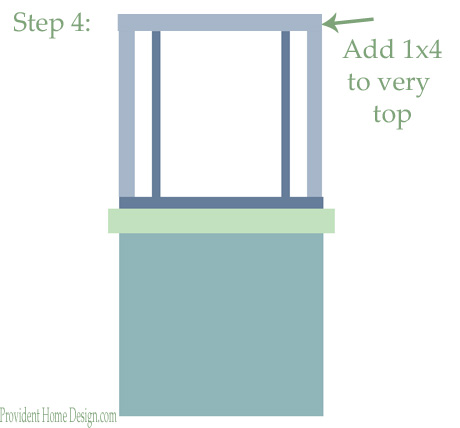
Note:  No need to miter just sit the 1×4’s directly on the 1×2.  You can go back and caulk later.

Wood Work Above Fireplace Step 3

Wood Work Above Mantle Step 4

Step 5 paint mantle woodwork white

Note:  An optional 6th step is to add crown molding to the top of the woodwork (to the 1×4 on the very top).  I didn’t at first and still really loved how it looked even without the crown molding.  I ended up having it crowned when the rest of the room was getting crown molding.

I really don’t think crown molding is necessary for this DIY but if you are interested here is youtube video on how to make these cuts.

That’s it!  The project went quickly and probably came to about $60 including the price of paint, wood, nails, and paint supplies.  Lots of bang for the buck!

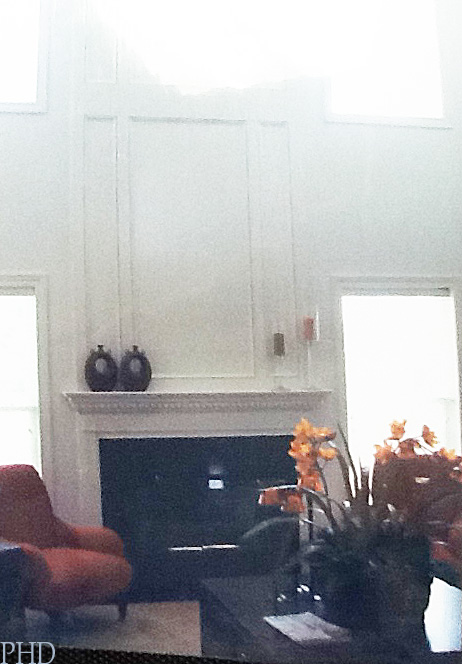
And because I love a dramatic before & after let’s do it one more time.:-)

Family Room Fireplace
How to Add Woodwork Above Your Mantle

I’d love to hear if you end up doing this project and of course let me know if you have any questions!!

Related Posts From the Blog:

  • DIY Exaggerated Window CasingsDIY Exaggerated Window Casings
  • Foyer and Hallway Makeover Reveal!Foyer and Hallway Makeover Reveal!
  • My Rustic Christmas Mantel & A DIY Pallet ProjectMy Rustic Christmas Mantel & A DIY Pallet Project
  • The Importance of Architectural Details & DIY Media Wall UnitThe Importance of Architectural Details & DIY Media Wall Unit
  • A New Brick Step!A New Brick Step!
  • Love Your Kitchen Series- Adding Wood TrimLove Your Kitchen Series- Adding Wood Trim
  • DIY Faux Crown Molding & A Switch-a-RoomDIY Faux Crown Molding & A Switch-a-Room
  • Powder Bathroom Makeover RevealPowder Bathroom Makeover Reveal

before and afters// decorating// DIY// tutorials// woodwork7 Comments

Subscribe

GET NOTIFIED VIA EMAIL WHEN THERE IS A NEW POST!

« Design 101- Decorating with Heirlooms & Antiques
Where to Find Good Deals on Rugs »

Comments

  1. Mary says

    Wednesday, September 3, 2014 at 9:15 am

    That looks fabulous, I pinned it. Our fireplace has the brick going all the way to the ceiling, and I’m always looking for ideas on how to break up all that brick. Saw your link at Work it Wednesday, thanks for sharing.

    ~ Mary

    Reply
    • Tamara says

      Wednesday, September 3, 2014 at 9:24 am

      You are so welcome, Mary! Thanks for coming by!! 🙂

      Reply
  2. Kathryn says

    Thursday, November 20, 2014 at 9:09 am

    This is crazy good. What a beautiful room!. The impact of that woodwork is phenomenal.

    I just discovered your site and yay for me! I’ve already found two projects I intend to take on–this one and the Ballard knockoff abstracts. Both projects dovetail perfectly with the look I’m creating in my home. In addition to your projects being beautiful, your tutorials make them so do-able.

    You are seriously talented.

    Reply
    • Tamara says

      Thursday, November 20, 2014 at 9:36 am

      Kathryn, that makes me so happy to hear!! I’m so glad you were inspired here and feel the projects I share are doable! Thank you for taking the time to say hi!:-)

      Reply
  3. Christina says

    Tuesday, August 28, 2018 at 8:25 am

    Hello!

    Is there a specific type of wood to use?

    Reply
    • Tamara says

      Tuesday, August 28, 2018 at 10:06 pm

      Nope, any wood! I like using pre-primed mdf. Just ask a worker at Home Depot or lowes and they can steer you in the right direction!👍

      Reply

Leave a Reply Cancel reply

Your email address will not be published. Required fields are marked *

Hello and Welcome!! My name is Tamara and this is where I share my tips and tricks to creating a beautiful home! If you are new, feel free to start HERE.

Subscribe

Get notified via email when there's a new post!

Join me on Instagram!

Load More...Follow on Instagram

More Blog Inspiration:-)

  • Icon Caroline on Design

    Close preview

    Loading...
  • Icon Centsational Girl

    Close preview

    Loading...
  • Icon Decorating Delirium

    Close preview

    Loading...
  • Icon Lauren Liess

    Close preview

    Loading...
  • Icon Life on Virginia Street

    Close preview

    Loading...
  • Icon Remodelaholic

    Close preview

    Loading...
  • Icon The Creativity Exchange

    Close preview

    Loading...
  • Icon Thrifty Decor Chick

    Close preview

    Loading...

Categories


Disclosure & Privacy Policy

You might also like

New Build Update-Paint, Lighting, and Floors oh My!

New Build Update-Paint, Lighting, and Floors oh My!

New Home Update

New Home Update

New Build Update- Cabinets are in!

New Build Update- Cabinets are in!

House Update–We Have Walls!

House Update–We Have Walls!

How to Paint Furniture to look Bleached out and House Update

How to Paint Furniture to look Bleached out and House Update

Join Me on Instagram!

Follow on Instagram

Copyright © 2019 · Savory theme by Restored 316

Enter your name and email to get my weekly post sent to your inbox... it's FREE!
Want to learn more about DIY, decorating, and making your home beautiful? Sign up below!
Your information will *never* be shared or sold to a 3rd party.