Provident Home Design

Decor, DIY, and Interior Design

  • HOME
  • ABOUT
    • About PHD
    • Contact Me
  • DIY PROJECTS
  • DESIGN 101
  • PAINT
  • HOME TOUR
  • DESIGN INSPO
  • DECOR TIPS

A Beautiful Master Bedroom Makeover for Lolly

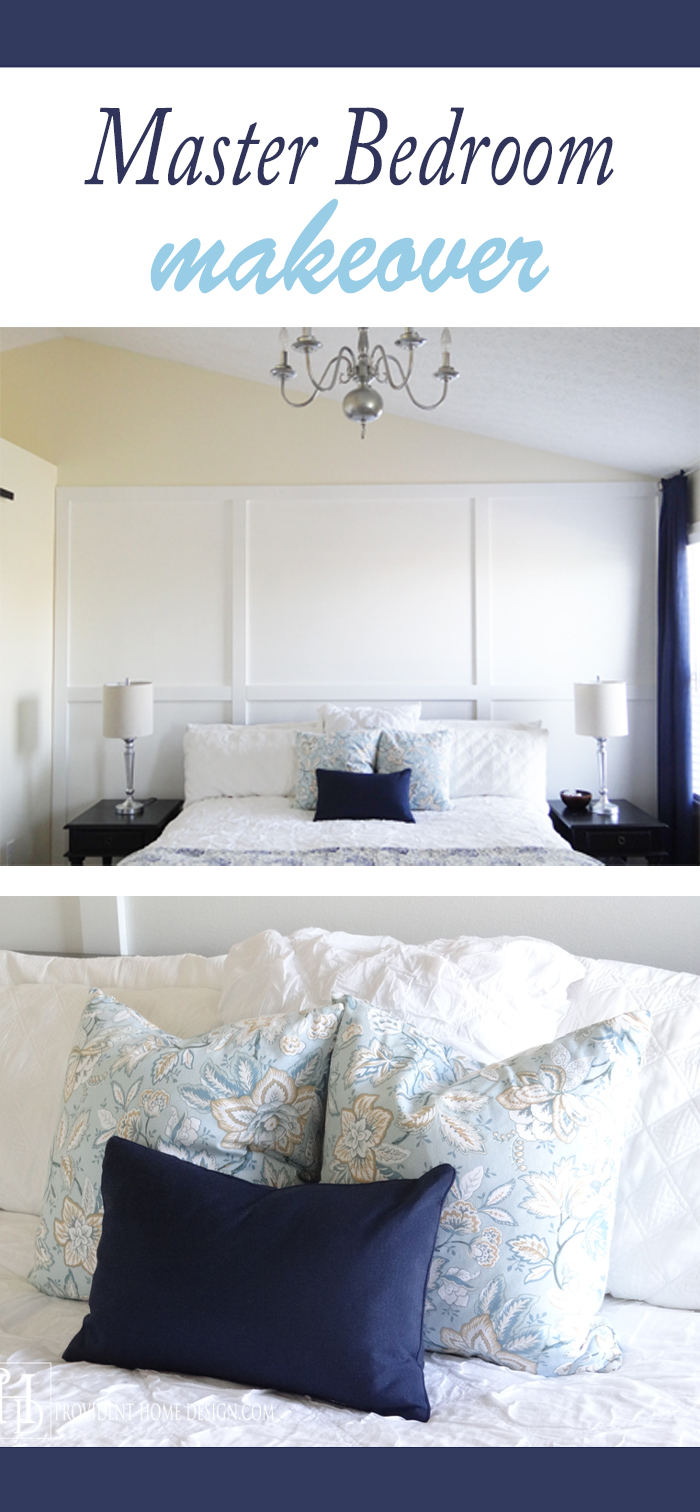
I’m excited to share Lolly’s bedroom makeover today!  Lolly is a friend who I’ve been helping makeover her house one room at a time.

We started with the Powder Bathroom, then the Laundry Room, and now her Master Bedroom.  All of these makeovers have been done on a budget!

I do the interior design planning and Lolly does most of the DIY.  It has been fun for me to see how her hard work has been paying off!!

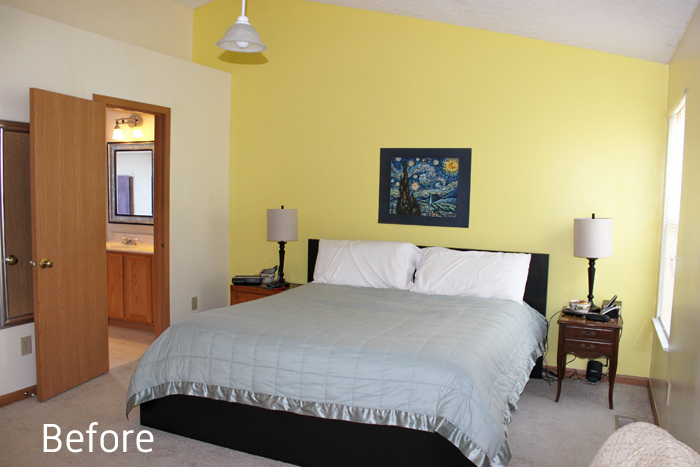
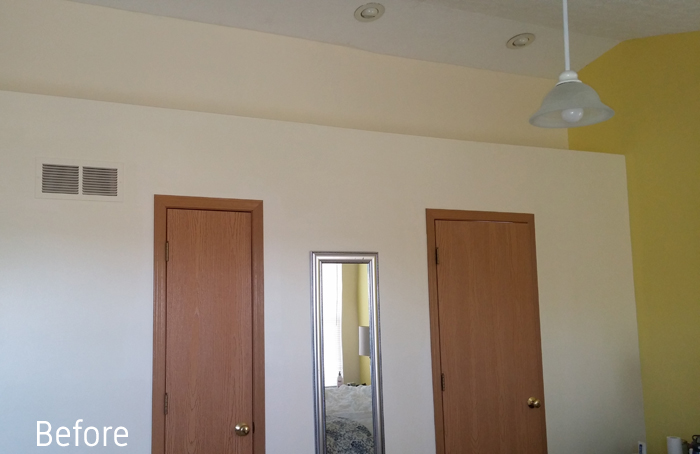
Here are the before shots.
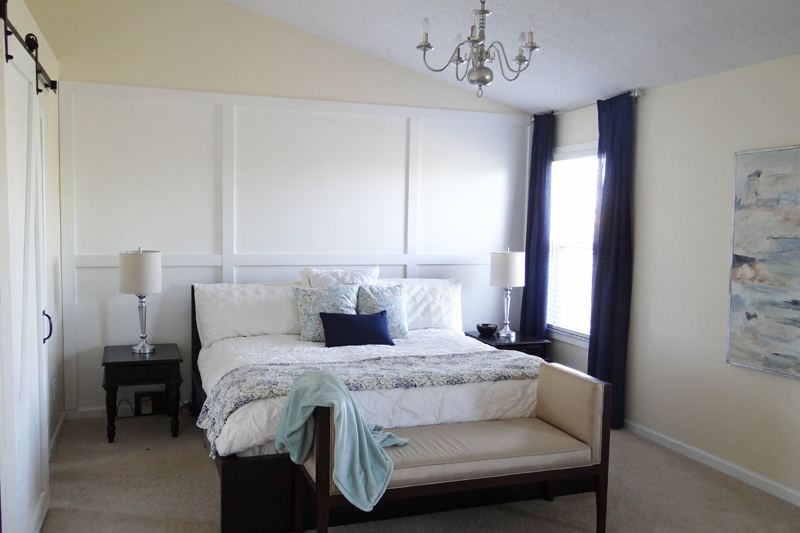
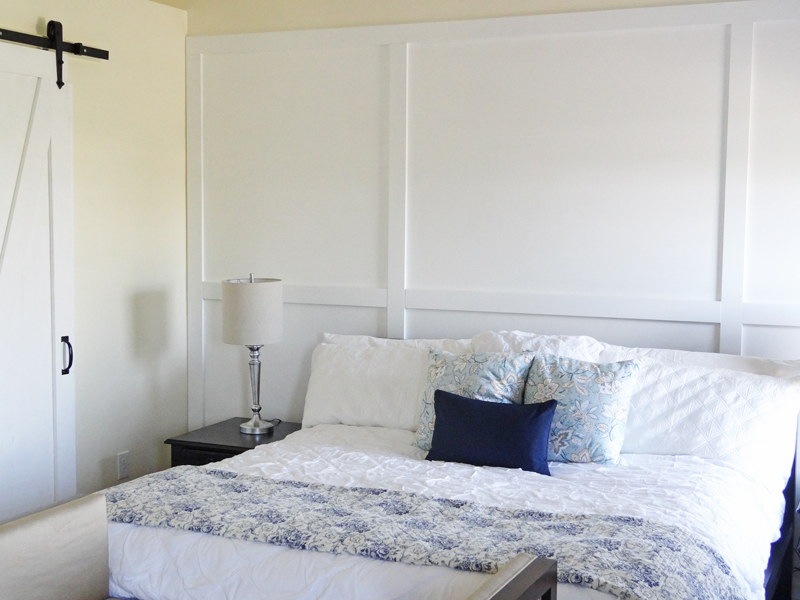
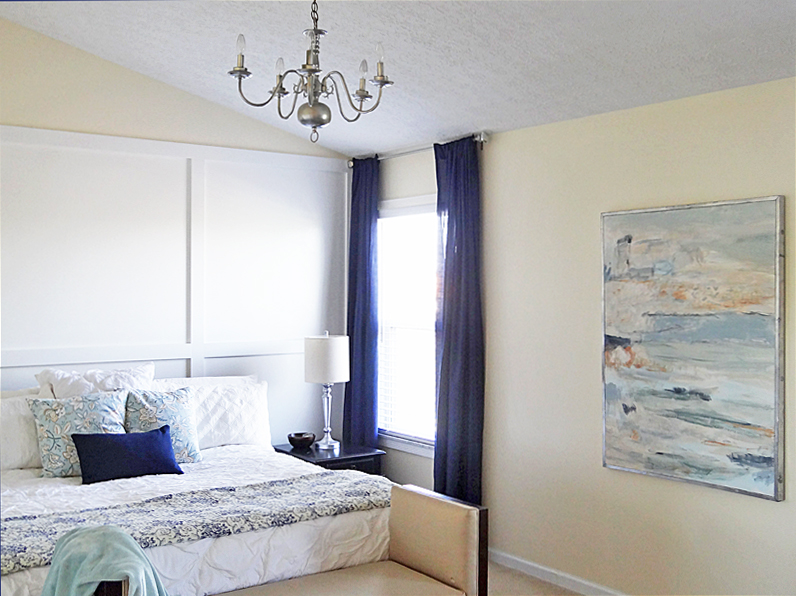
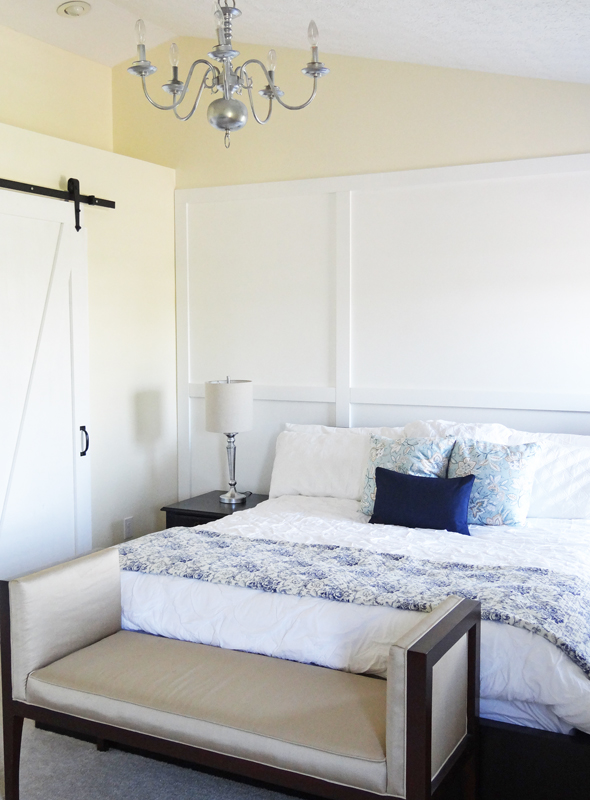
edroom Makeover Before Picture


Bedroom Makeover Before


Bedroom Makeover Before Gallery Wall


And now the After!

Master Bedroom Renovation


bedroom makeover


Makeover Bedroom


Master Bedroom Barndoor


Bedroom Makeover Gallery Wall After


Master Bedroom Makeover Gallery


Bedroom Makeover Photos


There are several ways we saved money on this makeover.  To begin, the drapes were only $5 per a”panel” (they are made from flat sheets).  Hanging them 2-4 inches from the ceiling is a trick to making drapes look more expensive and the ceiling appear taller!


Master Bedroom Makeove


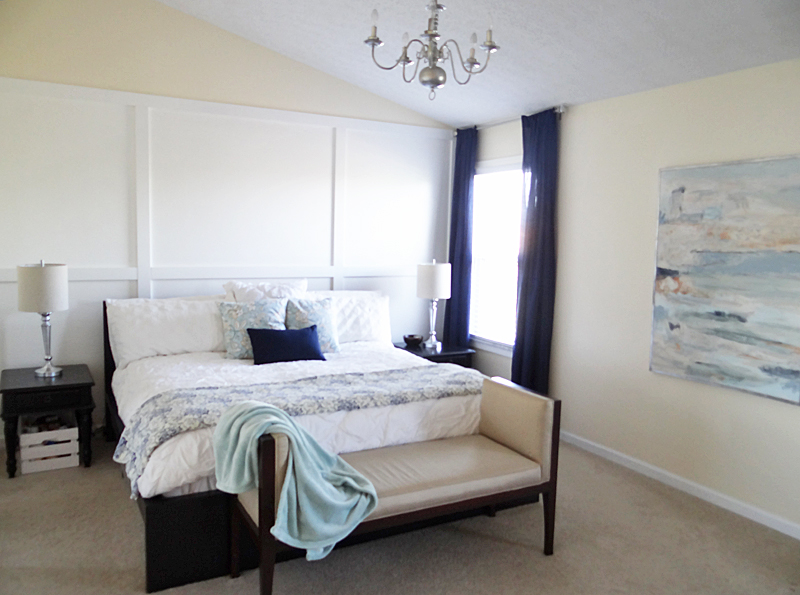
Lolly bought the bench at a stager’s sale for only $45 and the chandelier at a garage sale for $10.  It was super brassy.

Bedroom Makeover Ceiling Light Before


We spray painted the chandelier and her matching black nightstand lamps polished chrome with this exact spray paint (affiliate link).  It’s my favorite for getting the polished chrome look!  The matching black nightstands were from a garage sale too!

Master Bedroom Photo


Master Bedroom Lamp


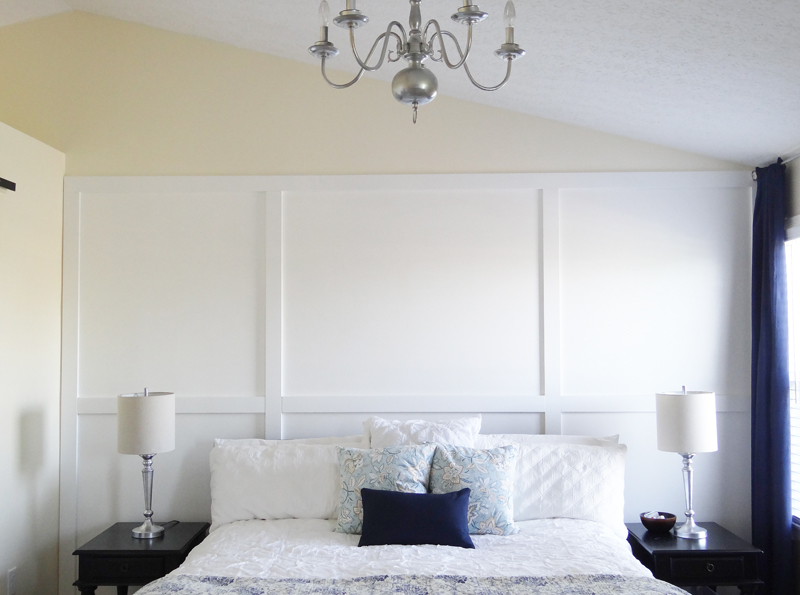
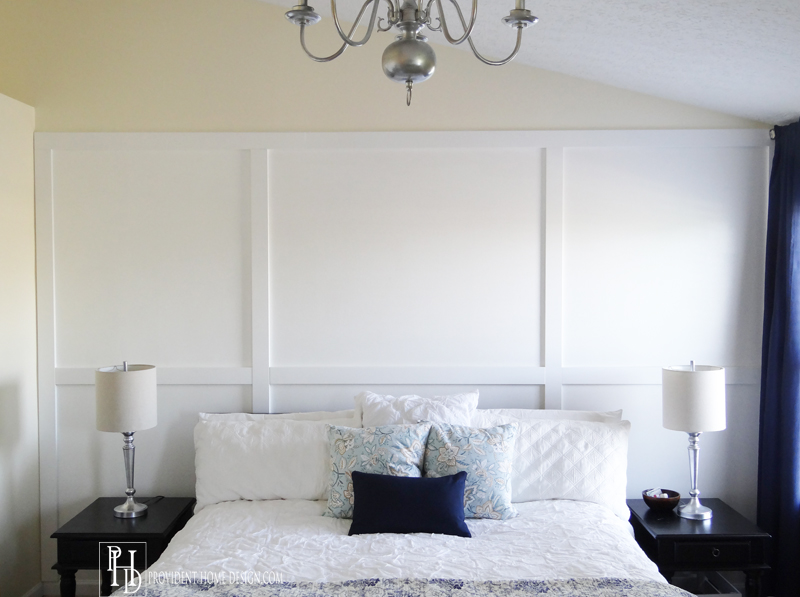
The feature wall gives a ton of bang for the buck!


Master Bedroom Makeover Final


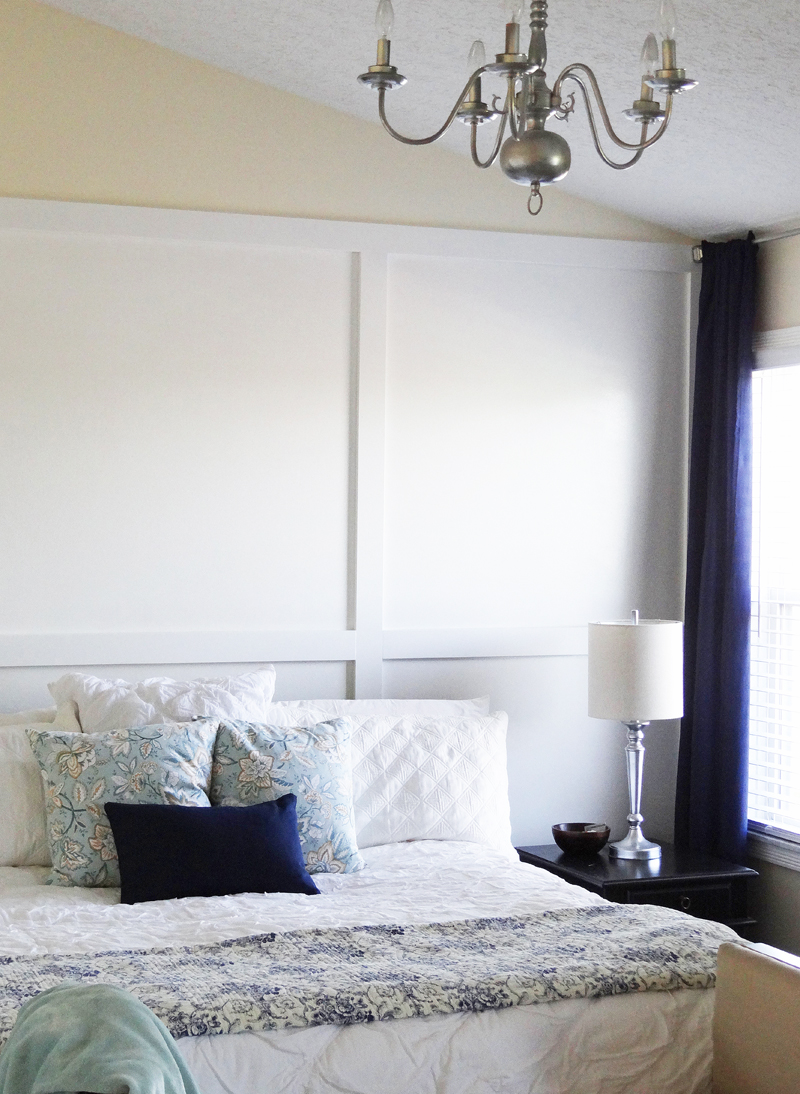
She used (7) 8ft. long primed mdf 1×4’s which cost a total of $30.   Below shows the order that she installed them with the arrow indicating that a level is a must for this project!

DIY Wood grid wall tneatment


Lolly also paint all her brown trim and doors white as well as installed white casing around her windows which made a huge difference in brightening up the space!  The subtle yellow paint on the walls is Behr Butter.


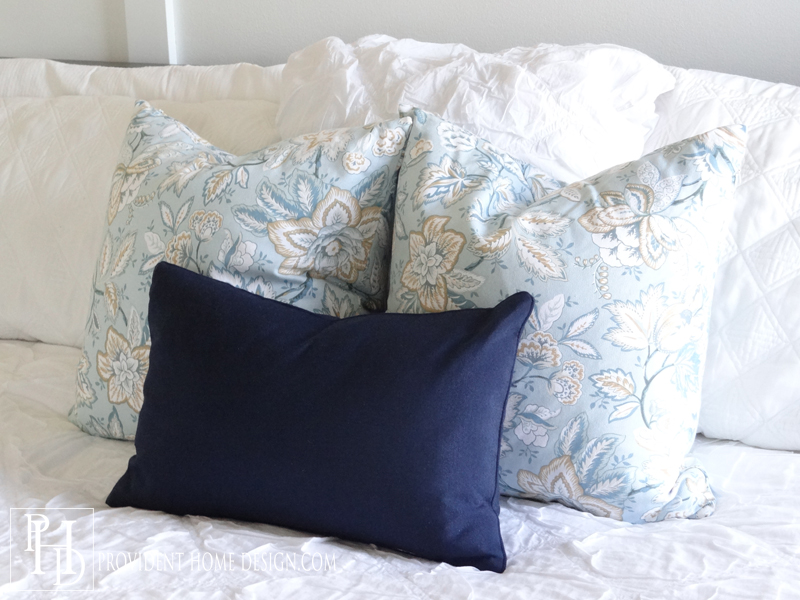
The white bedding is Pottery Barn which she got at a stager’s sale for only $50.  The accent pillows and throw are from Homegoods.   The quilt at the end of the bed was our jumping off point for the room which she bought at a garage sale for $10.

Master Bedroom Accent Pillows


Lolly already had a large blank canvas she had gotten for a great deal in storage so we decided her bedroom would be the perfect place to use it!  I got out some of my old wall paint samples and a couple of new little acrylic paint bottles and went to town!  You can watch the progression of the painting below!


Paint-for-Lolly's-Bedroom-Makeover


She added the “frame” which she made from wood spray painted the same silver spray paint as the lights!

Master Bedroom Inspiration


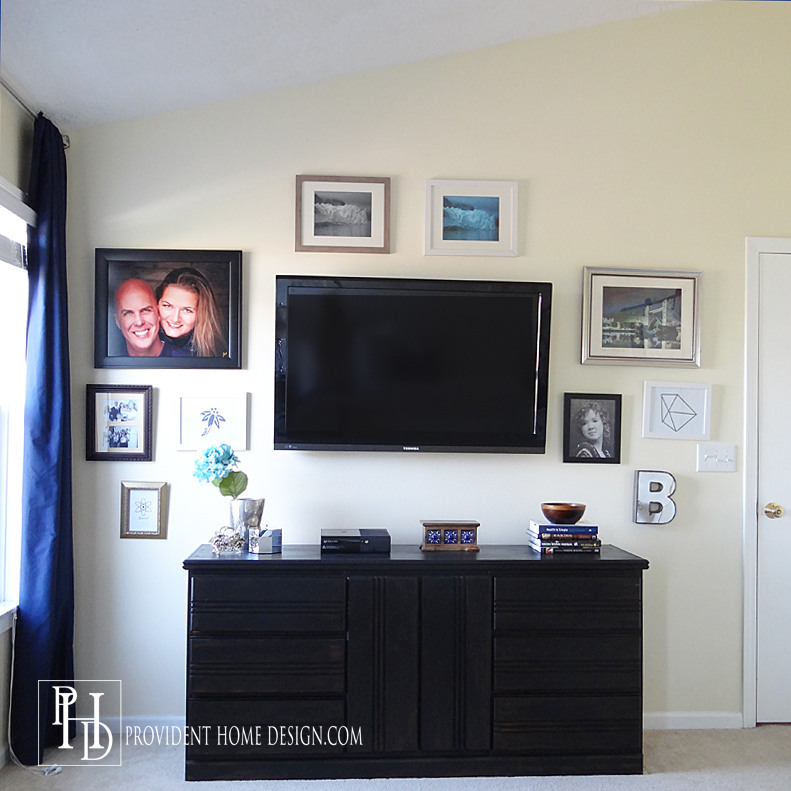
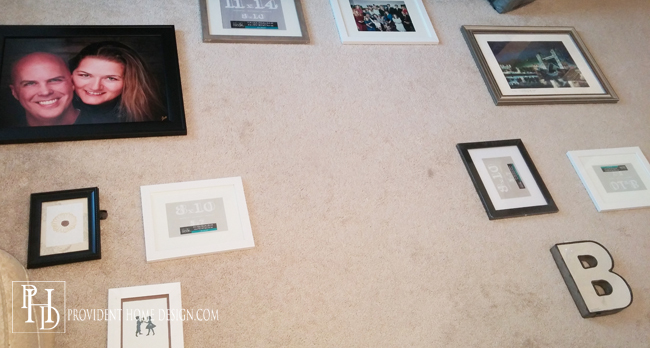
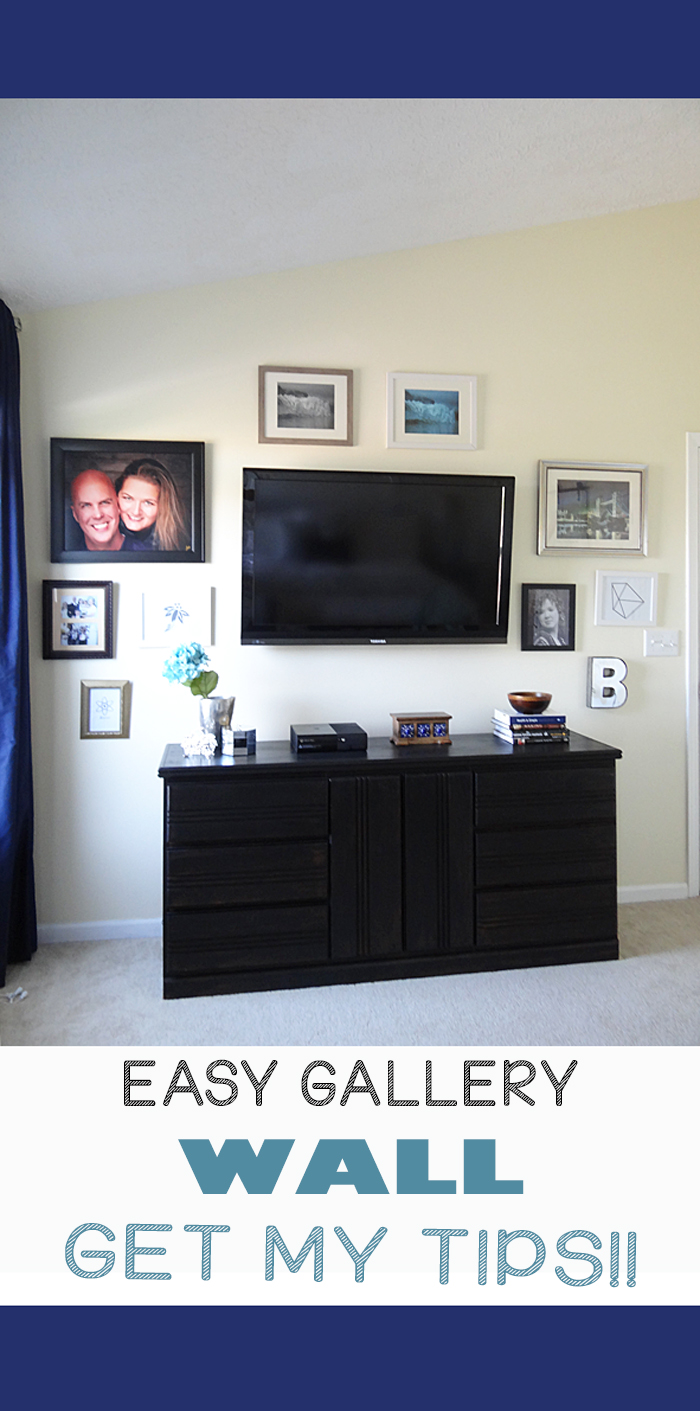
We put the gallery wall together by combining frames she already had with frames she bought clearanced at Michael’s.  We stuck to black, white, and silver frames to tie in with the rest of the room.

It was a lot easier to do the gallery wall then I thought it would be!  We just played around with the frames on the floor until we felt like it was visually balanced.

How to put together a gallery wall


Then you can use posterboard (it’s 50 cents at the Dollar Tree) to trace each frame and cut it out.  We taped the pasteboard on the wall where the corresponding frame position would be.

How to Create a Gallery Wall

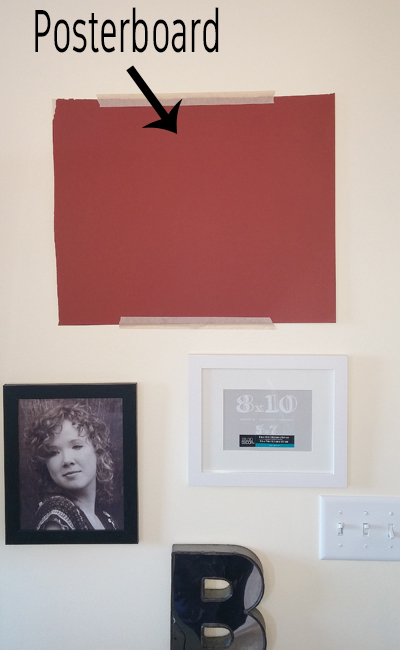
Once all of the pasteboards were on the wall we moved them around until it looked right (this way you aren’t making a bunch of nail holes in the wall while moving the frames around).

Master Bedroom Gallery Wall

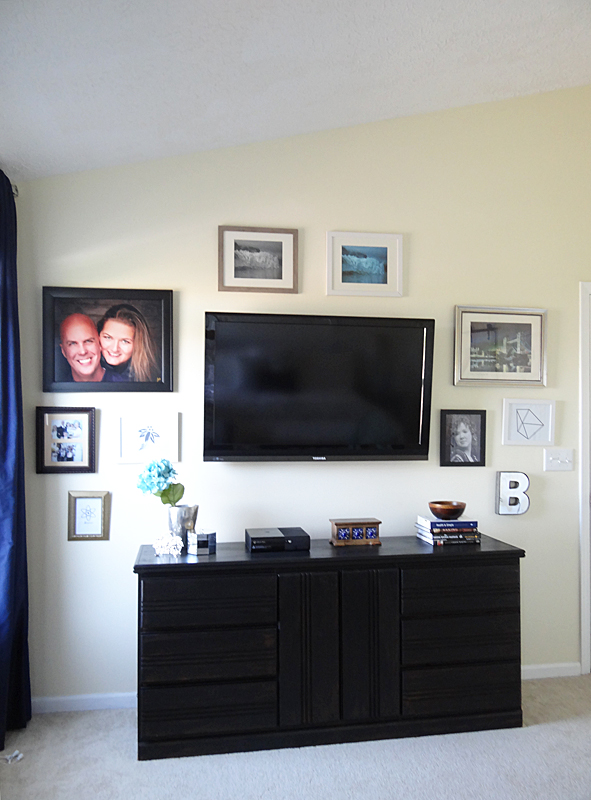
Once the p0sterboard is all in place you can make the nail holes and hang the frames!  We pulled the dresser in from a spare bedroom that was not being used.

It was oak so painted it black to balance out the black bed frame/headboard and nightstands across the room (tutorial for painting furniture black).

Lolly's Bedroom Makeover

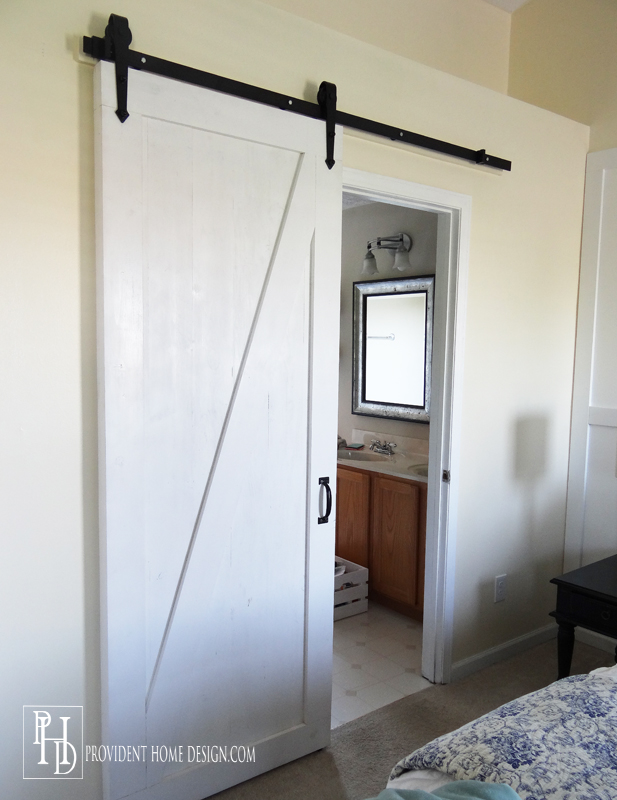
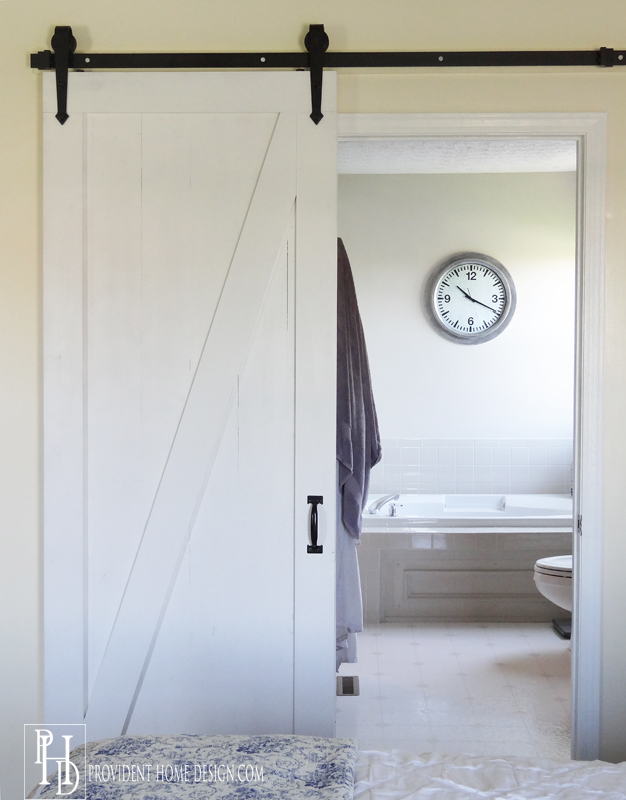
The last change to the room was the barn door.  Lolly’s budget for the bedroom makeover was between $300-$500.  Before the barn door, including paint and everything the makeover came to $300.

Because Lolly still had room in her budget she decided to include the barn door she had hoped for!  She and her husband consulted many tutorials online to come up with what they did!  Her husband made it for her and got it done just in time for Mother’s Day (total cost was around $200).:-)


Master Bedroom Barn door Bathroom


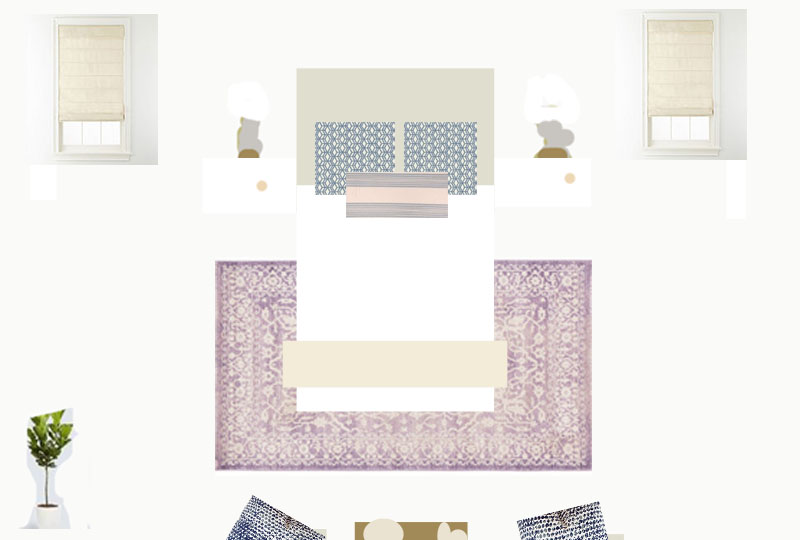
Before we started the makeover I asked Lolly what feeling she wanted the master bedroom to exude and wrote her answer down,  “clean, calm, fresh, elegant, and bright”.  Her favorite style is farmhouse glam.  How do you think we did?

I hope you got some ideas and were inspired in some way from this makeover!  As always thanks for being here!!  I hope you have a happy and safe Memorial weekend!!

Signature


Master Bedroom Makeover Without Breaking the Bank

Hands Down Best Silver Paint Spray

TIPS FOR AN EASY GALLERY WALL INSTALLATION

Related Posts From the Blog:

  • Favorite Interior Designers Series – Martha O’Hara InteriorsFavorite Interior Designers Series – Martha O’Hara Interiors
  • Why I Chose Marble Countertops & What I’ve LearnedWhy I Chose Marble Countertops & What I’ve Learned
  • Where to Find Good Deals on RugsWhere to Find Good Deals on Rugs
  • More Spray Paint MagicMore Spray Paint Magic
  • The Importance of Architectural Details & DIY Media Wall UnitThe Importance of Architectural Details & DIY Media Wall Unit
  • Affordable Solutions for Organizing your HomeAffordable Solutions for Organizing your Home
  • Boys Bedroom Makeover RevealBoys Bedroom Makeover Reveal
  • The One Room Challenge Week 4The One Room Challenge Week 4

before and afters// budget decor// decorating// furniture// inspiration// money saving tips// tutorials// window treatments// woodwork22 Comments

« The Secret to Painting Tall Walls
Beat up Table Turned Beautiful Farmhouse Table »

Comments

  1. Judy says

    Saturday, May 28, 2016 at 7:56 am

    Looks fantastic! Great work ladies and husband.

    Reply
    • Tamara says

      Saturday, May 28, 2016 at 8:51 am

      Thanks, Judy, it means a lot!

      Reply
  2. Dyan says

    Saturday, May 28, 2016 at 9:08 am

    Amazing makeover! The fact that you did it on a budget is a bonus.

    Reply
    • Tamara says

      Saturday, May 28, 2016 at 12:19 pm

      Thanks so much, Dyan. I really appreciate it!!

      Reply
  3. Amy Cochran says

    Saturday, May 28, 2016 at 2:53 pm

    Another beautiful refresh project!!

    Reply
    • Tamara says

      Sunday, May 29, 2016 at 1:56 pm

      Thank you, Amy!:-)

      Reply
  4. Drew says

    Saturday, May 28, 2016 at 11:10 pm

    This is beautiful Tamara. Now you need to kick Doug out of the house for a week so you and Lolly can do the rest 🙂

    Reply
    • Tamara says

      Sunday, May 29, 2016 at 1:57 pm

      Lol, Drew! Doug actually is an asset to the team.:-)

      Reply
  5. Jennifer@decoratingdelirium says

    Tuesday, May 31, 2016 at 7:34 pm

    The accent wall and the barn door are the show stoppers. I can’t believe you did it for around $500. That is impressive!!

    Reply
    • Tamara says

      Tuesday, May 31, 2016 at 10:20 pm

      Thank you, Jennifer! All those garage sale finds and painting really paid off in this makeover!:-)

      Reply
  6. Linda Ramos says

    Wednesday, June 1, 2016 at 1:17 pm

    This room turned out so beautifully! I don’t even know where to begin with what I love about it. The painting is incredible and I want one for myself. And the barn door was really just a perfect touch to the whole thing. Thanks for the inspiration 😀

    Reply
    • Tamara says

      Wednesday, June 1, 2016 at 1:35 pm

      Thank you for the kind words, Linda!!:-)

      Reply
  7. C.K. says

    Wednesday, June 1, 2016 at 7:16 pm

    What a beautiful bedroom you and your friend have created! Love the feature wall and those lovely throw pillows.

    Reply
    • Tamara says

      Wednesday, June 1, 2016 at 9:58 pm

      Thanks you, C.K.!:-)

      Reply
  8. TwoPlusCute says

    Wednesday, June 1, 2016 at 11:00 pm

    It looks great; what a difference. There is so much light and I like the frugal hack of the curtains. 🙂

    Reply
    • Tamara says

      Thursday, June 2, 2016 at 11:16 pm

      So glad you liked it TwoPlusCute!:-)

      Reply
  9. Arden says

    Monday, June 6, 2016 at 2:33 pm

    First time on your blog. Very classy! I am curious, though, if you did anything with the “ledge” area over the bathroom?

    Reply
  10. Rebecca Neustel says

    Sunday, October 2, 2016 at 11:52 pm

    Fantastic design AND within budget!

    Reply
    • Tamara says

      Monday, October 3, 2016 at 11:48 am

      Thanks, Rebecca!:-)

      Reply
  11. Loretta Machado says

    Tuesday, November 29, 2016 at 5:24 pm

    What brand of silver paint did you use?

    Reply
    • Tamara says

      Tuesday, November 29, 2016 at 5:43 pm

      Hi Loretta!:-) It’s Rustoleum brand! Here is the link, https://www.amazon.com/Rust-Oleum-7718830-Bright-Metallic-11-Ounce/dp/B000Z8DGXK/ref=as_li_ss_tl?ie=UTF8&keywords=Rust-Oleum%207718830%20Bright%20Coat%20Metallic%20Color%2011-Ounce%20Spray,%20Gloss%20Chrome&qid=1464397462&ref_=sr_1_1&sr=8-1&linkCode=sl1&tag=provhomedesi-20&linkId=23ba612a7aeca0b2837f1789e0473423.

      Reply
  12. Linda Christopher says

    Friday, June 7, 2019 at 6:34 pm

    I’m late to the party so the affiliate link to the spray paint is dead… could you tell me what it is? By the way, this is amazing! Nice job!

    Reply

Leave a Reply Cancel reply

Your email address will not be published. Required fields are marked *

Hello and Welcome!! My name is Tamara and this is where I share my tips and tricks to creating a beautiful home! If you are new, feel free to start HERE.

More Blog Inspiration:-)

  • Icon Caroline on Design

    Close preview

    Loading...
  • Icon Centsational Girl

    Close preview

    Loading...
  • Icon Decorating Delirium

    Close preview

    Loading...
  • Icon Lauren Liess

    Close preview

    Loading...
  • Icon Life on Virginia Street

    Close preview

    Loading...
  • Icon Remodelaholic

    Close preview

    Loading...
  • Icon The Creativity Exchange

    Close preview

    Loading...
  • Icon Thrifty Decor Chick

    Close preview

    Loading...

Categories


Disclosure & Privacy Policy

You might also like

The Final Before & After of our Current Home

The Final Before & After of our Current Home

New Build Update-Paint, Lighting, and Floors oh My!

New Build Update-Paint, Lighting, and Floors oh My!

New Home Update

New Home Update

New Build Update- Cabinets are in!

New Build Update- Cabinets are in!

House Update–We Have Walls!

House Update–We Have Walls!

Join Me on Instagram!

[instagram-feed num=9 cols=9 showbutton=false]

Privacy

Copyright © 2022 · Savory theme by Restored 316