Provident Home Design

Decor, DIY, and Interior Design

  • HOME
  • ABOUT
    • About PHD
    • Contact Me
  • DIY PROJECTS
  • DESIGN 101
  • PAINT
  • HOME TOUR
  • DESIGN INSPO
  • DECOR TIPS

GET NOTIFIED VIA EMAIL WHEN THERE'S A NEW POST!

Easiest Ottoman Slipcover Ever (and ORC Week 4 Update)

Hello!  How was your week?  It’s been busy here.  I have some littles who are excited out of their mind for Halloween.  Tonight is their trick or treat night and I still have a little bit left to pull together for their costumes (this year we have a skeleton, army soldier, tinkerbell, and a puppy).

This week I’ve been plugging away on the basement playroom makeover and have been able to get a few projects completed.

First, I made this cute, large “I love you” wall art (tutorial to come) inspired by an “I love you” sign I spotted on Pottery Barn Kids.

Pottery Barn Knockoff I Love You Sign

I also ordered some “hanging chairs” for the room for only $24.99 each.  There was a time in my childhood (I think I was around 10) where my older sister and I would use graph paper to design our dream rooms.  I remember mine had steps in it so that the room had different levels and it always had a swing.:-)

Hanging Chair

via Ebay

Although this is by no means a swing (the wall will be right behind them) I thought it would be something different and fun!  And with 4 kids and only 2 hanging chairs I’m sure we’ll gets lots of practice learning to take turns!! :O/

I also sewed up a couple of envelope pillow covers in a wide striped fabric I bought on sale at Joann Fabrics.

New Envelope Pillows

I am picturing that they will go in the hanging chairs as added back support.

Lastly, I was able to slipcover a large ottoman.

The ottoman below was given to me by a friend who was getting rid of it.
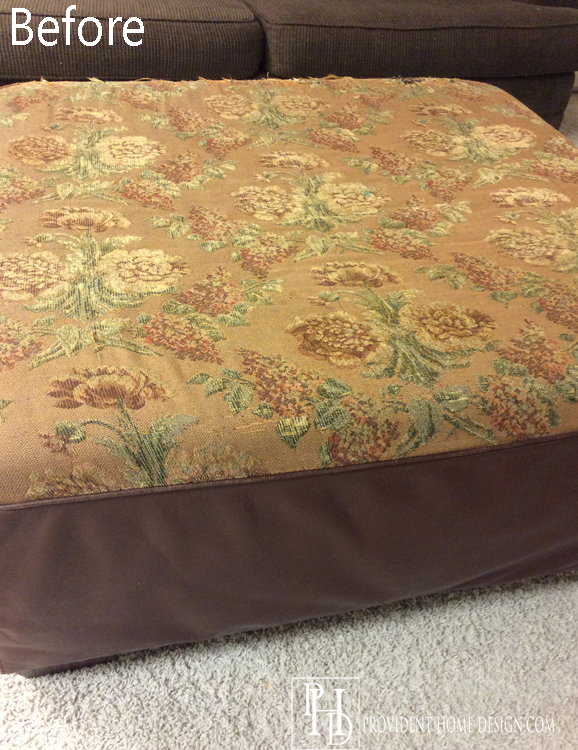
Ottoman Before 2
I knew it would need some work but I could imagine it going into the playroom perfectly.  It could be used as extra seating or lounging as well as something the kids could jump on (which would be a lot better than them jumping on the couch)!

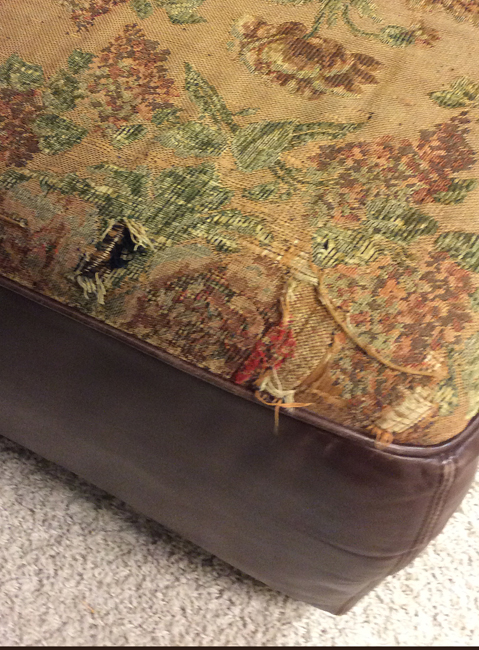
Initially I thought about painting the fabric part but when I saw the condition of the fabric I realized that was not going happen.

Ottoman Before

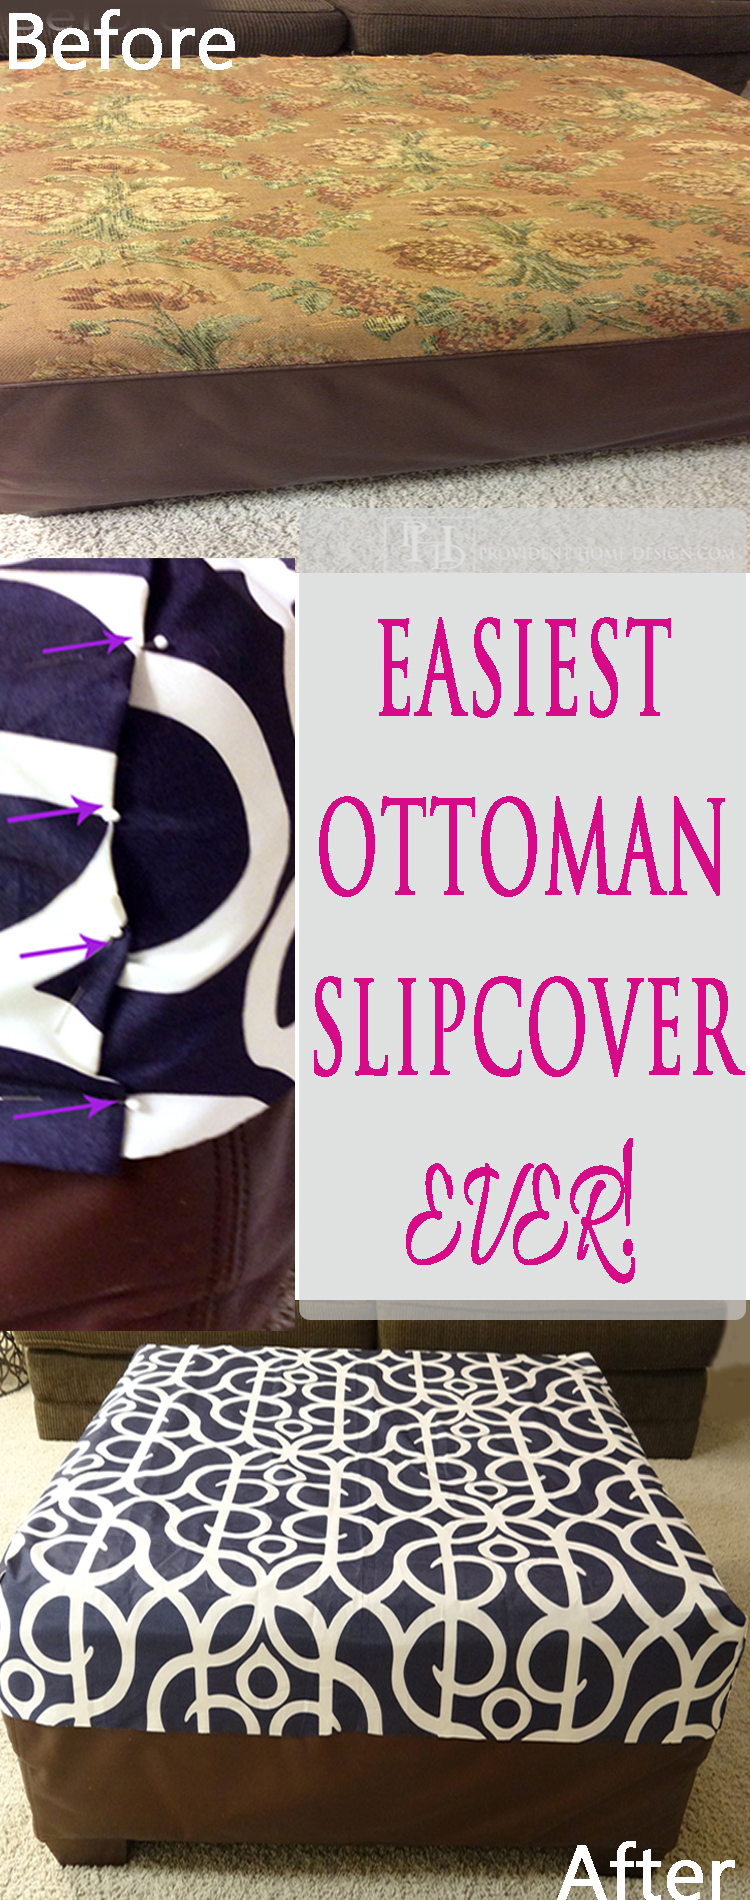
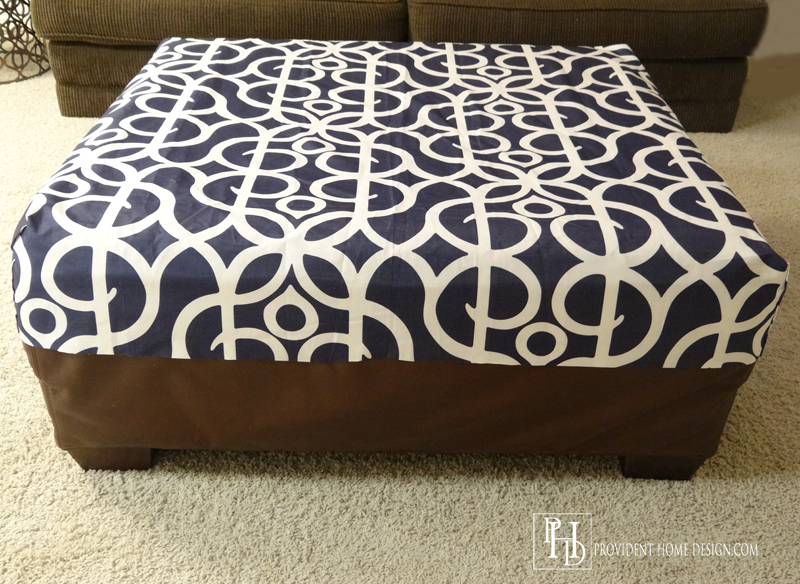
So, I sewed up a quick and easy slipcover with material I had on hand.  The material is from a Better Homes & Gardens drape panel I found at Walmart clearanced for $5.

Ottoman After

Let me show you how quick and easy it is to slipcover an ottoman!

First cut the material so that there is an equal amount of material hanging over on each side of the ottoman.

Note:  If you are covering the whole ottoman make sure the material is long enough on each side to tuck under the ottoman and staple underneath.

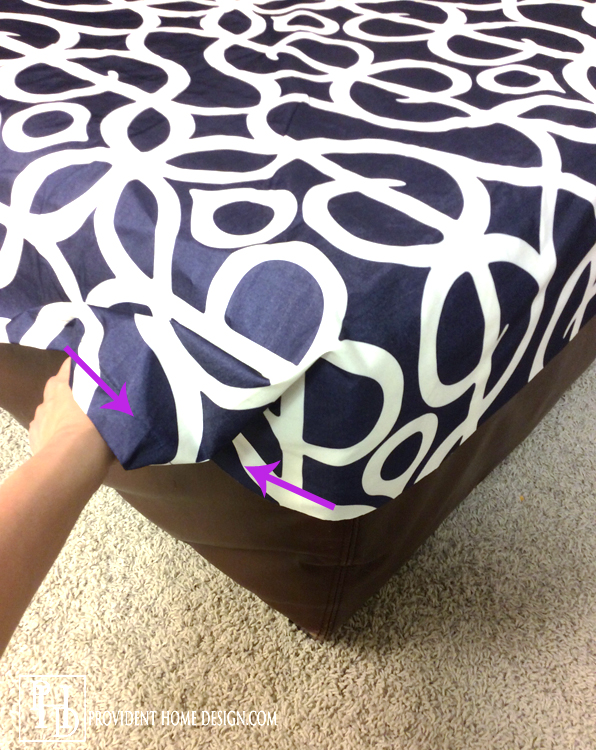
Starting at one corner of the ottoman take the tip of the corner as shown below and with your left hand gently pull it directly to the left.

Easy Reupholstering

When you pull it to the left the fabric will bunch up above it.  With your other hand take that section of fabric and pull it to the right.

Note:  The photo below shows this step.  The material with the arrow pointing right is the “bunched up” part that with your right hand you pull right (I couldn’t show this because I was holding the camera with my right hand #Ineed3hands #bloggerproblems):-)

How to Reupholster an ottoman

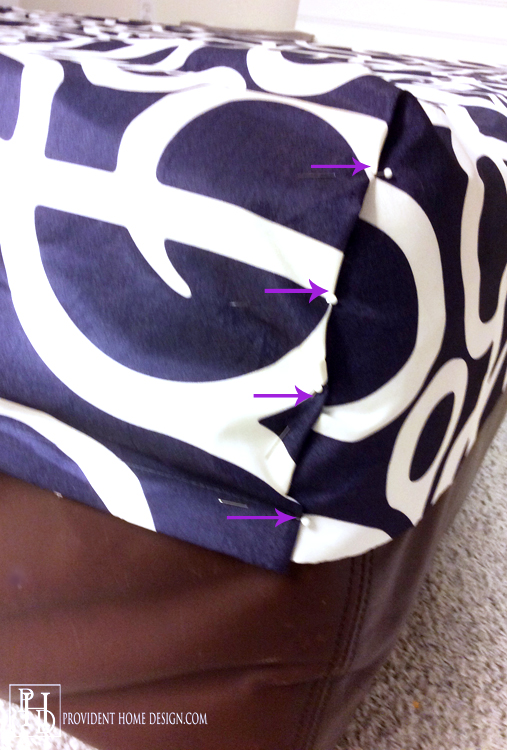
Doing the above step will  create a clean fold.  If you need to shimmy it around a little so that it is a cleaner fold do so (didn’t know we would be shimmying in this project, did ya?) 🙂

Once it is a clean fold like below pin it together.

How to Reupholster an Ottoman Corners

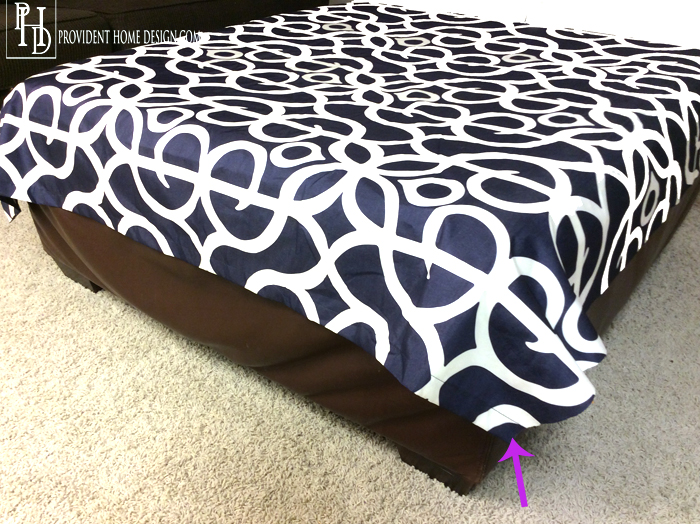
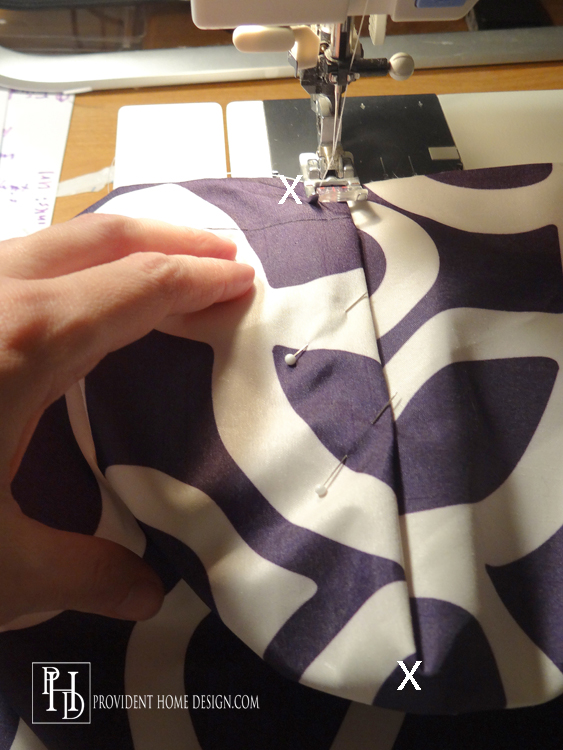
After doing this to all 4 corners it’s time to sew it up which I promise is the easiest part!  Put the bottom of the corner onto the sewing machine as shown below.  All you do is sew a straight line removing the pins as you go until you get to the top of the corner.

Note:  The X’s below show where I started sewing and where I stopped sewing.

Sewing a Slip Cover for an Ottoman


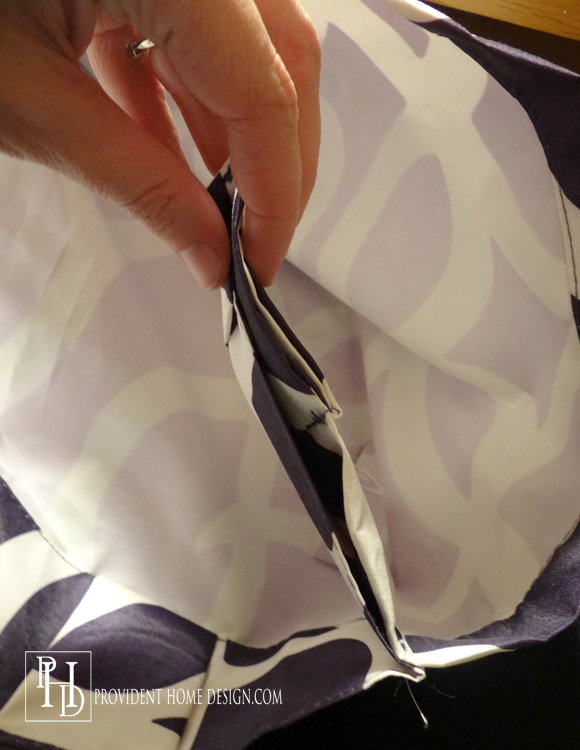
After you sew all of the corners flip the material inside out and you will see that there is extra material in each corner as shown below.

Reupholster an Ottoman

It is good to cut that extra inside material off so that the slipcover fits smoothly against the ottoman.    Just slip it on over the ottoman and if you are slipcovering the whole body of it pull it tight and staple it in underneath.  And you’re DONE!  Not too bad, eh?

On Saturday an electrician will be coming to add recessed lighting to the playroom and I’m really hoping to get the wide beadboard ceiling up as well as some additional DIY artwork.  You can check out the other One Room Challenge Participant’s progress this week, HERE.

I hope you found this slipcover tutorial helpful!  Feel free to pin for later cuz you never know when you’re friend’s going to give you a free ottoman that needs tlc.:-)  Have a great week and Happy Halloween!!

Signature

[jetpack_subscription_form]

Follow me on Pinterest and Instagram for more decorating ideas and inspiration!

Easiest Ottoman Slipcover Ever

Related Posts From the Blog:

  • Love Your Kitchen Series-BacksplashesLove Your Kitchen Series-Backsplashes
  • DIY Spray Painted Lattice Patterned RugDIY Spray Painted Lattice Patterned Rug
  •  A Look at Minimalism-5 Steps to a Minimalist Bedroom A Look at Minimalism-5 Steps to a Minimalist Bedroom
  • Budget Patio Makeover RevealBudget Patio Makeover Reveal
  • Powder Bathroom Makeover RevealPowder Bathroom Makeover Reveal
  • Couch Makeover & DIY Chalk PaintCouch Makeover & DIY Chalk Paint
  • My House Hunters EpisodeMy House Hunters Episode
  • How to Remove TileHow to Remove Tile

before and afters// budget decor// decorating// DIY// furniture// kids rooms// money saving tips// tutorials// wall art10 Comments

Subscribe

GET NOTIFIED VIA EMAIL WHEN THERE IS A NEW POST!

« How to Install Shiplap & Finished Wall Storage System (ORC Week 3)
Free Abstract Art Printables (and Week 5 ORC Update) »

Comments

  1. Carrie says

    Thursday, October 29, 2015 at 4:00 pm

    This slipcover looks amazing!!! And I always wanted chairs like that too when I was growing up. 🙂 This will be such a fun room for your kids! Happy Halloween!

    Reply
    • Tamara says

      Thursday, October 29, 2015 at 4:47 pm

      Thank you, Carrie!:-)

      Reply
  2. Wendy says

    Friday, October 30, 2015 at 12:46 am

    Naomi is also tinkerbelle 😉

    Reply
    • Tamara says

      Friday, October 30, 2015 at 8:49 am

      Oh my gosh I bet she looks SO adorable!! Text me a pic if you can!:-)

      Reply
  3. Amy says

    Sunday, November 1, 2015 at 12:28 am

    Love the pattern you picked for the ottoman cover. And look at you go- using a sewing machine!

    Reply
    • Tamara says

      Sunday, November 1, 2015 at 8:32 am

      Thanks, Amy :-). Sewing machines aren’t as scary as I once thought!

      Reply
  4. Shelley @ Calypso in the Country says

    Wednesday, November 4, 2015 at 6:49 pm

    I love the fabric…if only I could sew!
    Shelley

    Reply
    • Tamara says

      Thursday, November 5, 2015 at 9:57 pm

      You could totally do it, Shelley! Have a friend show you…you will be amazed at how easy it is to sew!

      Reply
  5. Teresa Abell says

    Thursday, January 11, 2018 at 2:10 pm

    I found an inexpensive used ottoman just like this, however the top was leather and torn up. I looked everywhere for a slipcover for it and found nothing I like! This is PERFECT…THANS SO MUCH!

    Reply
    • Tamara says

      Thursday, January 11, 2018 at 7:00 pm

      Happy to be of help!:-)

      Reply

Leave a Reply Cancel reply

Your email address will not be published. Required fields are marked *

Hello and Welcome!! My name is Tamara and this is where I share my tips and tricks to creating a beautiful home! If you are new, feel free to start HERE.

Subscribe

Get notified via email when there's a new post!

Join me on Instagram!

[instagram-feed]

More Blog Inspiration:-)

  • Icon Caroline on Design

    Close preview

    Loading...
  • Icon Centsational Girl

    Close preview

    Loading...
  • Icon Decorating Delirium

    Close preview

    Loading...
  • Icon Lauren Liess

    Close preview

    Loading...
  • Icon Life on Virginia Street

    Close preview

    Loading...
  • Icon Remodelaholic

    Close preview

    Loading...
  • Icon The Creativity Exchange

    Close preview

    Loading...
  • Icon Thrifty Decor Chick

    Close preview

    Loading...

Categories


Disclosure & Privacy Policy

You might also like

The Final Before & After of our Current Home

The Final Before & After of our Current Home

New Build Update-Paint, Lighting, and Floors oh My!

New Build Update-Paint, Lighting, and Floors oh My!

New Home Update

New Home Update

New Build Update- Cabinets are in!

New Build Update- Cabinets are in!

House Update–We Have Walls!

House Update–We Have Walls!

Join Me on Instagram!

[instagram-feed num=9 cols=9 showbutton=false]

Privacy

Copyright © 2021 · Savory theme by Restored 316

Enter your name and email to get my weekly post sent to your inbox... it's FREE!
Want to learn more about DIY, decorating, and making your home beautiful? Sign up below!
Your information will *never* be shared or sold to a 3rd party.