My two favorite catalogs to get in the mail are Pottery Barn and Ballard Designs. I love to study the spaces they create and I turn down the corners of the pages that are my favorite in order to bookmark them. The page below was the lucky recipient of a ‘corner turndown’ in a recent Ballard Designs catalog. 🙂
via Ballard Designs
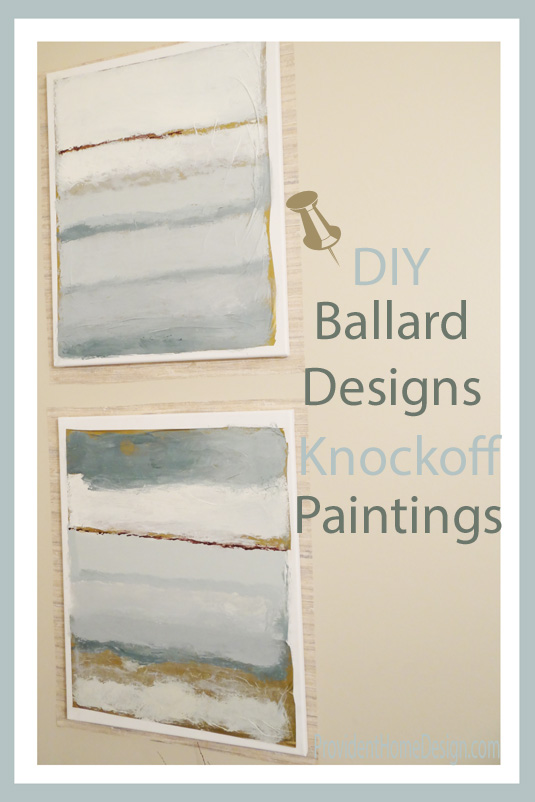
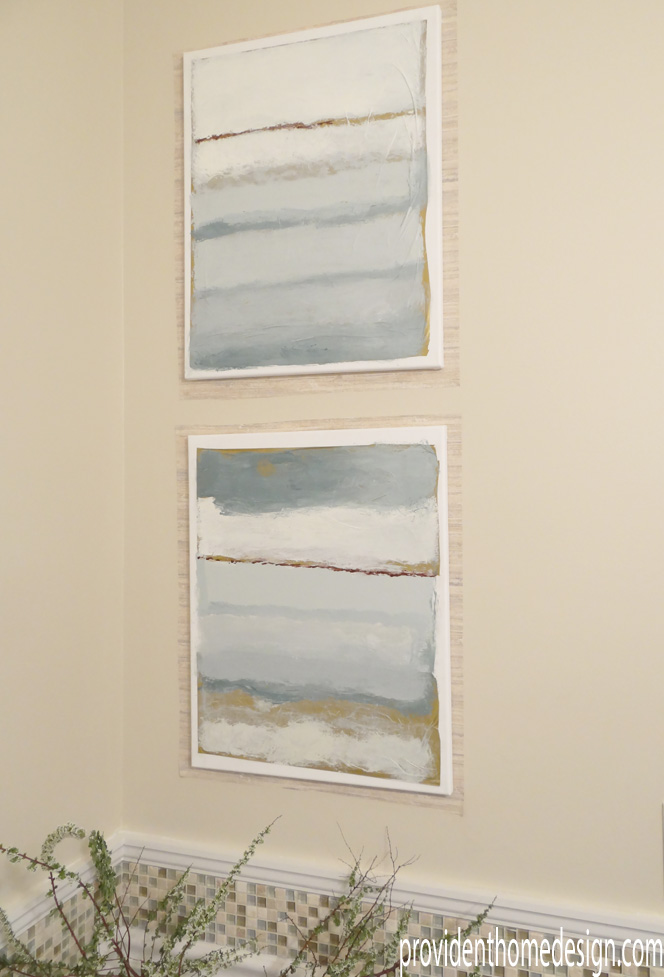
This room was masterfully composed by designer William Peace. I love the relaxed feel of the space and the mix of grays, blues, beiges, and golds. And of course the amazing set of abstract paintings! Aren’t they gorgeous!? Caroline Gold painted these oversized paintings for Ballard Designs. Together they cost $900 and measure 46 x 36 inches per painting!
I was inspired to use these paintings in my recent powder bathroom makeover but did not have the money or space to purchase Ballard’s version (if you do, by all means please buy them I’m all about supporting artists)!
If you neither have the money or space here is how I created my knockoff version.
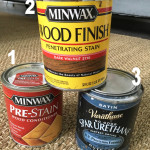
Supplies
My version only cost me $5 per painting but I had all of the paint already left over from paint samples for my powder bathroom as well as many of the other supplies from other projects. If you had to buy all the supplies the project would come to more like $14 a painting.
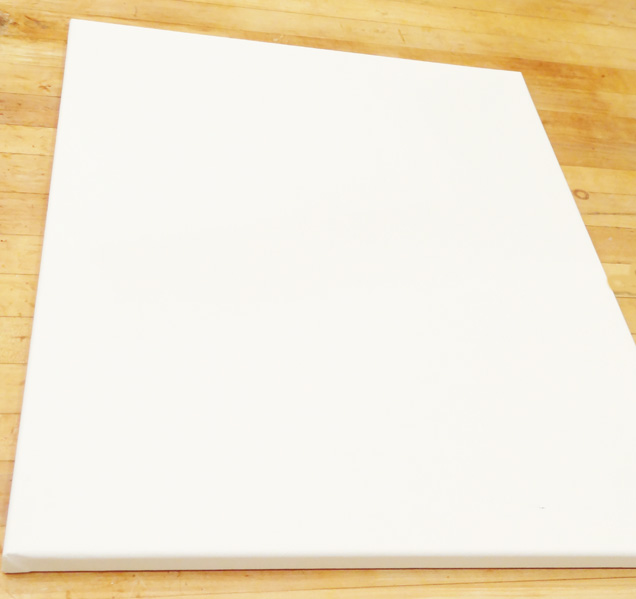
(2) 16 x 20 canvas- $8 for a 2-pack at Hobby Lobby
2 Pieces of Gold Tissue Paper- $1 at Dollar Tree
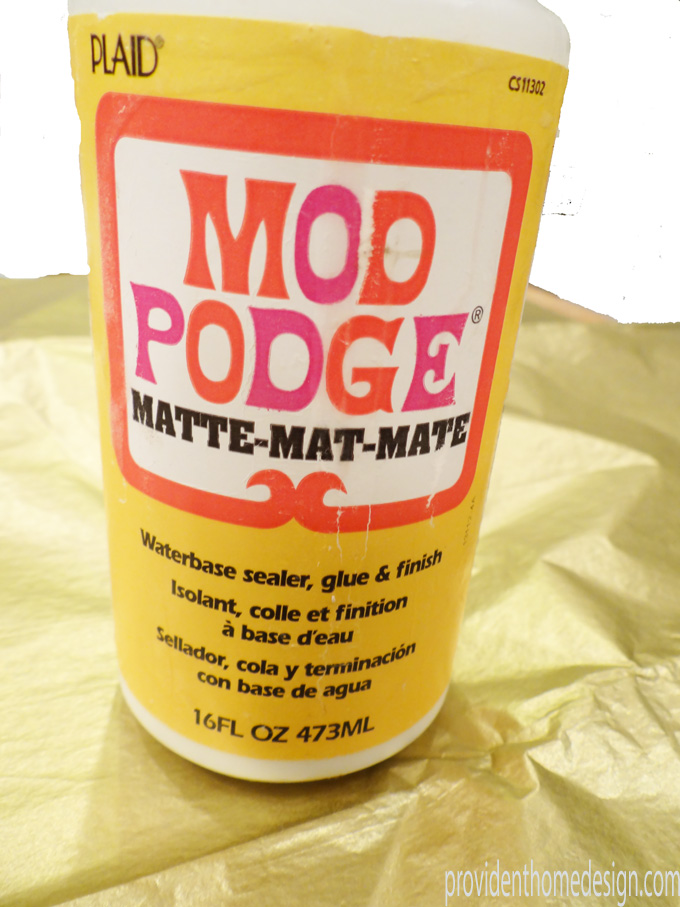
Modge Podge- Can’t remember the cost I’ve had mine for awhile
Medium Size Paint Brush or 2- $1 at Dollar Tree
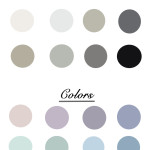
Paints- Sherwin Williams Riverway, Behr Rocky Mountain, Benjamin Moore Palladian Blue, Sherwin Williams Kilim Beige (you can buy all of these colors at Home Depot in the sample size for $3 a sample)- $12
White and Brown acrylic paints-$2
‘Step By Step (oooh baby)’
1. Take out your 2 canvases and Modge Podge two pieces of gold tissue paper onto the canvases as shown below.
Tip- I brushed the modge podge onto the canvas and then laid the tissue paper on top of it and smoothed it out. Don’t worry if you can’t get it totally smooth, the wrinkles end up looking cool when the paint is on top. It gives the painting more dimension and makes it look professional.
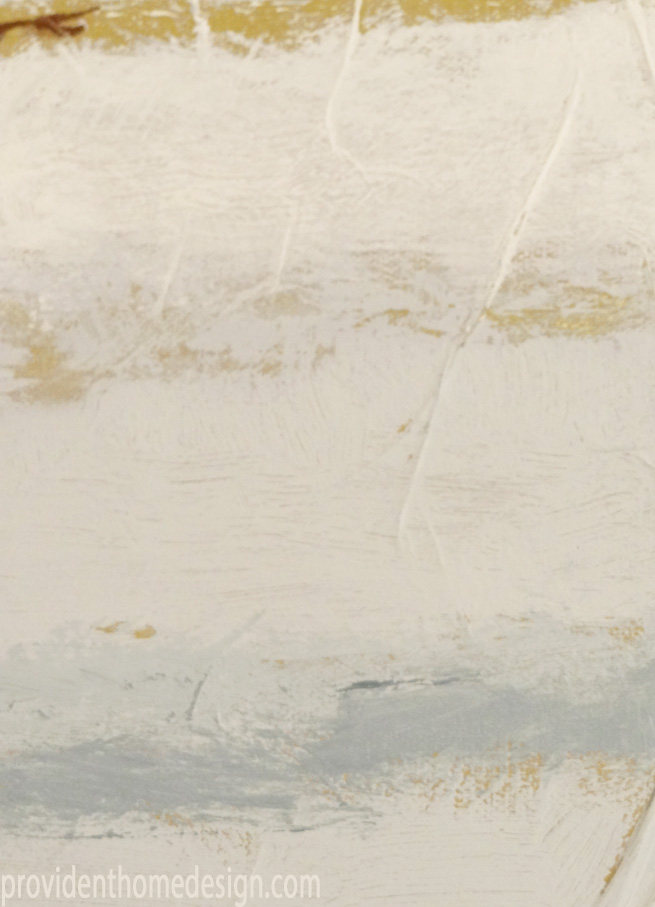
3. Start with the canvas on the left that has no gold tissue paper in the midsection (in otherwords the one wearing the gold bikini):-) I had the original next to me on my ipad the whole time to refer to often. Start at the bottom by brushing on some white paint. I used white left over wall paint but I’m sure a white $1 acrylic paint would work too. Use short, choppy brush strokes to mimic the original painting.
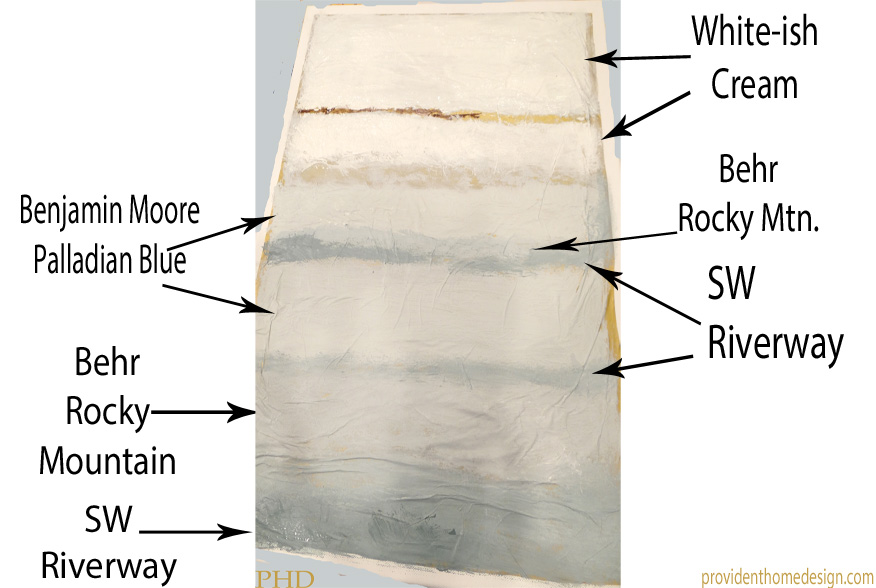
4. Continue painting the rest of the canvas in the colors shown below. Wipe your brush on a paper towel before changing colors. After you get your first coat of paint on and it dries go back and tweak the painting where needed. Refer to the original and don’t hesitate to layer colors by brushing on wisps of colors where you need to (for example the white in the very middle of the painting has wisps/light brush strokes of Behr Rocky Mountain on top of it).
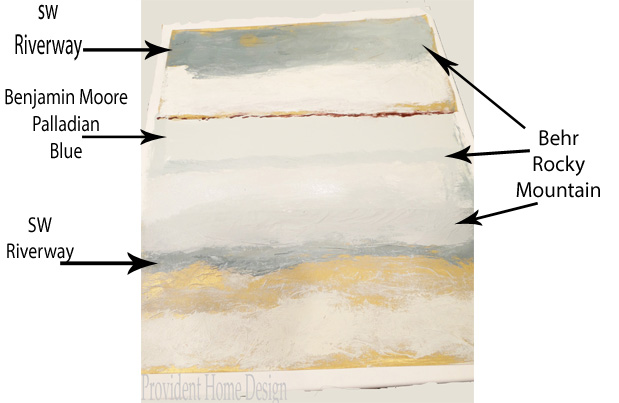
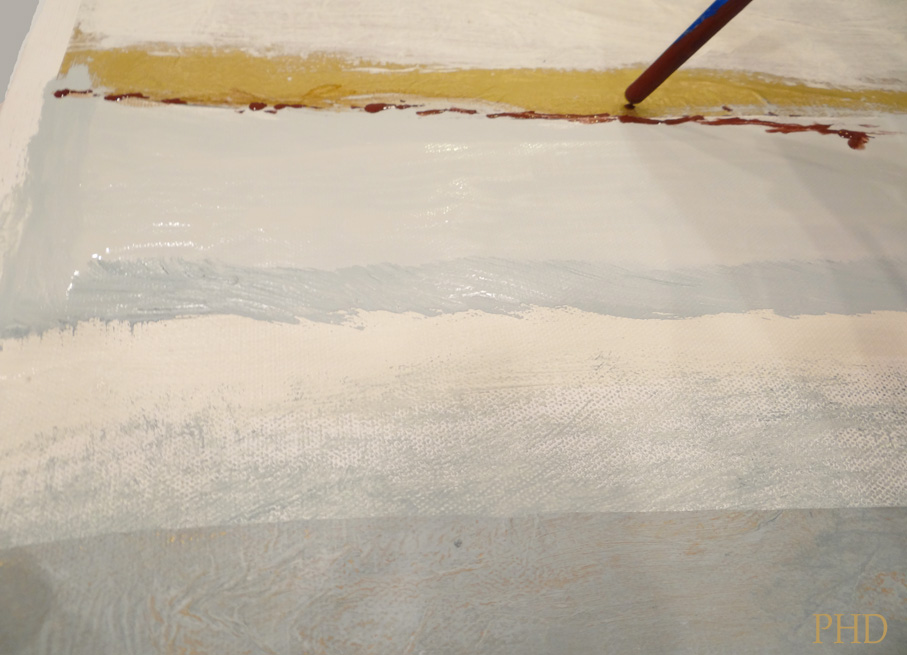
5. When the painting is done use the back of a small paint brush to paint the brown line across the painting right above the palladian blue color.
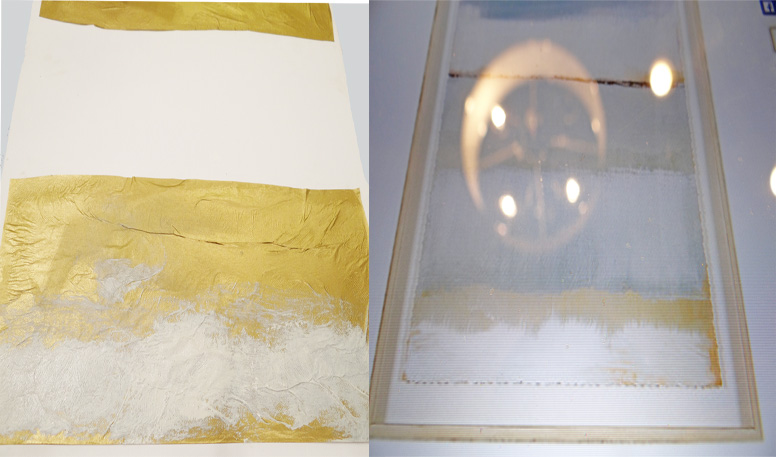
6. Put this painting aside to dry and get the other canvas that should look like this.
7. Use the same methods as above for painting the colors shown below (don’t forget the brown line).
8. If you notice below the paintings have an outer edge that is beige in color.
via Ballard Designs
I chose to use some faux grasscloth wallpaper I had on hand from a different project to put up on the wall behind where the paintings would hang to ‘frame it’.
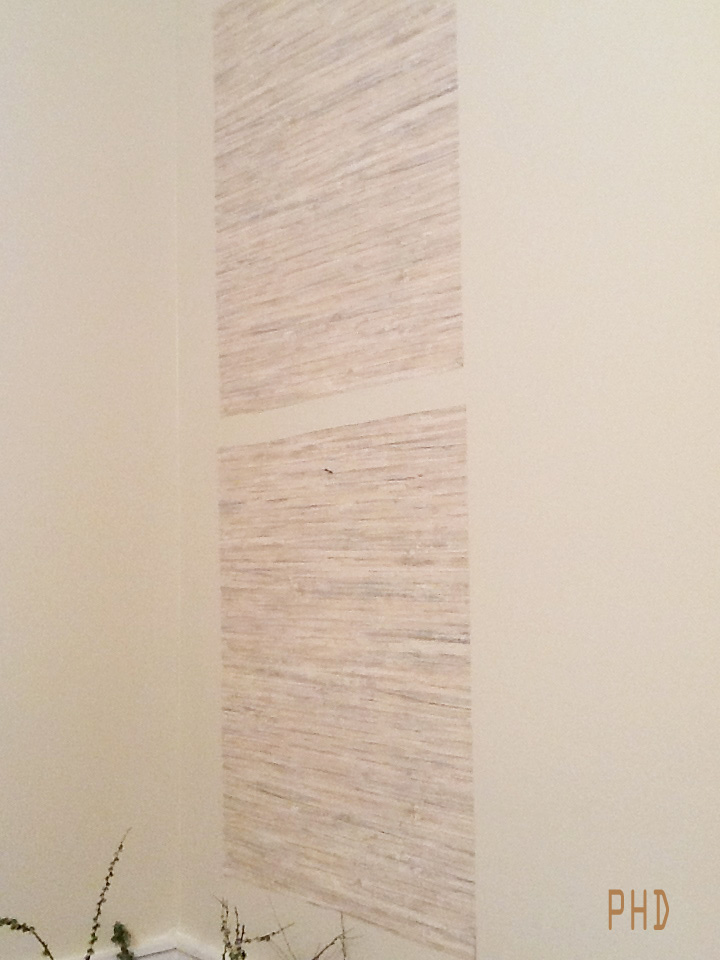
Assuming you don’t have wallpaper lying around in the perfect beige color you need (yeah I know lucky break):-) you could tape off a rectangle on your wall and paint it SW Kilim Beige or you could paint SW Kilim Beige directly onto your canvas’s edge. If you took the latter route you would need to do this step first being sure to tape for a clean edge between the beige and white space.
So what do you think? Going to give it a try? Let me know if you have any questions!!!
It turned out beautifully! I’d love to try this myself.
Thanks Jennifer! You can totally do this! I really enjoyed the process of doing this one. The colors are so pretty and soothing that it creates a nice calming work atmosphere as you create it!:-).
What a wonderful idea!! Also thank you so much for sharing this with the world. Would love to see your other genius ideas for paintings. Definately going to try this, although I’ve never painted in my life!!
Hi, Chrissie, thanks for stopping by! Here another paintings post I did that you may enjoy, http://providenthomedesign.com/2014/03/08/wisteria-wall-art-knockoff/.:-)
This is a super idea! And they look SO good! Thanks for sharing!
Thank you, Amber!:-)
These are absolutely beautiful! I would love to make these for my bathroom. I can’t wait to try it out!
Thanks, Laura! I’m excited for you to try them!
Since I saw your original bathroom “before and after” post I have been brainstorming on how you did this. It’s been fun waiting for your post and I can’t wait to give it a try. Btw I laughed when I read your funny description of the “tissue paper bikini”, my laugh woke up my hubby a little and he asked what was so funny. All I said was “tissue paper bikini” and he said that sounded like a good idea :). Thanks for the tutorial and the laugh although I think my hubby might be a little disappointed when he sees what I really was laughing about.
Hilarious!!! Thank YOU for the laugh, Lorie! I’ll be smiling about that one for awhile!:-)
Hi Tamara, saw you on Work It Wednesday. Your paintings turned out so beautiful! A couple of these would be perfect for our bedroom. We have a huge blank wall to stare at, but I’m going to change that with your tutorial. Thanks for sharing your talent!
Awesome, Val! So glad to hear these paintings have inspired you!!:-)
I’m so glad I found your blog- absolutely delightful!
Ballard Design is one of my all time favorites-
I’m so encouraged to get painting again after
reading this post!
Thanks! Heidi
Heidi, that makes me SO happy to hear! I find painting super relaxing and at times therapeutic. And then to be able to use what you’ve created in beautifying your home is extra rewarding! Thanks so much for your comment!
Love these, very artistic!
Thank you, Sharon!
You are so talented! I love how your paintings turned out. I am pinning this for later reference. Thanks for sharing this neat technique.
You’re very welcome, Amy! Thanks so much for stopping by!:-)
Wow. I try really hard to be creative but this is just genius. I’m going to give it a try but try to do my own colors. I’ll let you know how it turns out.
Ayisha, please do, I would LOVE to see your variation of it!:-)
Tamara, your paintings came out so beautifully! I love the gold peeking through. I’ve tried some beach landscapes but they look like a 2 year old did them. I will have to follow your tutorial and see if I can make some masterpieces! Thanks for sharing at Best of the Nest!
Thanks, Lisa! I’m so happy to have found your blog recently. You have done such a beautiful job with your home!! 🙂
Wow Tamara, what a gorgeous knock off! You did such a beautiful job, I know from experience abstracts look so much easier than they are, but your tutorial is great! Enjoy your pretty artwork!
Thanks, Pam! I’m in love with your kitchen!:-)
These turned out FABULOUS!!!! I love them.
Thank you!! 🙂
Your paintings turned out totally gorgeous!
Thanks, Heather!!
Oh my goodness, I saw that same page in Ballard and thought “I can do that”… 🙂 You did a lovely job!!!
Haha, thanks Ursula! Guess DIY minds think alike!:-)
What a great idea, Tamara! Good knock-off projects are so inspiring! I love the ever-so-subtle grasscloth “frame”, too. Thanks for linking up with us at Best of the Nest!
Thanks, Jennifer! Thanks for having me!:-)
This is so nifty! Found you through a blog link and can’t wait to read some of your other posts now!
Thanks, Laura! I hope you enjoy the rest of your visit! 😉
Wow, these are gorgeous! Fantastic job! I would love to link to this if you didn’t mind.
Thanks, Rachel. You are welcome to link to this project! Thanks for asking!:-)
Your paintings are beautiful. I love how you added the grasscloth to the wall behind them!
Thanks, Virginia! 🙂 I love when I am able to use left over supplies from previous projects!!
You did such an excellent job on these paintings! I’d love for you to share at our link party going on now!!
http://www.delineateyourdwelling.com/2014/06/link-it-or-lump-it-party-number-42.html
Thanks for the invite, Amy! I would be happy to!
These are gorgeous! You did such a great job. I need to create some art for my apartment, and this is so inspiring:)
Thanks, Ginnie, for stopping by! I’m happy to hear these paintings inspired you!!
that looks great. and oh man, did you just channel the new kids on the block? lol.
Sure did! 😉 They were my favorite band in the 6th grade. 🙂
I love a good knockoff! These are absolutely stunning – love the gold leaf detail. You really knocked this one out of the park!
Thank you, Erica! So sweet of you!
This is such a cool idea and yours is better than the original, much more expensive version! Great job and thanks for sharing!
Thanks, Angela!!
Yours look perfect. What a great job – I want to try this. Thanks for sharing.
Thanks, Debbie! Go for it! The great thing about abstract paintings is it doesn’t have to be perfect to be beautiful! 🙂
I LOVE this! We have been renovating a 70’s era house and the wall color in the bedroom went a bit awry, not allowing me to use the artwork I had originally picked (but not purchased yet TG!) I am totally going to try it this weekend.
Boo on paint colors going awry! So glad these paintings have inspired you, Sandy! I would love to hear how they turn out for you!
Wow! That is incredible! You have just inspired me to try my own artwork! So amazed : )
I too am a Ballard and Pottery Barn Catalog saver….with the pages folded!
Deb
@Seeking Lavender Lane
Happy to hear you are inspired, Deb! 🙂 It’s a great feeling to be able to hang something you’ve created up on your wall!!
I do the same thing with the Ballard catalog 🙂 I am definitely going to do this for my LR
I love that you do the same thing and that you were inspired here today!:-). Thanks so for for taking the time to say hi!
These look fab! I love the texture from the tissue paper
Thanks, Lisa!:-)
Where Does the Kilim Beige go?
Hi, Margaret, thanks for your question! The Kilim Beige is optional but is used to create a border around the painting like in the Ballard inspiration paintings. Step #8 in my tutorial should answer your question. Let me know if you have further questions!
I’m no artist by a long shot, but I think even I could do this! BTW, I like yours better than the ones from Ballard Designs.
Go for it, Laurel! I’m sure it will turn out great!
So glad I came across this post! I have been trying to get myself psyched up to two larger canvasses I want to paint for my dinning room but keep chickening out. I now have my project for the weekend and new found confidence!
Yay, Liz! I’m excited for you!:-)
Very, very nice but I do have a question. I painted a copy of a print I saw at target. It’s an exact copy but is my own work (much like your project), but I’ve always felt weird about it – like I infringed on a copy right! Since you’re posting this, I guess copy right is not a worry, but I’ve always been so curious about it since I did my painting! What are the rules and are there any rules in a case like this?
Hi, Sue, I know this can be a pretty controversial topic but i appreciate your question. It is my understanding that copyrights protect artists work from being reprinted (by a machine) without permission. But for someone to be inspired by their work and try to create their own is not a copyright infringement. This is my understanding, thanks for asking!
Most copyrights are in place so someone cant make a profit of another artists work. An artist wont sue you for making a copy for your own home, especially if your not in a financial position to buy one of their originals.
Note, for anyone who is planning to try this. If you don’t have mod podge you can use the paint to glue the tissue to the canvas, though you might want to test it to make sure it doesn’t bleed through the tissue.
Great Job Tamara!
I was enjoying reading this then got to the image showing the hand. I was fixated by how much paint was added to the image to make it look messy. I would still like to try this regardless thanks for sharing.
Lol, David, I was trying in photoshop to make the background of the photo less distracting by changing it to all blue but it was super late and I was new to photoshop and did a really sloppy job. Would have been less distracting to leave it how it was. You live, you learn.:-)
LOVE THIS!! I have a 46″ square canvas on the wall that I’m tired of and I want to do something like this. I appreciate you sharing your technique with the tissue paper. Brilliant!! Yours look so good.
Aww, thanks Jamie! I used the tissue paper method again for an abstract in my living room makeover. You can check it out here if you are interested, http://providenthomedesign.com/2015/03/31/living-room-makeover-reveal/. Excited for you to make your masterpiece!:-)
You did a fantastic job. I have gotten into DIY myself when my grandson and daughter came to live with me not only because raising children is expensive but we do projects together.
Wonderful, Karyn! I find DIY very satisfying!:-)
Love the knockoff painting. But, why cover all the canvas when so little of the gold actually shows?
Great question, Mel! The tissue paper serves as a texture builder when painted on it makes the painting look more professional because it add depth to the painting.
I am so happy to have found your blog! Ballards is one if my favorite catalogs & you have inspired me to search for more DIY projects to get that “Balards look” in my own home. Your tutorial was very detailed and I can’t wait to try! Thanks!
So happy to have you, Debbie! I get a giddy over a new Ballard’s catalog…glad I’m not the only one!!:-)
Thank you so much for your post. Loved this painting from Ballard Designs…estatic when my daughter sent me your post. My aunt and I tackled it today…..looks great!
Yay! Thanks for sharing, Kerry!:-)
Thanks for the inspiration. I did them this weekend and I am so happy with the results. I framed them and love the look! Which I could post a pic for you.
I would love to see them, Kerrie! Wish you could post a pic too (feel free to email me a pic, providenthomedesign@gmail.com)!! So glad you are happy with them!:-)
That is awesome! I love what you did, so creative! Thank you!
Thank you, Ann, glad it inspired you!