Provident Home Design

Decor, DIY, and Interior Design

  • HOME
  • ABOUT
    • About PHD
    • Contact Me
  • DIY PROJECTS
  • DESIGN 101
  • PAINT
  • HOME TOUR
  • DESIGN INSPO
  • DECOR TIPS

GET NOTIFIED VIA EMAIL WHEN THERE'S A NEW POST!

How to Put Glass in Cabinet Doors

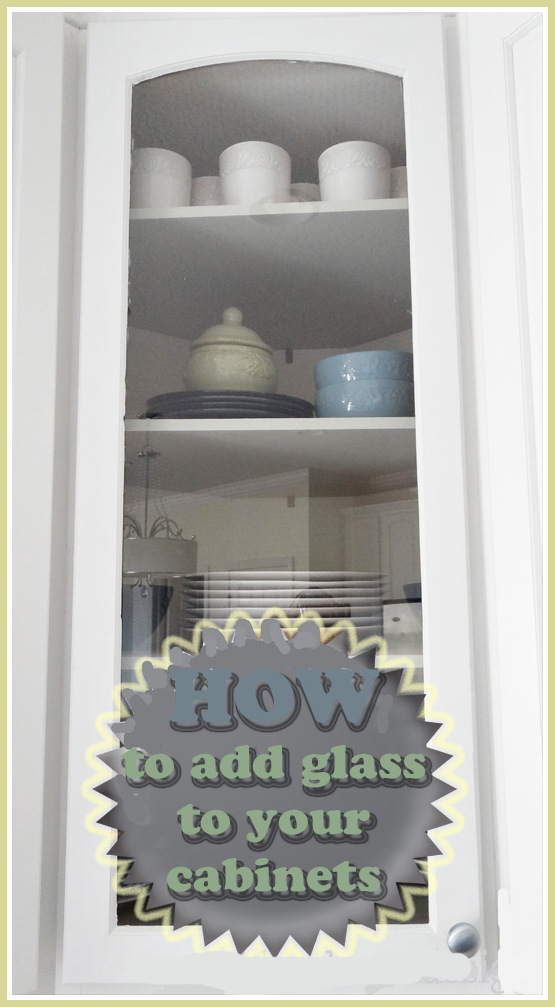
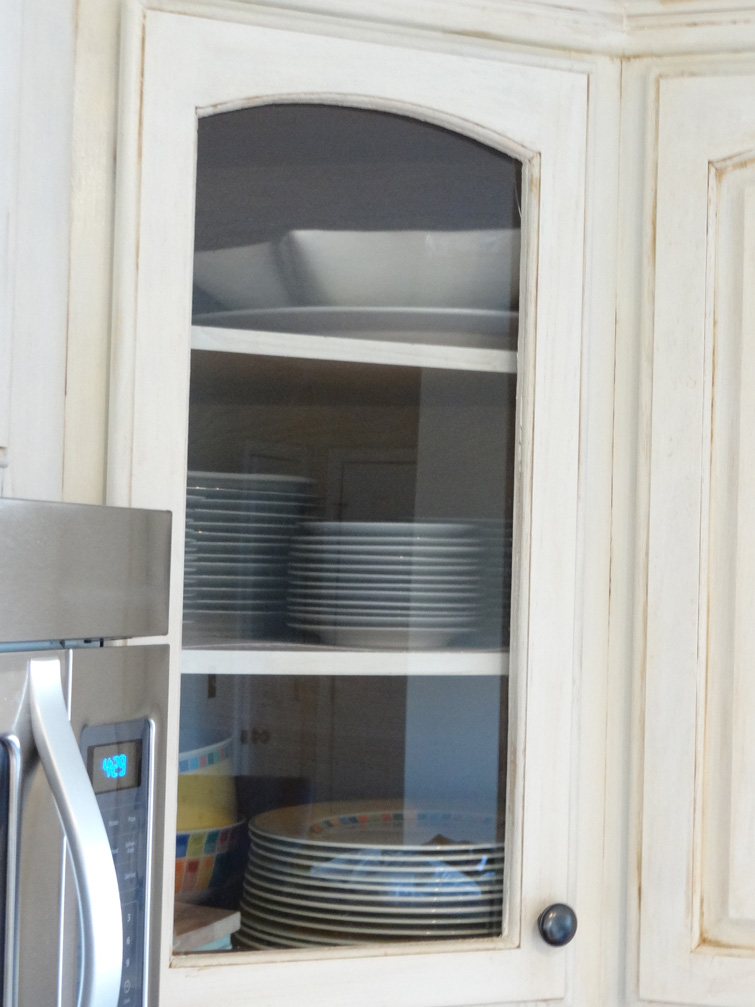
Happy Monday!  If you haven’t already read why I’m such a big fan of having at least one glass cabinet in your kitchen click here.  Today I will teach you how to put glass in your cabinet doors.


How to put add glass to cabinet door


Before I start a DIY project of this nature I always ask myself, if worst case scenario happened during this project what would be the next step?  I don’t start the DIY project until I have a Plan B intact.  In this case, worst scenario is the door gets ruined and becomes unusable (well, of course you could saw your fingers off, drop a piece of glass on your barefoot, or while you are doing this project an asteroid could hit planet earth, but most likely the worse case scenario is a ruined door). 🙂

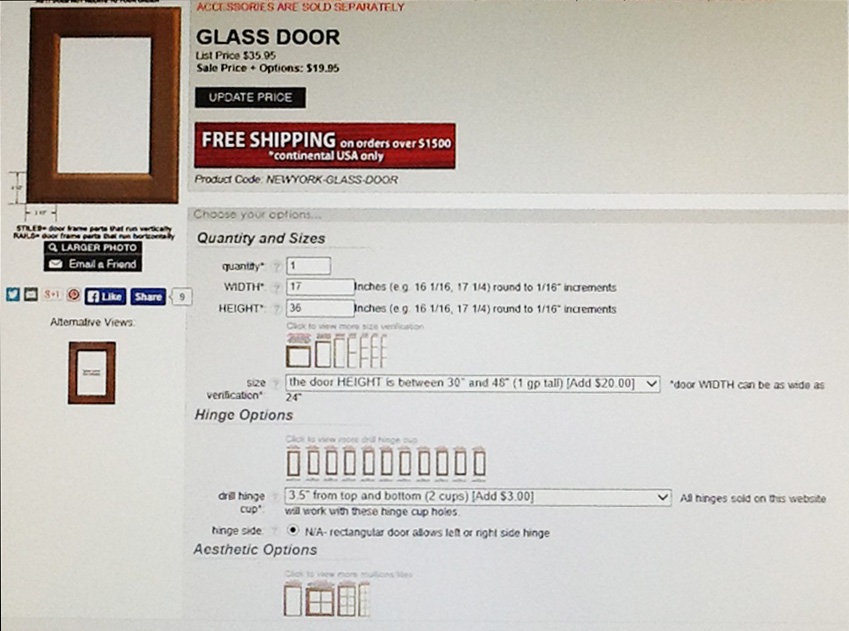
Never fear though, if worst case scenario happens and you ruin the door I have found a great online source that sells cabinet doors that are already pre-cut for the glass to be inserted and they are fairly inexpensive.  Your price depends on the specific options you choose for your door as can be seen in the picture below.


glass cabinet doors


After entering in my specifications the door came to $50.  I went forward with this project because I was fine with spending $50 on a new, precut door if the things went awry.  You will have to make this decision as well, as there is always the risk of failure I mean accidents happening that are never your fault at all of course!:-)


So here is the Step by step SO doable tutorial!


Supplies:
Drill
Jig saw (bought mine Lowe’s for $40)
router (optional)
sandpaper
caulk
glass
glass clip or fastners


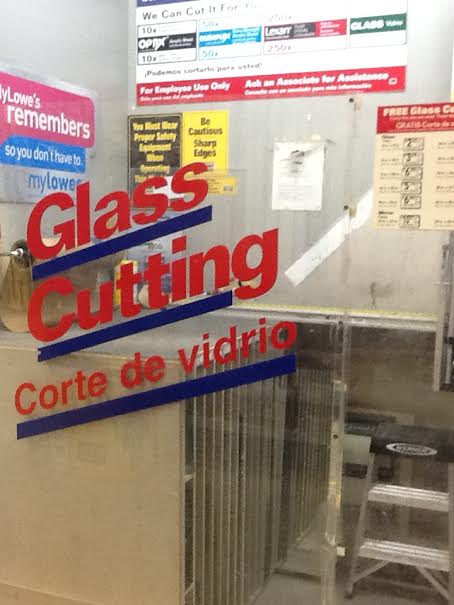
*****A word on glass.  I have found my glass at Lowes for super cheap.  To find it, go to the back of the store to the Doors Desk and tell them you want glass cut.  A couple aisles down there will be a glass cutting station that looks like this.  They will ask you what size you want and then cut it for you.
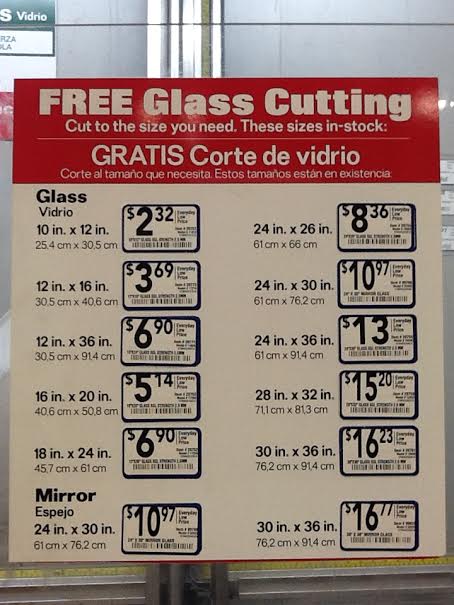
 

Where to buy glass for cabinet door
Prices are below.
prices
Glass cut size will depend on what style of cabinet you have and if you want to use a router or not.  If you have a panel that tapers off similar to the one below (tapering can be seen below the green banners) you will most likely not need a router.  In this case you would buy a piece of glass 1/2 –  3/4 an inch wider and taller than your measurements.  So if your measurements are 15 x 28 than you would ask them to cut a piece of glass to abt. 15 3/4 X 28 3/4.


How to measure what size glass you need for cabinet door
If you choose to use a router you will need to do the routing first and then measure the area to determine glass size.


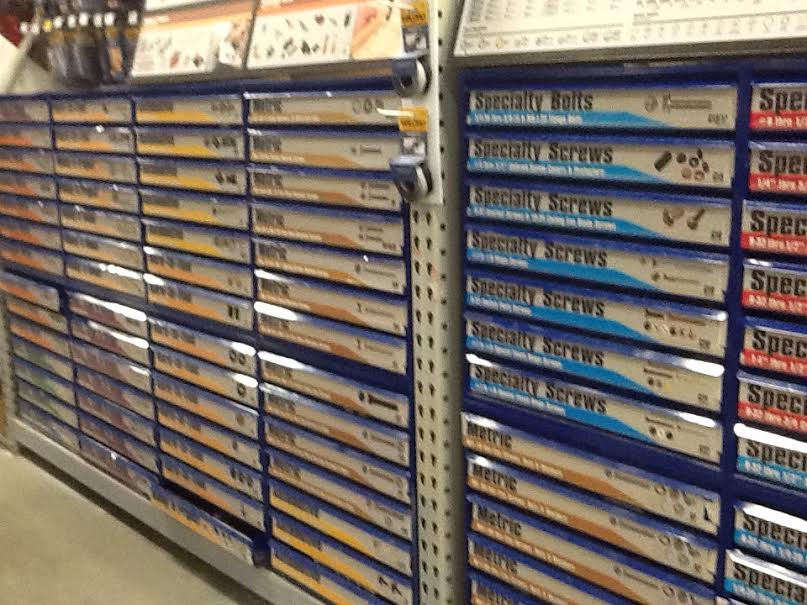
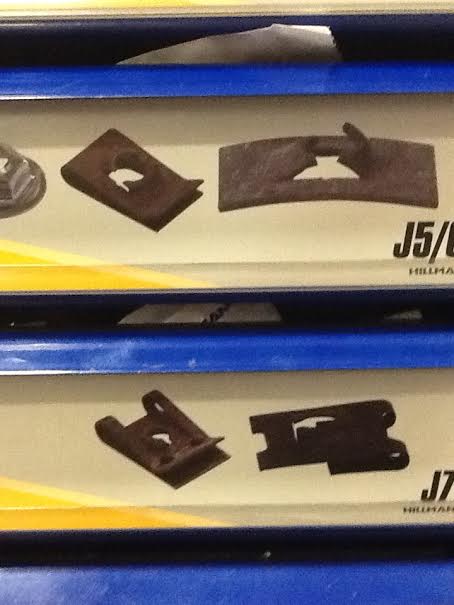
******A word on glass clip/fasteners.  These can be found at Lowes too.  Go to their Hardware Desk and the aisle to the left of the desk will have rows of small drawers that look like this.


where to get bracket to hold glass in cabinet door


Find the section that says “Automotive” and look for the drawer labeled J5.  You will want to the black fastener on the left, 4-6 of them.


supplies needed to hold glass insert in cabinet door


Steps:


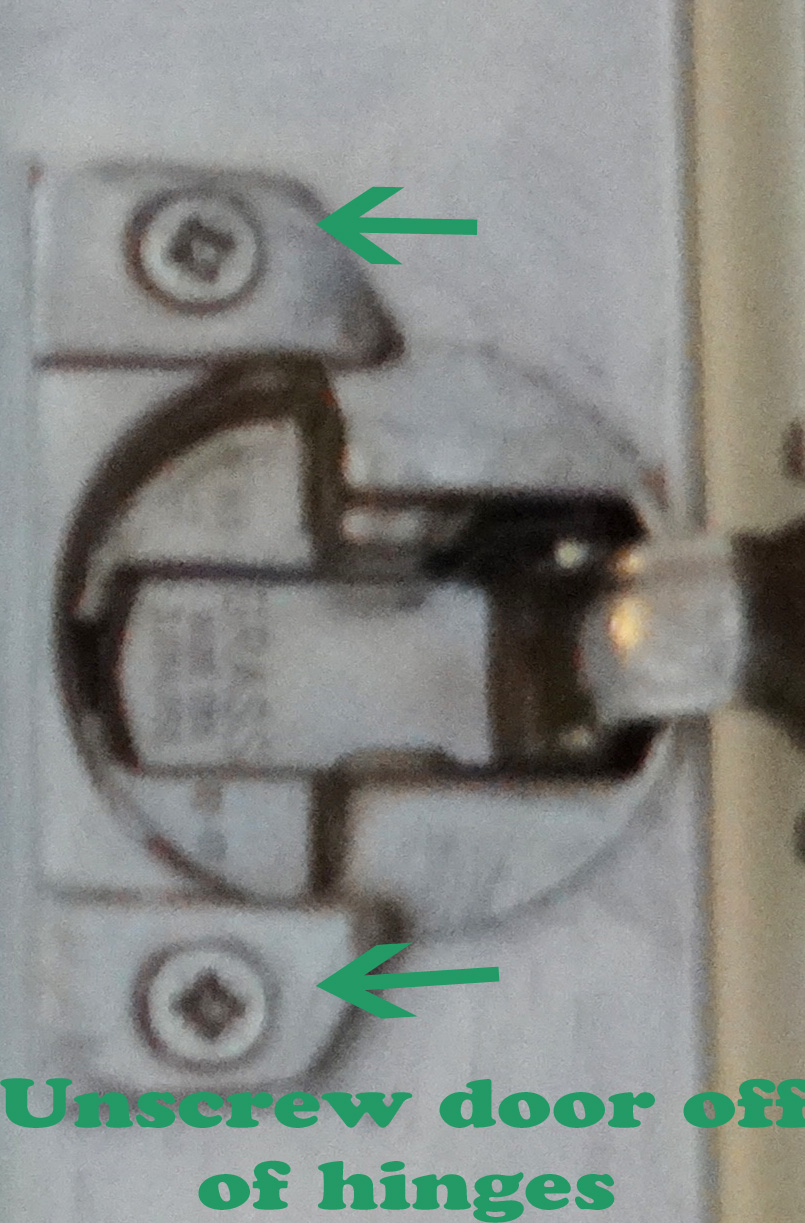
1.  With a screwdriver or drill unscrew the door off it’s hinges.
How to install glass in cabinet doors


2.  Place the door on buckets or something that keeps the door at least a foot off the ground and make sure there is nothing under the center area of the door.  Door should be front side up.


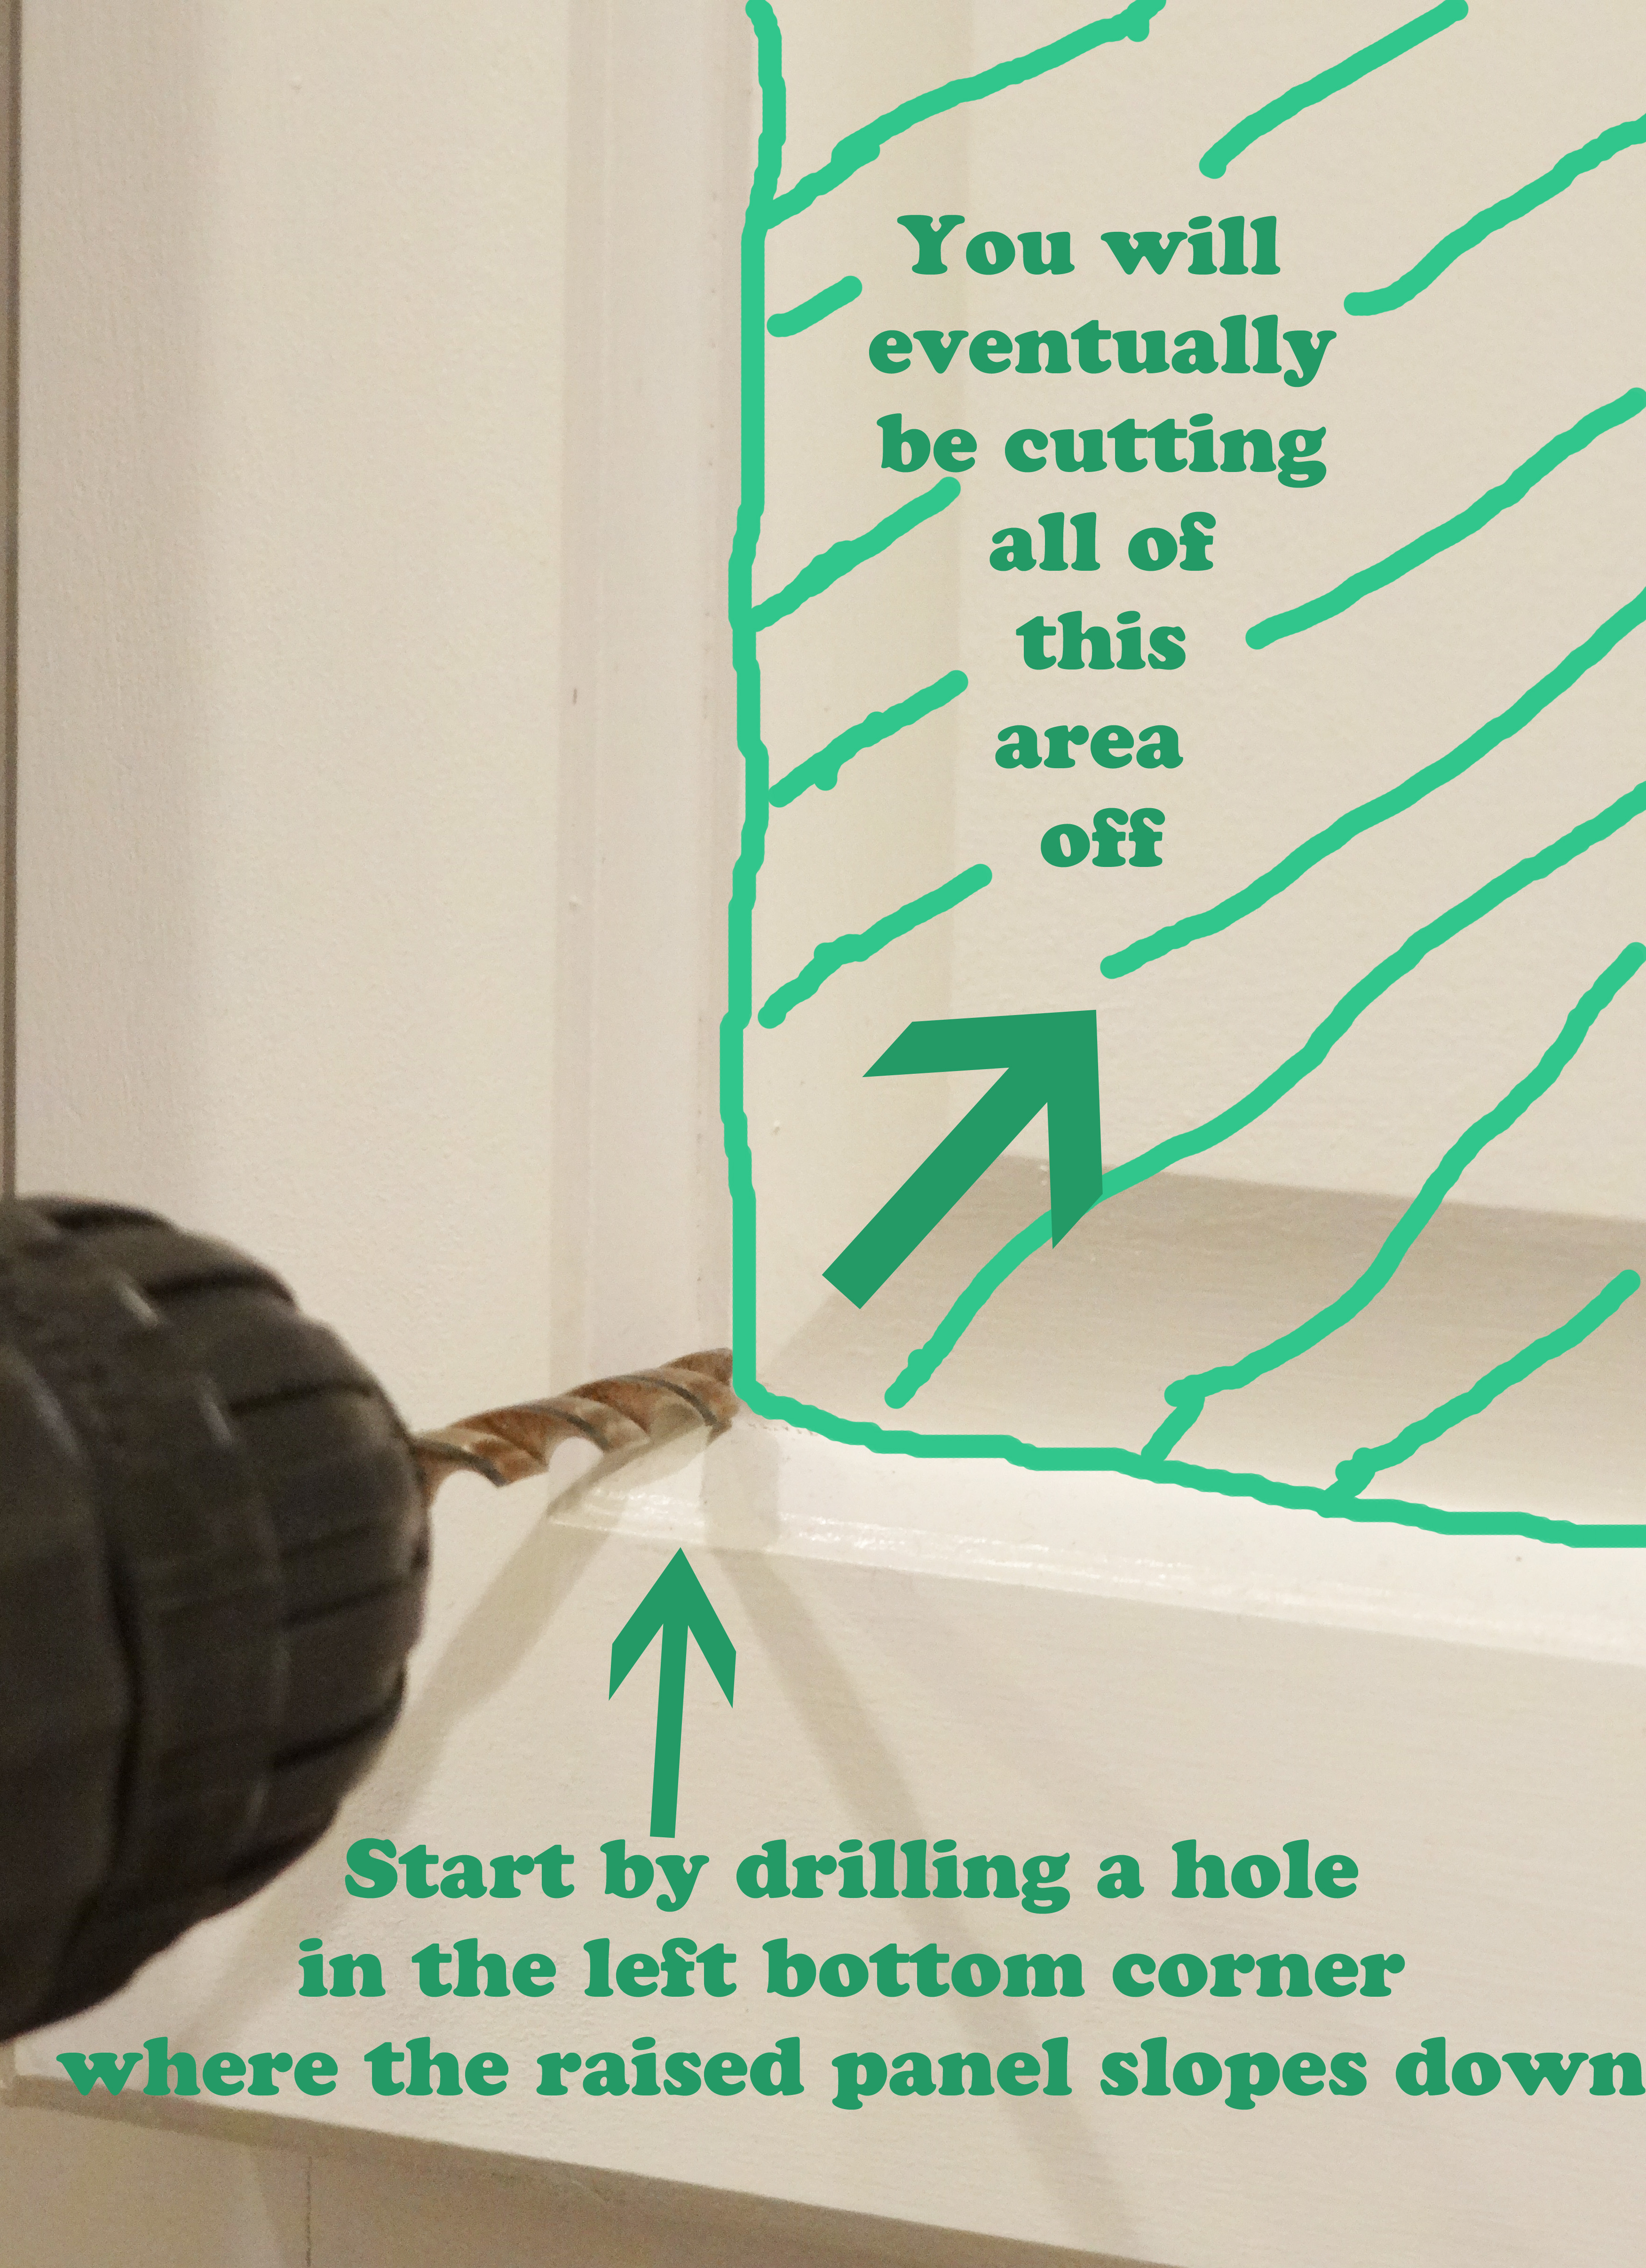
3.  With a large drill bit, drill a hole in the bottom left corner of your door.
Drilling hole to put glass in cabinet door

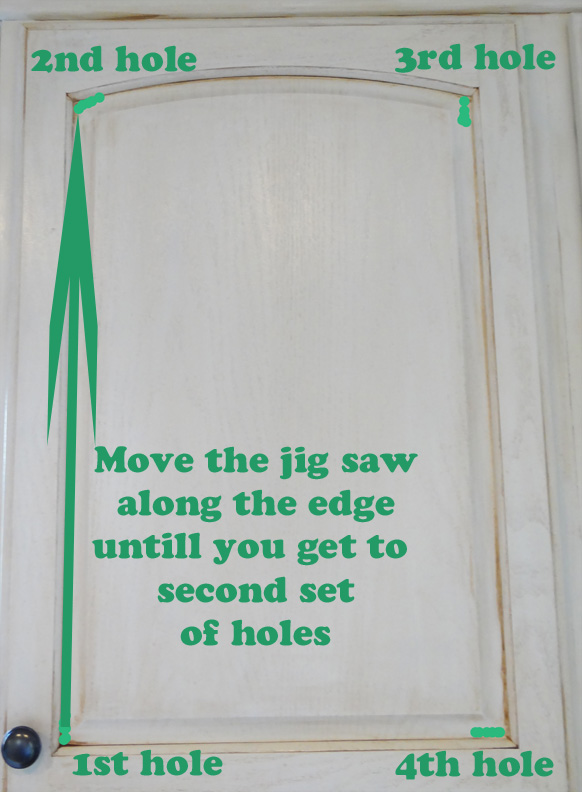
4. Drill another hole right above the hole you just made.  What you are doing is making the holes in the corners of door large enough so that our jig saw blade can fit in them.  It must be done in all 4 corners of the door like the below picture (green marks represent where the holes should be made and hence where the jig saw blade will be inserted).

A friend's cabinet.

My friend, Wendy’s kitchen cabinet door. I got her started but she finished up the rest without any help!


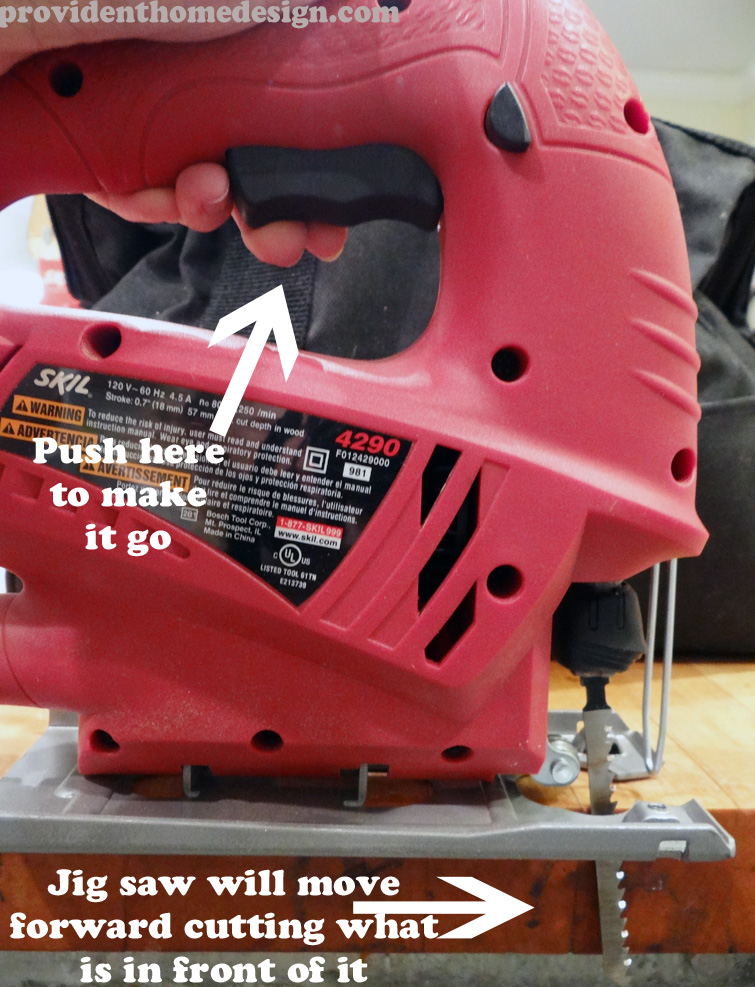
5.  Put your jig saw blade into the first hole (jagged side of blade will be facing towards the top of the door).

jigsaw


6.  Okay, you with me?  You SO have this!!!  Squeeze the button to make the jig saw go forward.  Slowly move towards the top left corner and stop at your next set of holes.  Note:  If this is your first time using a jig saw then awesome, just make sure you practice a bit first on a spare piece of wood so that you get the feel of how it moves.


How to put glass in cabinet doors

7.  Stop motor, pull jig saw blade out, and place it in the second hole.  Now turn on jig saw and carefully move it along the bottom of the slope toward the 3rd hole.


8.   Now stop motor, pull jig saw blade out, and place it in the third hole.  Turn on jig saw and carefully move it along the bottom of the slope toward the 4th hole.


9.  Once you’ve reached the 4th hole you are a Pro.  Take out your jig saw place it in the 4th hole going towards the 1st hole and bring it on home!  You have successfully cut out the panel of your door where the glass will go.


10.  Take a piece of sandpaper and gently sand the inner rim where you made your cut.  The jig saw probably made some rough edges so lightly sand them and with a damp paper towel wipe away the dust.
Sandpaper


 11.  If you choose to do a router do so now.

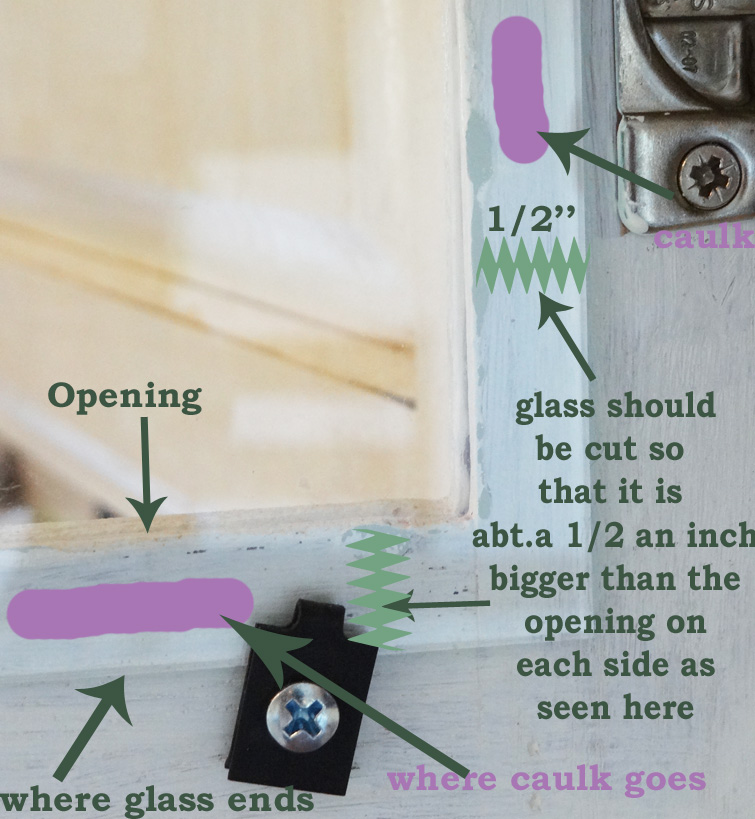
12.  Turn your cabinet door face down on a work table or floor with newspaper under it.  Put a very thin line of caulk around the entire perimeter of the frame.


13.  Now carefully center and place already cut glass over the frame.  There should be about a 1/4 – 1/2 inch overlap excess of glass on all sides as can be seen here.
Note:   Make sure if caulk oozes out onto the front side of the glass that it is wiped up right away.
DIY glass cabinets caulk and clip
14.  Let sit for 30 minutes.


15.  Now add fasteners by putting them over the glass but not too far in or they will be seen through the glass.  You may need to drill a small hole first before screwing in to prevent to much stress to the glass.  With a screwdriver or drill fasten screw in snug but not too snug or the glass can break.  Use however many fasteners you want.  I typically use 4-6.


clips on glass cabinet


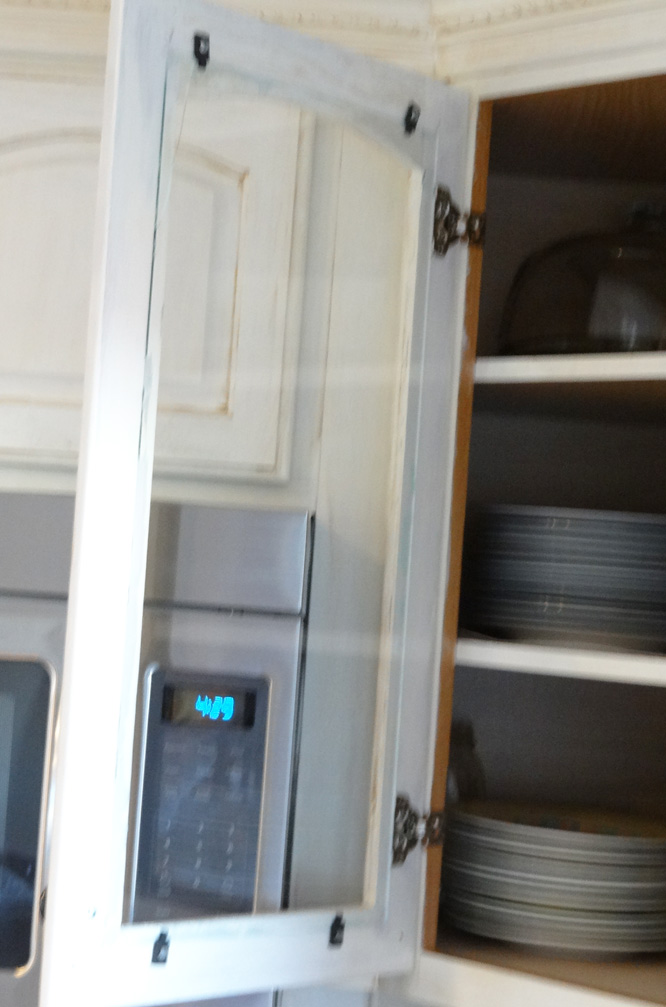
16.  Reattach your cabinet to the hinges and enjoy your beautiful new glass cabinets! 🙂


How to put glass in cabinet doors

Great job, Wendy!!! Thanks for letting me take pictures of your beautiful glass cabinet!


Don’t hesitate to let me know if you have any questions! My DIY glass cabinet only came to a whopping $18–that’s a lot bang for your buck! Think you’ll try it???

Signature

Related Posts From the Blog:

  • Favorite Paint Brand-I’ll Share Mine If you Share YoursFavorite Paint Brand-I’ll Share Mine If you Share Yours
  • Let’s Talk Best DIY ToolsLet’s Talk Best DIY Tools
  • Peel and Stick, Removable Wallpaper Options!Peel and Stick, Removable Wallpaper Options!
  • A New Rug for the Living RoomA New Rug for the Living Room
  • Why I Love BlogsWhy I Love Blogs
  • Makings of a Stylish Man CaveMakings of a Stylish Man Cave
  • DIY Orb Ceiling Light FixtureDIY Orb Ceiling Light Fixture
  • Pantone’s 2015 Color of the YearPantone’s 2015 Color of the Year

budget decor// cabinets// DIY// kitchen// money saving tips// tutorials30 Comments

Subscribe

GET NOTIFIED VIA EMAIL WHEN THERE IS A NEW POST!

« Love Your Kitchen Series–Glass Cabinets
This Week’s Deals »

Comments

  1. amy says

    Tuesday, March 4, 2014 at 10:25 pm

    Your so handy! Your tutorial is so great maybe even I could tackle this project! 😉

    Reply
    • phdesign says

      Tuesday, March 4, 2014 at 10:37 pm

      You definitely could, Amy! And I would be happy to be there for moral support if you needed!:-)

      Reply
  2. Margaret says

    Sunday, May 11, 2014 at 1:31 pm

    I am so glad I found you Tamara, love all your wonderful ideas and the tutorials. You are so thorough, fancy providing pics of where to find the materials needed and the handy website for replacement doors. Thanks so much for this. I have been wanting to do this for ages in my kitchen. My only hesitation is that the cupboards would have to be tidy at all times…might be a challenge for me. 😉

    Reply
    • Tamara says

      Sunday, May 11, 2014 at 4:26 pm

      Aww, thanks for such a nice comment, Margaret! I agree, I definitely could not have glass in all of my cabinets due to some of the clutter in my cabinets. But even doing one or two cabinets makes a huge difference in the feel and openness the room! It’s definitely worth the upkeep! Let me know if you end up giving it a try!:-)

      Reply
  3. kristinsalazar597020196 says

    Monday, June 23, 2014 at 10:28 pm

    So beautiful, makes such a big difference! Thanks for linking up to INspire Me Monday!

    Reply
  4. Tamara says

    Tuesday, June 24, 2014 at 9:29 am

    Thanks so much for a great link up party, Kristin!!

    Reply
  5. shirl says

    Saturday, June 20, 2015 at 10:40 am

    Thanks for the great tutorial! Now maybe I can work up the courage to give it a try. have wanted to do this for a long time. you have inspired me to bigger diy things! shirl

    Reply
    • Tamara says

      Saturday, June 20, 2015 at 10:47 am

      You can do it Shirl!!

      Reply
  6. tatiana says

    Wednesday, October 14, 2015 at 2:49 pm

    Hello!

    Thank you so much for your time. Please help me! The inside of your cabinet door looks different than mine. My cabinet doors have a square frame. It appears that I do not have that 1/2″-1/4″ edge space to hide the caulked glass. I’m assuming yours already came with that specific inner edge cut on the back of the cabinet door?

    for instance: my glass will not sit into the cabinet frame (like yours) if i cut a straight square. It appears as if it will fall through. I’m not sure how to support it without the inner edge to hide the caulking and so that it aligns with the door…. I hope that makes sense LOL!

    Reply
    • tatiana says

      Wednesday, October 14, 2015 at 2:56 pm

      Nevermind! I just read about the router. I’m new to this and had no idea what that meant. Thank you!

      Reply
      • Tamara says

        Wednesday, October 14, 2015 at 3:50 pm

        No worries, Tatiana! Let me know if you have any other questions!!

        Reply
        • Sue says

          Saturday, June 4, 2016 at 3:33 pm

          Hi Tamara, do you have to buy router or are there stores that can do it for you?

          Reply
  7. Betsy levin says

    Thursday, November 5, 2015 at 8:42 pm

    How would you place them. Next to each other?l

    Reply
    • Tamara says

      Thursday, November 5, 2015 at 10:02 pm

      There is no one right way to do it, Betsy. I only have one in the corner in this house. In the condo I lived in before I did it in several. Here is the link to it, http://providenthomedesign.com/2014/04/09/2-year-anniversary-pillow-talk/ (3rd photo down). You can put them next to each other or however you would like!:-)

      Reply
  8. Renee says

    Saturday, January 2, 2016 at 11:22 am

    Your down-to-earth instructions are very refreshing and thank you for being specific enough so the average girl can get this done! 🙂

    Reply
    • Tamara says

      Saturday, January 2, 2016 at 12:33 pm

      Hi Renee, I’m so glad you found the tutorial easy to follow! I try really hard to make my tutorials that way!:-) Happy New Year!:-)

      Reply
  9. Brumley C. says

    Sunday, March 27, 2016 at 9:46 pm

    Great tutorial!

    Reply
  10. Asia says

    Wednesday, June 15, 2016 at 11:22 pm

    TAMAMRA!! This is AMAZING!!! THANK YOU THANK YOU FOR SHARING!!!

    Reply
    • Tamara says

      Thursday, June 16, 2016 at 9:04 am

      You are so welcome Asia!! Thanks for coming by!:-)

      Reply
  11. Becky says

    Tuesday, August 2, 2016 at 9:17 pm

    Could you please tell me the website you found where you could order doors if needed? Thank you.

    Reply
    • Tamara says

      Tuesday, August 2, 2016 at 9:39 pm

      Sure, Becky, it’s in the post but I should have made it more obvious. It’s called Barker Door and this is the link, http://www.barkerdoor.com/New-York-Glass-Panel-Cabinet-Door-p/newyork-glass-door.htm. Thanks for reading!:-)

      Reply
  12. lynnanne says

    Thursday, September 22, 2016 at 3:27 pm

    sorry those yours look fine and dandy real glass doors are inset in the wood, not fastened to the back

    Reply
  13. Kris Lee says

    Tuesday, October 25, 2016 at 5:16 am

    Can you do this on laminated cabinets?

    Reply
    • Tamara says

      Tuesday, October 25, 2016 at 1:02 pm

      Hi, Kris, yes I don’t see why not. It should cut the same! Thanks for your question!:-)

      Reply
  14. Summer Conn says

    Wednesday, August 2, 2017 at 8:48 pm

    Is your glass inset into the door or is it just siliconed to the back?

    Reply
  15. Lisa says

    Tuesday, October 10, 2017 at 10:14 am

    This has to be the most well informed tutorial I’ve seen. You didn’t skip a beat. You have filled my cup with so much confidence. Nice job. Keep it up.

    Reply
    • Tamara says

      Tuesday, October 10, 2017 at 5:09 pm

      Aww thanks, Lisa! So glad you were inspired. You can totally do it!!:-)

      Reply
  16. Heather says

    Wednesday, November 1, 2017 at 11:04 pm

    Totally looking to do this to my upper cabinets but looking to do more of a ‘frosted’ look so I can do them all (and hide the gazillion kids cups and bowls). Can you buy the glass frosted at Lowe’s? Your tutorial was amazing and very detailed so I feel confident going forward with this project. Thanks so much!

    Reply
    • Tamara says

      Thursday, November 2, 2017 at 12:57 am

      Hi, Heather, I can’t remember if they offered frosted glass. It’s definitely worth a check! If they don’t you could spray the glass with ‘frosted spray paint’, here’s my affiliate link to it on Amazon, http://amzn.to/2xNzX53. Or you could use frosted window film on the glass…here is my affiliate link to that on Amazon, http://amzn.to/2gWGjbt. Hope this helps!:-)

      Reply
  17. Deedee Nave says

    Wednesday, November 22, 2017 at 7:03 pm

    So how long does it take to put glass in a cabinet door when you built the wood frame yourself just to go put one in a 4 by 2 6 of them how long would it take a carpenter

    Reply

Leave a Reply Cancel reply

Your email address will not be published. Required fields are marked *

Hello and Welcome!! My name is Tamara and this is where I share my tips and tricks to creating a beautiful home! If you are new, feel free to start HERE.

Subscribe

Get notified via email when there's a new post!

Join me on Instagram!

[instagram-feed]

More Blog Inspiration:-)

  • Icon Caroline on Design

    Close preview

    Loading...
  • Icon Centsational Girl

    Close preview

    Loading...
  • Icon Decorating Delirium

    Close preview

    Loading...
  • Icon Lauren Liess

    Close preview

    Loading...
  • Icon Life on Virginia Street

    Close preview

    Loading...
  • Icon Remodelaholic

    Close preview

    Loading...
  • Icon The Creativity Exchange

    Close preview

    Loading...
  • Icon Thrifty Decor Chick

    Close preview

    Loading...

Categories


Disclosure & Privacy Policy

You might also like

The Final Before & After of our Current Home

The Final Before & After of our Current Home

New Build Update-Paint, Lighting, and Floors oh My!

New Build Update-Paint, Lighting, and Floors oh My!

New Home Update

New Home Update

New Build Update- Cabinets are in!

New Build Update- Cabinets are in!

House Update–We Have Walls!

House Update–We Have Walls!

Join Me on Instagram!

[instagram-feed num=9 cols=9 showbutton=false]

Privacy

Copyright © 2021 · Savory theme by Restored 316

Enter your name and email to get my weekly post sent to your inbox... it's FREE!
Want to learn more about DIY, decorating, and making your home beautiful? Sign up below!
Your information will *never* be shared or sold to a 3rd party.