Hello! I’ve been excited to share this tutorial with you because it has made such a big impact in my own home and for under $100!
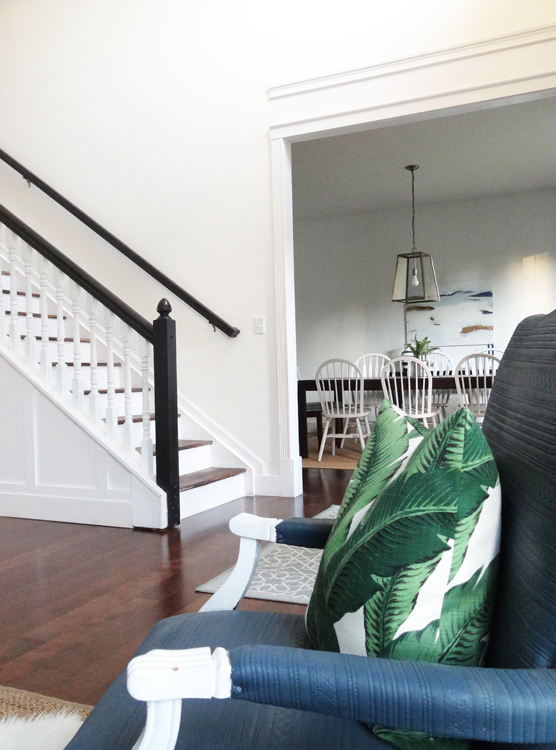
My stairway to the upstairs is the first thing you see when you come into our house.
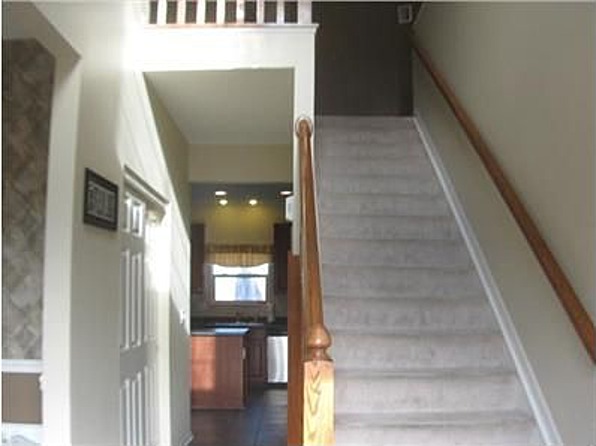
When we moved here it had the builder-basic carpet stairs with oak railings. This isn’t an awful look but it wasn’t what I was hoping for.
BEFORE
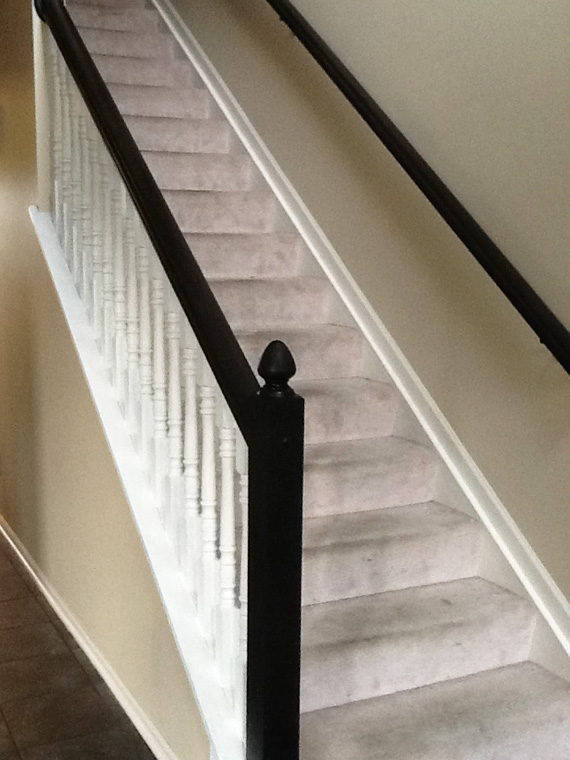
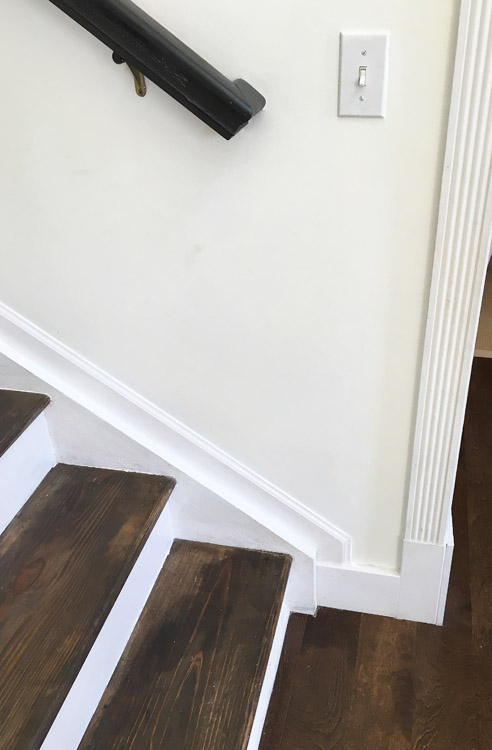
The first thing I did was paint the hand railings dark espresso and the railings white (HERE is the tutorial on how to do this step which is SO worth it IMHO)!
PROGRESS
Next I got so disgusted with the carpet on my stairs that never seemed to look clean no matter how much I cleaned it that one day I just started pulling it up (I’m not an impulsive person but once in awhile when it comes to home projects it happens).:-)
My youngest was around 1 years old at the time so I still wanted some padding on the stairs in case of falls. I kept the carpet pad on the middle portion of the stairs and installed a $75 “runner” down the middle of the steps.
You can learn all about how to take the carpet off your stairs HERE as well as how to add an inexpensive runner!
PROGRESS
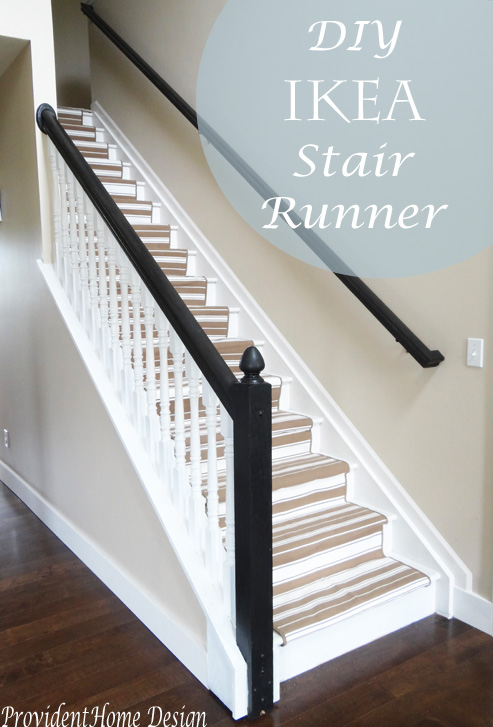
I really loved how it looked but I’ve always for the past 5 years dreamed of having the clean look of brown wood treads with white risers.
Plus a few months into having the the new runner one of my children managed to spew all over the top of the stairs and although much of the mess came out it did leave stains on three of the steps.
So as soon as my youngest got really good at walking up and down the stairs by himself I began researching the best way to go about staining stairs.
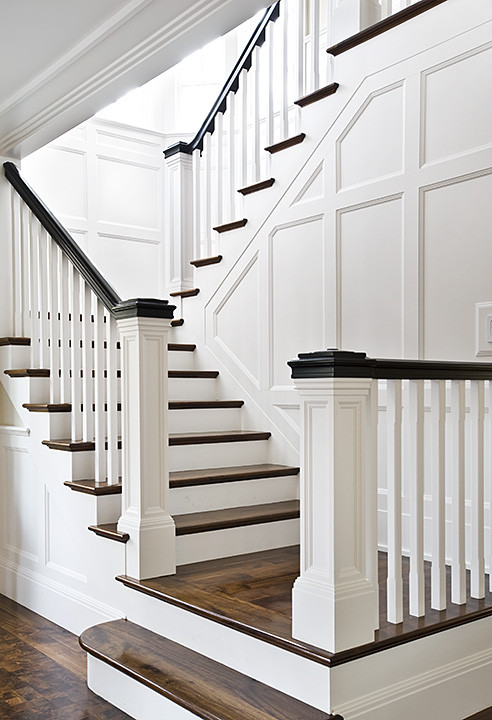
After much consideration I decided that using the original pine treads would be the easiest and most cost effective avenue. And here is the results!
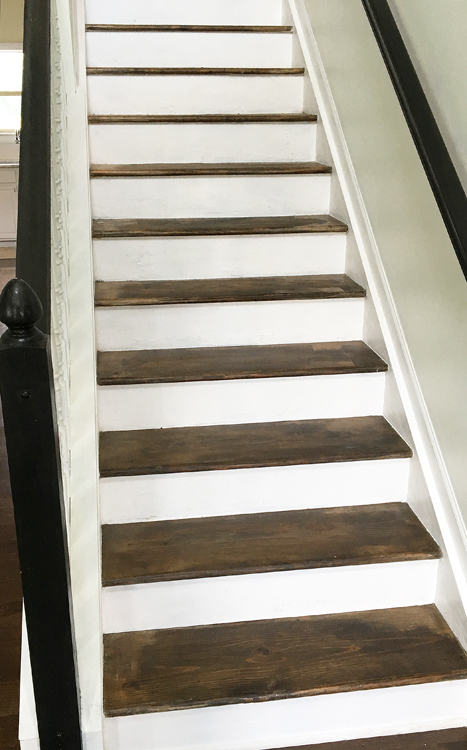
AFTER
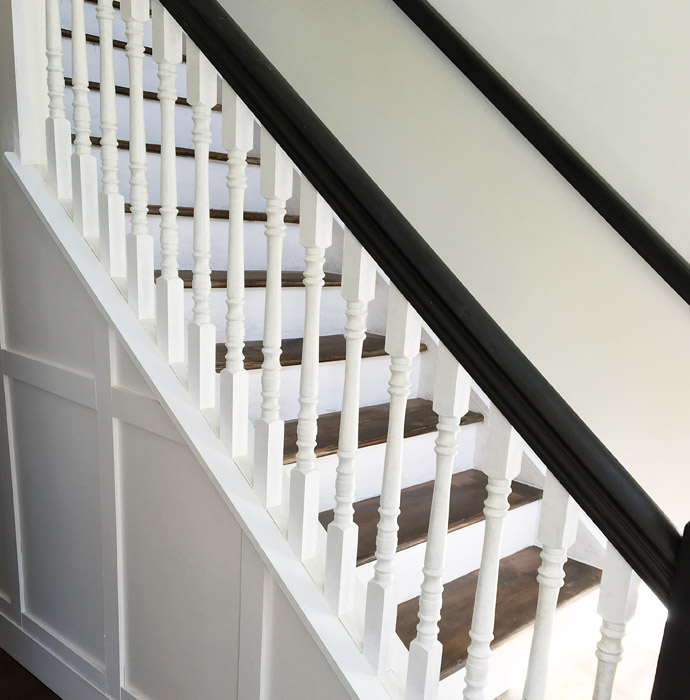
I am so happy with the results!!
You CAN totally do this even if you are a beginner at DIY–so don’t let fear get in your way!
I will take you Step by Step (no pun intended)!:-)
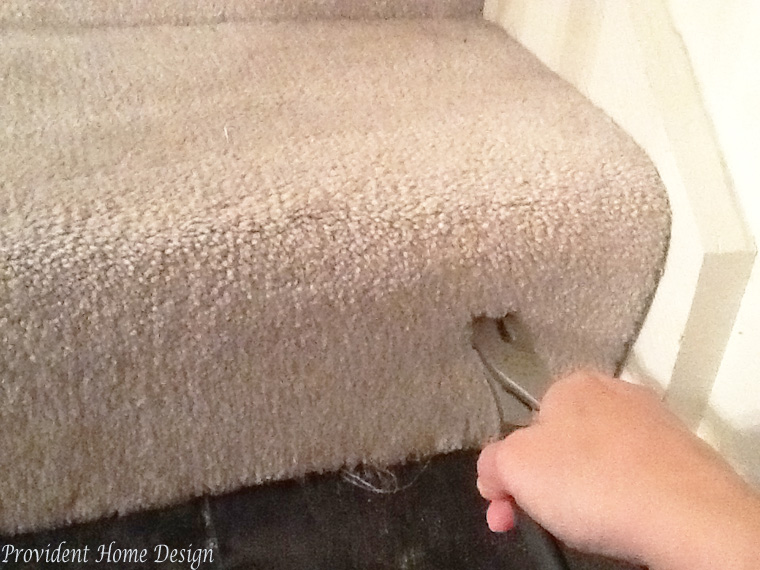
1. I started with the bottom step by using pliers to pull the carpet away from stairs.
2. Once you get the carpet up this is what you will see. The blue stuff is the carpet padding (yours might be a different color) and the arrows show where the nail strips are.
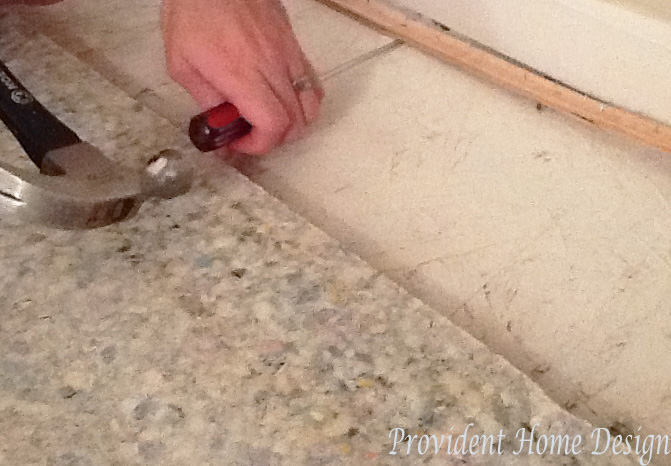
With a flat head screw driver up against the nail strip strike the end of the screw driver with a hammer until you can get under the nail strip and pull/pry it up (you may want to use gloves during this step).
TIP: Getting the nail strips up is the longest part of the process (and some are easier than others to pull up). I only had a little bit of time each night to work on this project so I did a few steps at a time and then put the carpet back down over the steps.
I wouldn’t pull the whole carpet off the stairs all at the beginning unless you knew you were going to have the time to get all the nail strips up in one big nail stripping session.:-)
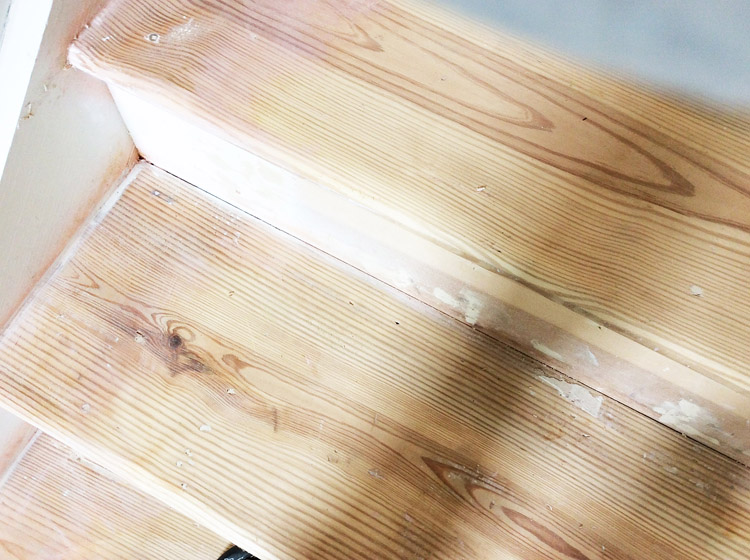
3. Pull off the padding and remove any staples or nails left on the steps. The flat head screwdriver works great for prying up the staples as well.
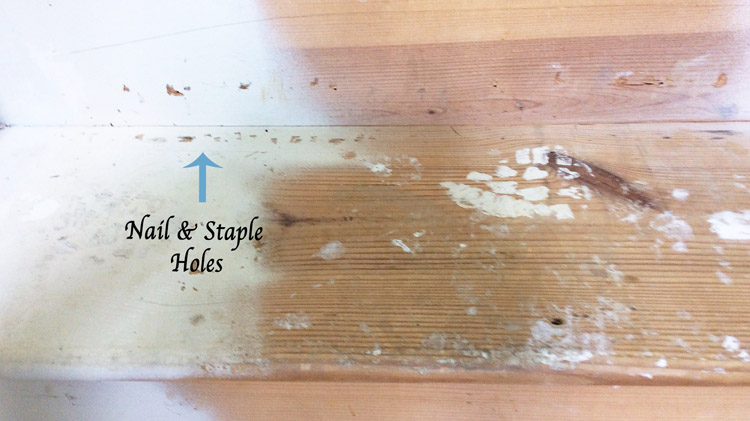
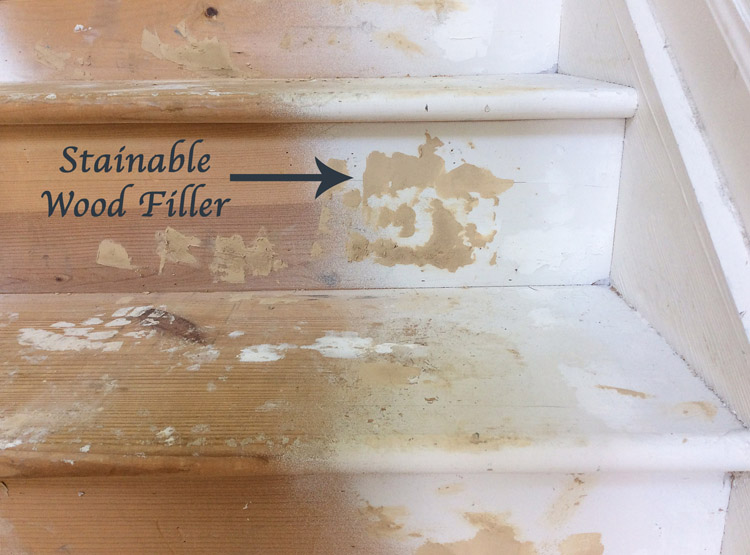
4. After step 3 you will be left with little nail and staple holes.
Fill these holes with a stainable wood filler (for your convenience I will have a supply list with links to these items at the end of this post). You can apply and smooth out the wood filler best with a putty knife.
5. Now it’s time to sand. For this step I borrowed a friend’s belt sander. If you don’t have a sander or a friend to borrow one from no worries!
There are some 4 1/2 star sanders on Amazon for only $15-$35 that will work awesome for this project (links to the sanders at the end of the post).
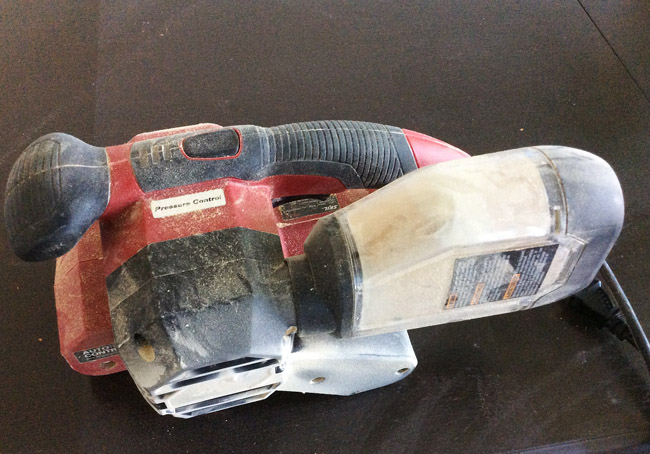
Sand both the treads and the risers until smooth.
6. The belt sander worked really well for me, however, it didn’t do well getting the spots close to the edges of the stairs (you won’t have that problem with the sanders I recommend below)
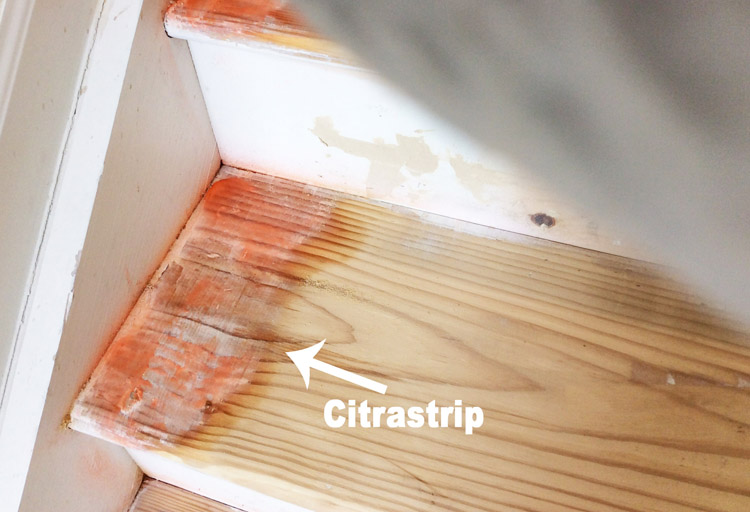
So for these areas I used a product called Citrastrip. I got the spray bottle version for convenience. After spraying it on you leave it for 30 minutes and then start scraping it off with a putty knife or scraper.
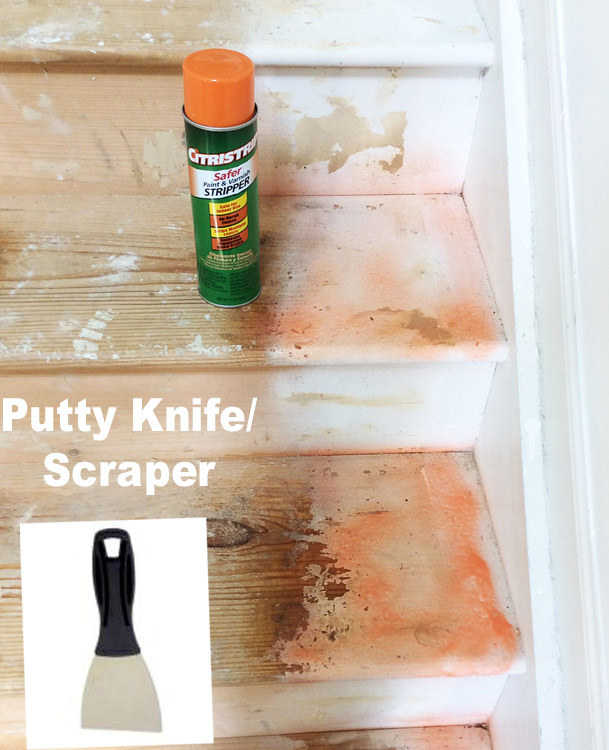
When I had installed the runner a couple of years ago I had also painted the sides of the steps will 2 coats of white enamel paint so it took a few applications of the citrastirp before I got all of the paint up.
7. Now onto the fun part! You will use these products in the order shown below.
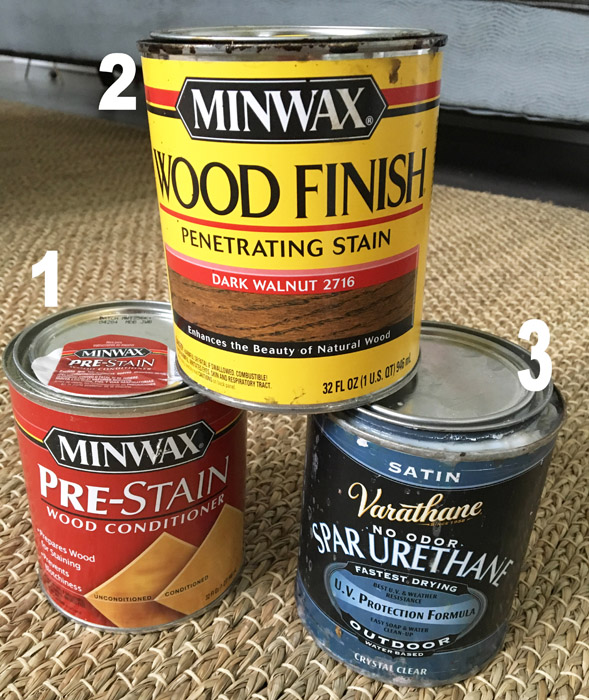
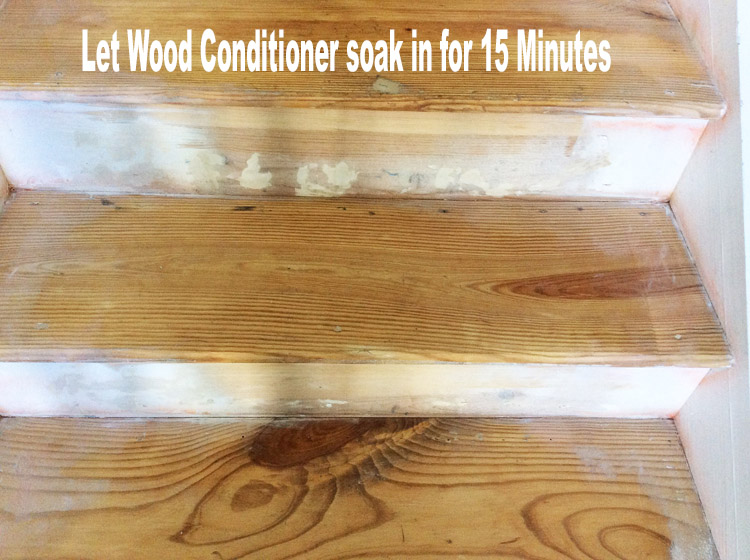
First, with a paint brush cover four steps with Pre-Satin Wood Conditioner. The conditioner is very important to achieving a beautiful, even stain so please do not skip this step!
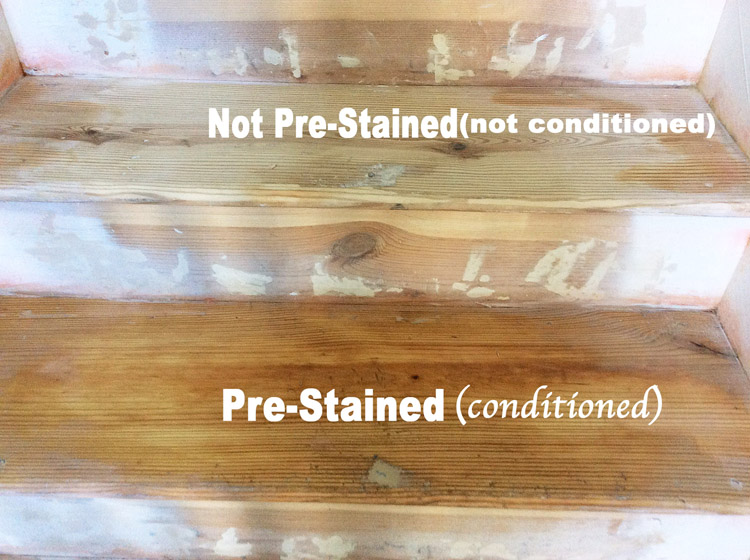
Let the wood conditioner soak in for 15 minutes and wipe away any excess (there wasn’t any for me).
8. Have a rag ready. Using a different paint brush, brush on your stain making sure to use a thin and even coat. Quickly remove excess stain on the step by vigorously wiping the step down with a rag.
Sadly I didn’t get any pictures of this step because of the time sensitive nature involved.
Tip: It is easier to add more stain for a darker color but impossible to make the stain lighter after it dries (and it dries very quickly). So be sure that as soon as you apply the stain that you “wipe it away”.
Keeping adding coats of stain until you get your desired color. I only needed to do one coat.
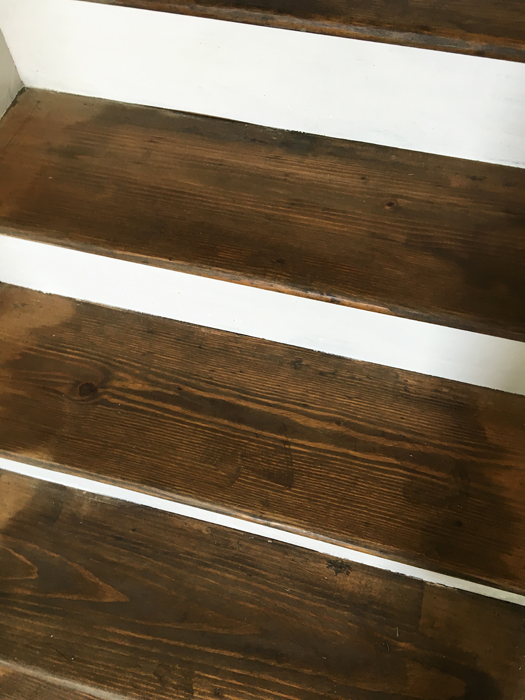
9. Once you get it to your liking it’s now time to protect all your hard work and give it a professional looking finish by brushing on a Polyurethane. I applied 3 thin coats since I knew our stairs would get lots of abuse.
10. For the last step tape off the edge where the treads and the risers meet and where the treads and sides meet and paint risers white.
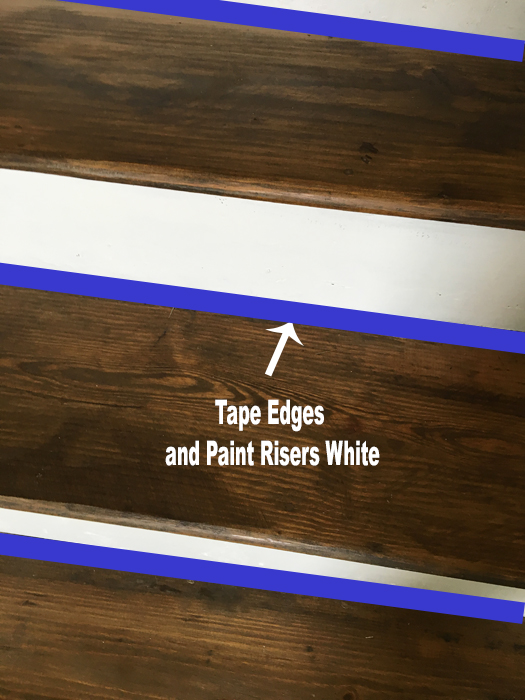
Make sure to tape precisely so that you get a clean crisp line once the tape has been removed! Once the paint dries, remove the tape and you are DONE!!
We are loving our new steps!
As promised here is your supply list that links you to the actual products you can purchase for this project! (affiliate links included for your convenience)!
SUPPLIES
Electric Sander (Option 1) (Option 2)
Stain (I used Miniwax Dark Walnut)
Polyurethane- For a little shine (Option 1) For more shine (Option 2)
White Paint- I used Behr’s Pure White Enamel Paint from Home Depot
I hope you enjoyed this tutorial! As always let me know if you have any questions! I hope you have a great rest of your weekend!!:-)
Wow! What a difference! The stairs, handrail, and white risers create a sharp, clean look, which complements the dining room (?) set in the adjoining room. You have a good eye, Tamara. I foresee you being a successful interior decorator, once the kids are older.
That means a lot, Amber! Thank you!:-)
Hi Tamara, another great post from you (as always)! 🙂 I have 2 questions
1) What i your experience are the pros and cons of having a carpet, a runner, or nothing on the stairs? Many people believe if there is no carpet or a runner, the stairs are slippery. Is it really so? The stairs in my grandparents house were just painted wood, I don’t remember any accidents there.
2) In all American blogs people use stain and a protective layer but never tinted varnish. Is there any particular reason for this? I have used varnish for T&G ceiling in the pantry and it looks OK. Haven’t use in on the floor though.
I second Amber that you are very tallented and have all that is needed for a successful interior designer/decorator. In fact, if you were in the UK, I would hire you without any doubt 🙂
Thank you, Val, I really appreciate your confidence in me!! 🙂 I think that with both carpet and runners that the pros are less pain and injury if you fall down or up them (yes, i have fallen up stairs before).:-) I think also less noise when walking up and down the steps. Also some people make prefer the feel of carpet on their feet over wood. The pros of no carpet or runner is easier clean up and maintenance, less noticeable wear (after almost 2 year the runner looked old and tired). I honestly like the feel of the hardwood on my feet better–don’t know why. It has a cleaner, more striking look. I haven’t found the hardwood stairs to be slippery at all. I used a Satin sheen on the polyurethane which I have thought about going over it again in a gloss sheen because that would match the sheen of my floors better. If I do it I will let you know if using a gloss makes the stairs more slippery (I don’t think it will but it could). I’m not very familiar with varnish or tinted varnish. I’ve heard of it but it’s not talked about much. I looked it up and it sounds great! Now I want to try it!! 🙂 Let me know if you have any other questions! Thanks, Val!
WOW! Good job. I would have thought you brought in a carpenter!
Thank you, Charley! It was a fun project (more fun than I thought it was going to be). Makes me want to find something else to sand and stain. 🙂
You can come do my stairs and do same exact color and everything. How did you manage with baths and sleeping quarters upstairs? I want to do it but I want to allow people to bathe.
Great question Edna! It really doesn’t take very long to dry–maybe an hour tops.
I am wondering what you did at the top of the stairs where the landing is? I have hardwoods on the 1st level, but carpet upstairs. How do you finish off the top?
Hi Melissa! Great question! At the top of the stairs I cut a straight line in the carpet with a utility knife about an inch and half past the top stair nose. I stained the part of the stair nose showing. The carpet edge has frayed a bit. I’m not too worried because I plan on replacing the carpet on the upstairs landing with hardwood eventually because the carpet gets so much traffic it always looks bad. Otherwise I would probably get some no fray type adhesive to put on the carpet edge to keep it from fraying and keep it looking nice.
So that would actually be the landing, right?
I’m curious how the edges of the stairs have held up. I’m doing this very soon and am wondering with all the heavy duty traffic our stairs will get if there will be dings and knicks on the edges.
Hi, Donna, thanks for reaching out. We are really hard on our stairs and I’m happy to say they’ve held up great so far! SO glad I did this project!
Love this look! Quick question, why did you paint last?
Hi Tamara, wonderful job.
I only have a question: when do you do the white paint?
I will definitely do this project at my house.
Thanks for sharing!
Hi, Ana! I did the white paint at the very end. I taped off the stained part where the white and stain meet so that I could protect the stained part from accidentally getting painted white. I’m excited for you! It makes such a difference!
Hi can you post a picture of the top of the stairs plz i like to do this in my house im a little scared about the top i have carpet in the top part thanks
Couple of questions: How long did it take the odor to go away in your house when doing this project with these supplies? Secondly, have you been pleased with the white risers or do you find them difficult to keep clean?
Hi, Cynda, I would say a couple of days at most! And I haven’t had any problem with the white risers getting dirty at all! Still so glad I did it!!:-)
Do you start at the top? my stairs are the only way to get to my whole living area..do I do a bit at a time..thank you.
Hi Paula! I started on the bottom and worked up. I worked on them a little at a time too (4 steps at a time). I pulled the carpet up about 4 steps and then I pulled out the staples and strips on the steps and if I didn’t have time to do more I laid the carpet back down and it would laid back down as if nothing had happened. Then the next day I pulled the carpet back up and worked on it some more. I don’t know if this makes sense but it was a great method for working on it a little at a time.
Hi Tamara! Your stairs are gorgeous! Great job! We are currently in the process of building our home so have a blank slate to work with. Our staircase has not gone in yet. This may seem like a silly question, but do you think builder grade stairs are stainable? I am not sure what kind of wood they are built from. If so, I am definitely going to get my hands dirty before closing on our new build and stain our staircase!! Thanks so much for the inspiration!
Hi, Kristin, congrats on the new house! Yes the builder grade is stainable…the wood under the carpet on my stairs that I stained were builder grade. They were pine wood which is what most builders use. It wouldn’t hurt to ask your builder though. Hope this helps!!:-)
Hi there! Looks fabulous! Just started this myself at 7:30pm last night! Literally couldn’t look at my carpet anymore! Question- do you have a landing in between? Would love to see how that came out. I have a large landing in between two sets of stairs. I guess I will just be staining that whole area? I wonder if the wood will be the same there. Crossing fingers that it’s not plywood there! I’ve only finished pulling up 5 stairs so far. We shall see!
Hi! I love this! How long did you wait after staining to put the first coat of poly, then how long did you wait between each coat of poly? Also, how long did you wait to walk on the stairs after the final coat of poly?
Thanks so much!
Hi Maranda! It all dries pretty quickly. I want to say I waited about 15 minutes between stain and poly and poly and poly (but I would check the recommendations on the can). I did the final coat of poly on the stairs at night after the kids had gone to bed so that it would have more time to dry and cure. It got a nights worth of drying time. Hope this helps!!
Thank You so much Tamara.
It is very useful.
Beautiful job! My question is when you put on poly does it make stair slippery to walk on? I want to stain my stairs and not have a runner on it. But my concern is putting on poly will make treads slightly slippery?
Hi, Kathleen, great question! I can see why you would be concerned but thankfully it doesn’t make them slippery at all. Poly away!:-)
Hi! What grit sandpaper do you recommend using for the stairs? I didn’t see that noted anywhere, sorry if it is and I missed it!
Hi Aly! Thanks for the question. I would start out with a coarse grit sandpaper around 60 grit and then afterwards move to a fine grit paper of around 200 or above.
I just can across your post when looking to stain my stairs. Thank you so much for your helpful tutorial! I will be working on staining our new basement stairs shortly.
You are very welcome, Kim! I’m exciting for you!!
Hi Tamara, I saw you blog and so far my stairs have come out amazing! I am to the final step of paintin the rises white… how long did you let the poly cure before applying painters tape. I do not want to damage the look on the treads.
I’m sorry for the delay Tiffany! To be safe I would let it cure for 24 hours. Hope this helps!
Hi Tamara, Love your stairs … my question is my stairs were tiled but I had them removed and light oak treads and risers put on but now I’m hating the light … would I be able to do the same thing on the replacement treads and risers ?
Yep! It should work great, Tammey!
So excited to finish our stairs following these amazing instructions. Sanding is complete , I start staining today. Thankyou for this tutorial.
I have one question. For the skirting and kick boards I can’t seem to get all the existing stain off although it isn’t shiny. Is it Ok to start painting these areas white?
Hi Cheryl! You should be able to start painting them especially if you use Behr’s alkyd enamel paint that I talk about in this post, http://providenthomedesign.com/2014/10/18/paint-bathroom-vanity-like-professional/.
What color did you paint the handrails?
Hi Tamara, when you say you did four steps at a time, do you mean to say that you focused on 4 steps (conditioner->stain->poly) then moved into the next four?