Provident Home Design

Decor, DIY, and Interior Design

  • HOME
  • ABOUT
    • About PHD
    • Contact Me
  • DIY PROJECTS
  • DESIGN 101
  • PAINT
  • HOME TOUR
  • DESIGN INSPO
  • DECOR TIPS

New Build- Laundry Room/Mudroom Reveal

Hello, I hope you are having a Happy Friday so far!  It’s cold here but at least the sun is out.  The older I get the more I realize I am solar-powered so I’m always thankful when it’s a sunny day!

Today I am sharing my laundry room/mudroom.  We found that in our previous house we rarely used our dining room so instead of having a dining room we opted to make it a laundry room/mudrooom. I knew I wanted there to be windows in the laundry room to get as much natural light in the room as possible (remember I’m solar-powered and doing laundry takes lots of power so it was necessary).?


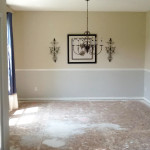
Here is the picture of the room right before we moved in.  Since the door leads into the garage the builder felt we should build a ‘pony wall’ to hold the pipes for the washer and dryer.  He felt this would cut down on the risk of the pipes freezing in the winter since garages can get cold.


And here it is now!


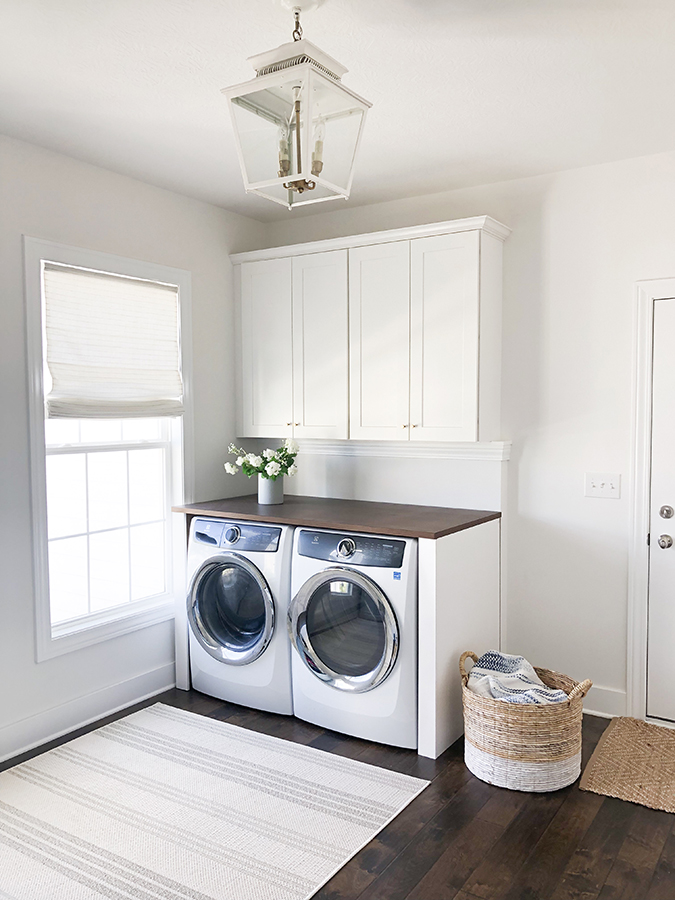
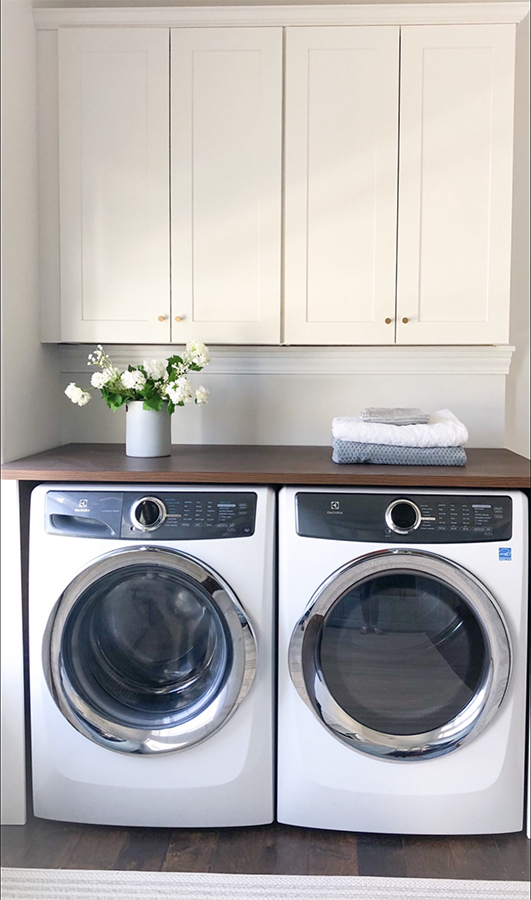
I built the woodwork around the washer and dryer which really gives it a finished look (let me know if you’d like me to do a DIY tutorial for it).  I’m still deciding if I want to do some kind of backsplash.  I don’t really need one functionally but it might add visual interest.  What would you do?


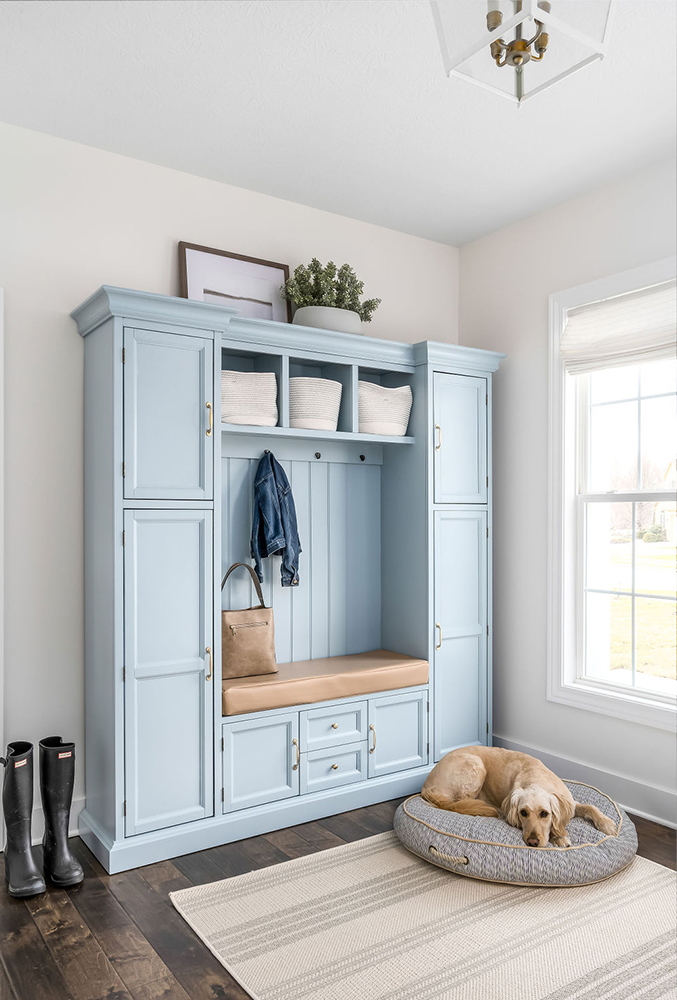
Across from the washer and dryer is ‘the keep all the coat, hats, gloves, and backpacks contained system’ which is quite the feat in our family!  It has done the job well.

Marshall Evan Photography


Having the builder build something like this would have cost over $2000.  I found this one which had everything we needed for under $1000.  It did take time to put it together and paint it the color I wanted but it was worth it to me.


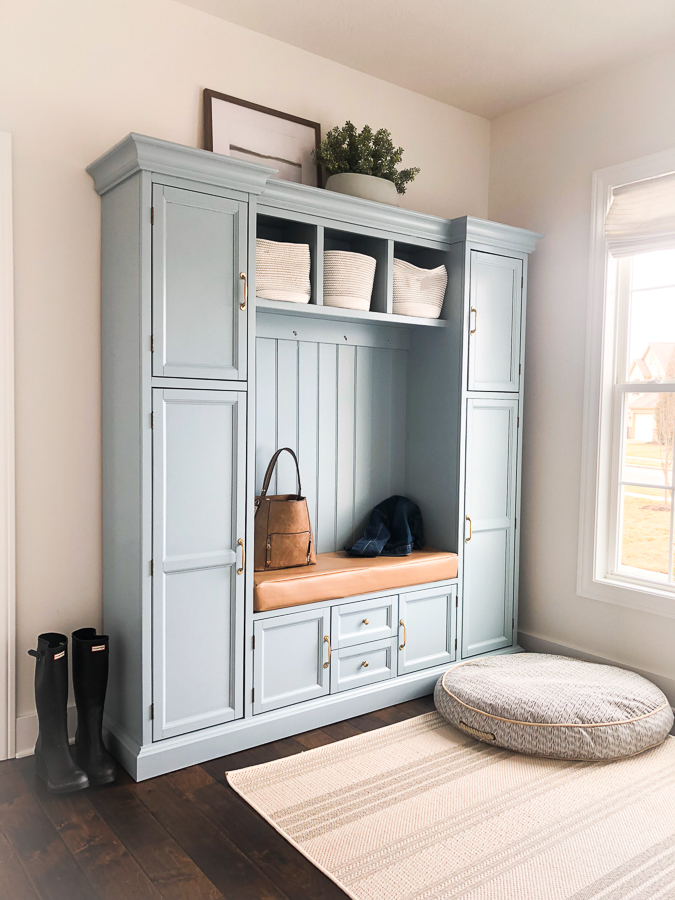
I also added a thicker foam to the bench seat and had it wrapped in some faux leather fabric I found at JoAnn’s.


The doorway next to it leads out into the entry of our home and contains a pocket door in case I ever want to close the door while the washer and dryer are on.  We have really put this room to use and it hasn’t let us down yet!


Sources for the Room:

Striped Rug- Lulu and Georgia

Ceiling Light- Ballard Designs (I got it when it was 30% off)

Cabinet/Bench System- Home Depot (I bought the brown one but painted it a custom blue color, Benjamin Moore Smoke is a similar color)

Accessories- Homegoods


Let me know if you have any questions or comments!  I hope you have a wonderful weekend!!


?,


Related Posts From the Blog:

  • A Beautiful Master Bedroom Makeover for LollyA Beautiful Master Bedroom Makeover for Lolly
  • The Look for Less- My 5 Most Recent Home Decor Deals!The Look for Less- My 5 Most Recent Home Decor Deals!
  • A Tiny Toilet Room Makeover & Painting Cabinetry AdviceA Tiny Toilet Room Makeover & Painting Cabinetry Advice
  • Design 101-  Decorating with Heirlooms & AntiquesDesign 101- Decorating with Heirlooms & Antiques
  • Easy DIY Painted $1 Glass VaseEasy DIY Painted $1 Glass Vase
  • Pantone’s 2015 Color of the YearPantone’s 2015 Color of the Year
  • Need a Valentine’s Gift Idea?Need a Valentine’s Gift Idea?
  • 25 Home Décor Items, Under $2525 Home Décor Items, Under $25

Building a Home// DIY8 Comments

« New Build- Boys Room/ Guest Bedroom Reveal
New Build- Kitchen Reveal »

Comments

  1. laura says

    Friday, November 8, 2019 at 6:14 pm

    curious what your finished dimensions are on the bench arrangement.
    Can you explain what size units you put together?

    Reply
    • Tamara says

      Friday, November 8, 2019 at 11:08 pm

      Hi Laura! Here are the dimensions that were provided, Total dimensions: 81.5 in. H x 79.25 in. W x 17 in. D
      Cubbies: each is 12 in. H x 13 in. W x 10.5 in. D. Seat cushion: 2 in. H x 41.5 in. W x 14.25 in. D. It came in three boxes. I think the biggest pieces were the base and the top and the side pieces which were around 80 inches x 20 inches (long and skinny). I didn’t have any problem putting it together on my own. The only time I needed another tall body was at the end when you put the top of the unit on… it was helpful to have my husband take one end and I took the other and lifted it up over the top. Hope this helps!!

      Reply
  2. Maria Veit says

    Friday, November 8, 2019 at 8:10 pm

    You did a great job with it. Thank you for sharing.

    Reply
    • Tamara says

      Friday, November 8, 2019 at 11:09 pm

      Thank you so much, Maria! I appreciate you taking the time to comment and for your kind words!:-)

      Reply
  3. Linda F Henderson says

    Saturday, November 9, 2019 at 2:31 am

    Wonderful Job, I wouldn’t change a thing. Thanks for sharing!

    Reply
    • Tamara says

      Saturday, November 9, 2019 at 12:54 pm

      Thank you, Linda, for following along and for your feedback!!?

      Reply
  4. Jean Rice says

    Wednesday, November 13, 2019 at 9:14 am

    I don’t think you need a back splash, the nice molding & wood top gives it a clean look, back splash would make that small area look too busy; just my opinion.

    Love, Aunt Jean

    Reply
  5. Jenny B. says

    Friday, January 17, 2020 at 9:27 pm

    Yes, please, on the DIY tutorial for the W/D woodwork & countertop! I want to do the same thing in our laundry room. 🙂 I might add a backsplash. It would be cute! Maybe you could stencil one rather than using tile. Kate at House Mix Blog stenciled her kitchen backsplash, and it looks great! https://www.housemixblog.com/2019/09/19/stenciled-kitchen-wall/

    Reply

Leave a Reply Cancel reply

Your email address will not be published. Required fields are marked *

Hello and Welcome!! My name is Tamara and this is where I share my tips and tricks to creating a beautiful home! If you are new, feel free to start HERE.

More Blog Inspiration:-)

  • Icon Caroline on Design

    Close preview

    Loading...
  • Icon Centsational Girl

    Close preview

    Loading...
  • Icon Decorating Delirium

    Close preview

    Loading...
  • Icon Lauren Liess

    Close preview

    Loading...
  • Icon Life on Virginia Street

    Close preview

    Loading...
  • Icon Remodelaholic

    Close preview

    Loading...
  • Icon The Creativity Exchange

    Close preview

    Loading...
  • Icon Thrifty Decor Chick

    Close preview

    Loading...

Categories


Disclosure & Privacy Policy

You might also like

The Final Before & After of our Current Home

The Final Before & After of our Current Home

New Build Update-Paint, Lighting, and Floors oh My!

New Build Update-Paint, Lighting, and Floors oh My!

New Home Update

New Home Update

New Build Update- Cabinets are in!

New Build Update- Cabinets are in!

House Update–We Have Walls!

House Update–We Have Walls!

Join Me on Instagram!

[instagram-feed num=9 cols=9 showbutton=false]

Privacy

Copyright © 2022 · Savory theme by Restored 316