Provident Home Design

Decor, DIY, and Interior Design

  • HOME
  • ABOUT
    • About PHD
    • Contact Me
  • DIY PROJECTS
  • DESIGN 101
  • PAINT
  • HOME TOUR
  • DESIGN INSPO
  • DECOR TIPS

GET NOTIFIED VIA EMAIL WHEN THERE'S A NEW POST!

The One Room Challenge Week 4

Hello!  I hope you’ve had a great week so far!  I dropping in today to share some of the progress I’ve made on the two rooms I’m making over for the One Room Challenge!

First I wanted to share a lamp makeover I did.  I have had these matching lamps for years that I bought from Homegoods for my family room sofa table.


Sofa Table Christmas Decor

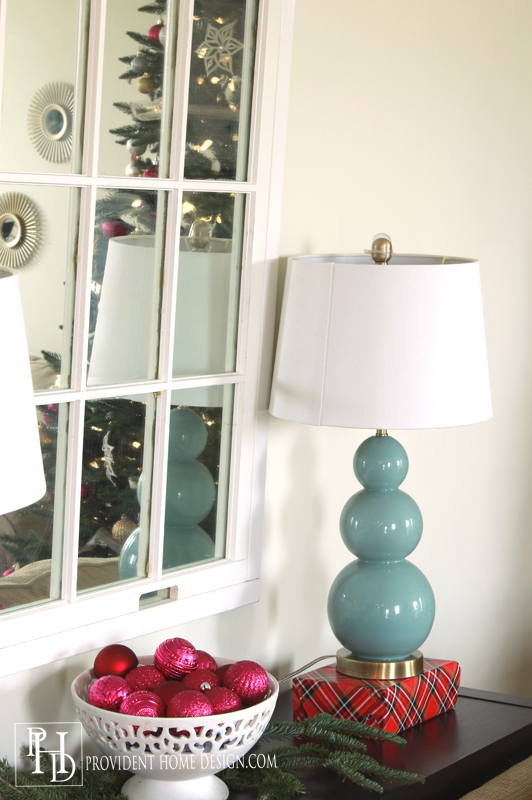
Although I’ve loved the shape of them they have always been a bit short for space.  After finding some better scaled ones (at Homegoods again) I decided to use these in my master bedroom makeover.

However, they were not the right color for my bedroom.  So this week I painted them.
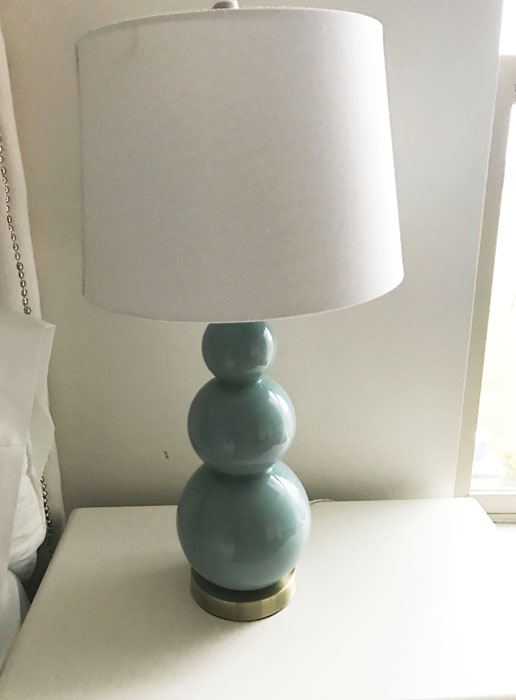
Before

Lamps Before

At first I thought I wanted the lamps to be gold so I took off the shades and taped the electrical parts and spray painted them gold with THIS spray paint (affiliate link).

Spray Paint Lamps Gold

I didn’t end up liking the gold color with the room so I decided to paint over them in gray.  I used some gray sample wall paint I had on hand.

This is what it look like right after I painted on the first coat of gray paint.

Paint Lamps Gray

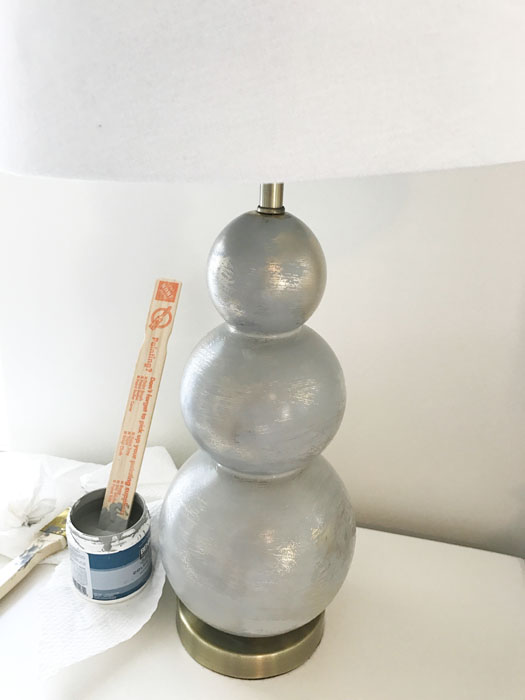
When I came back a few minutes later some of the gray paint had crackled which I hadn’t expected to happen BUT…

Another Closeup of Lamps Painted

I liked it ALOT!  It think it gives a cool artistic look to the lamps!

Upclose of Lamps After Painted

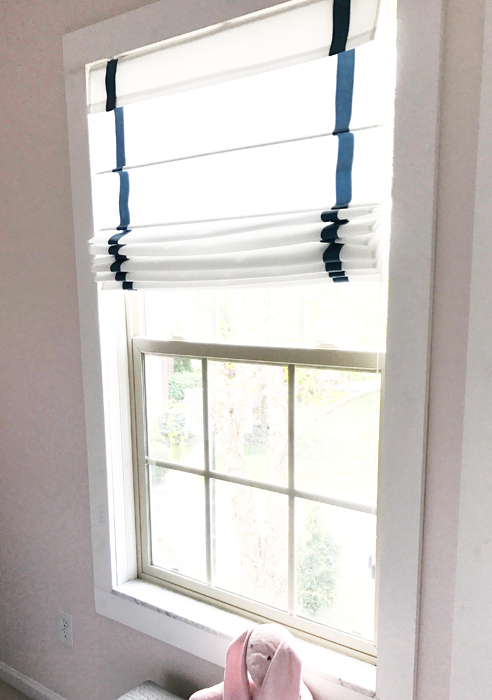
Another project I worked on this week  was window treatments for my daughter’s bedroom makeover!  I bought these white roman shades on sale at jcp.com for $23 a piece (in real life they look white not the color below).

Roman Shades Plain White

I bought the white shades with the intentions of embellishing them in a similar fashion as the Pottery Barn Kids ones below (that sell for $200 a shade).

Pottery Barn Kids Roman Shades

via Pottery Barn Kids

To accomplish this I purchased  THIS 1.5 inch grosgrain ribbon from The Ribbon Retreat and adhered in the shade with fabric glue.

Putting Ribbon on Roman Shade

I decided to just do a single ribbon that comes down on each side and I love how it turned out!!  As you can see in the picture I also added wood trim around the windows which is a little detail that always makes a big impact and just costs about $15 a window to do (tutorial to come)!

Adding Ribbon to Roman Shade

On Monday a delivery truck brought the 2 Ikea Hemnes 8 drawer dressers I had ordered online.  I bought one for my daughter’s bedroom makeover and one for my son’s shared bedroom.

I was nervous about ordering two without really seeing them in person but I am happy to say they have even exceeded my exceptions!  I love this dresser!!  It is sturdy, super large and roomy, and beautiful!  If you are looking for a large dresser you won’t find a better one for the price ($250).
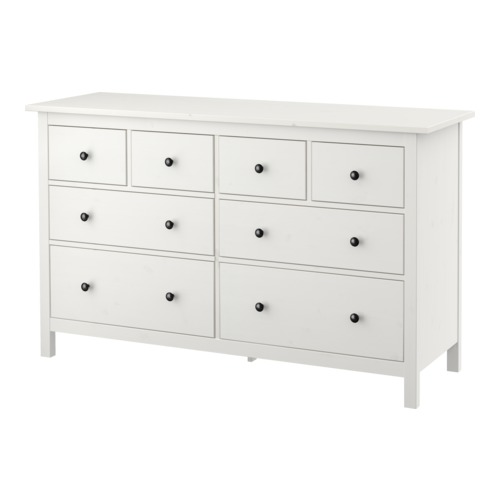
Ikea Hemnes Dresser

via IKEA

That being said they definitely take some time to put together (it took me 5+ hours to do the first one)!  I used THIS youtube video to guide me in putting them together which helped a lot!

I’m really excited about how things are coming along but I can’t believe I only have 2 weeks left!   I best be getting back at it!  Thanks for following along and as always let me know if you have any questions!!!:-)

You can check out the progress of the other ORC participants HERE!

signature

Related Posts From the Blog:

  • Sneak Peek of the 2015 BIA Parade of HomesSneak Peek of the 2015 BIA Parade of Homes
  • Design 101- Creating a Focal PointDesign 101- Creating a Focal Point
  • Design  101- Balancing Cool and Warm ColorsDesign 101- Balancing Cool and Warm Colors
  • Design 101- LayersDesign 101- Layers
  • Love Your Kitchen Series-BacksplashesLove Your Kitchen Series-Backsplashes
  • Friday 5 DIYFriday 5 DIY
  • Parade of Homes-House Tour #2 1/2Parade of Homes-House Tour #2 1/2
  • 5 Things to Know about Benjamin Moore’s Color of the Year ‘Simply White’5 Things to Know about Benjamin Moore’s Color of the Year ‘Simply White’

before and afters// budget decor// decorating// DIY// kids rooms// paint// window treatments4 Comments

Subscribe

GET NOTIFIED VIA EMAIL WHEN THERE IS A NEW POST!

« DIY Ceiling Beam-One Room Challenge Week 3`
One Room Challenge Week 5- One Week Left! »

Comments

  1. Charley says

    Thursday, April 27, 2017 at 3:12 pm

    WOW, love, love, love what happened to the lamp. No one would EVER guess you had just painted it. REMARKABLE. Speaking of paint, I had a very large abstract picture over my fireplace. Chose it based on the colors, then redecorated…………Yesterday I took blue room paint, some silver and gold and completely changed the pix. It looks fantastic. My husband thought I was crazy when I said I was going to do this. It was sitting in the garage not being used so I had nothing to lose. He absolutely LOVES it…..now I can add Artist to my resume!

    Reply
    • Tamara says

      Thursday, April 27, 2017 at 11:27 pm

      So awesome, Charley!!!!:-)

      Reply
  2. Rhonda says

    Friday, April 28, 2017 at 8:37 pm

    What a wonderful surprise the way the lamps turned out! I think you’re onto something here! Love how these rooms are coming along! You have such a flair for decorating!

    Reply
    • Tamara says

      Friday, April 28, 2017 at 10:53 pm

      Thank you, Rhonda, that means a lot!!

      Reply

Leave a Reply Cancel reply

Your email address will not be published. Required fields are marked *

Hello and Welcome!! My name is Tamara and this is where I share my tips and tricks to creating a beautiful home! If you are new, feel free to start HERE.

Subscribe

Get notified via email when there's a new post!

Join me on Instagram!

[instagram-feed]

More Blog Inspiration:-)

  • Icon Caroline on Design

    Close preview

    Loading...
  • Icon Centsational Girl

    Close preview

    Loading...
  • Icon Decorating Delirium

    Close preview

    Loading...
  • Icon Lauren Liess

    Close preview

    Loading...
  • Icon Life on Virginia Street

    Close preview

    Loading...
  • Icon Remodelaholic

    Close preview

    Loading...
  • Icon The Creativity Exchange

    Close preview

    Loading...
  • Icon Thrifty Decor Chick

    Close preview

    Loading...

Categories


Disclosure & Privacy Policy

You might also like

The Final Before & After of our Current Home

The Final Before & After of our Current Home

New Build Update-Paint, Lighting, and Floors oh My!

New Build Update-Paint, Lighting, and Floors oh My!

New Home Update

New Home Update

New Build Update- Cabinets are in!

New Build Update- Cabinets are in!

House Update–We Have Walls!

House Update–We Have Walls!

Join Me on Instagram!

[instagram-feed num=9 cols=9 showbutton=false]

Privacy

Copyright © 2021 · Savory theme by Restored 316

Enter your name and email to get my weekly post sent to your inbox... it's FREE!
Want to learn more about DIY, decorating, and making your home beautiful? Sign up below!
Your information will *never* be shared or sold to a 3rd party.