Provident Home Design

Decor, DIY, and Interior Design

  • HOME
  • ABOUT
    • About PHD
    • Contact Me
  • DIY PROJECTS
  • DESIGN 101
  • PAINT
  • HOME TOUR
  • DESIGN INSPO
  • DECOR TIPS

GET NOTIFIED VIA EMAIL WHEN THERE'S A NEW POST!

DIY Mirrored Window Pane

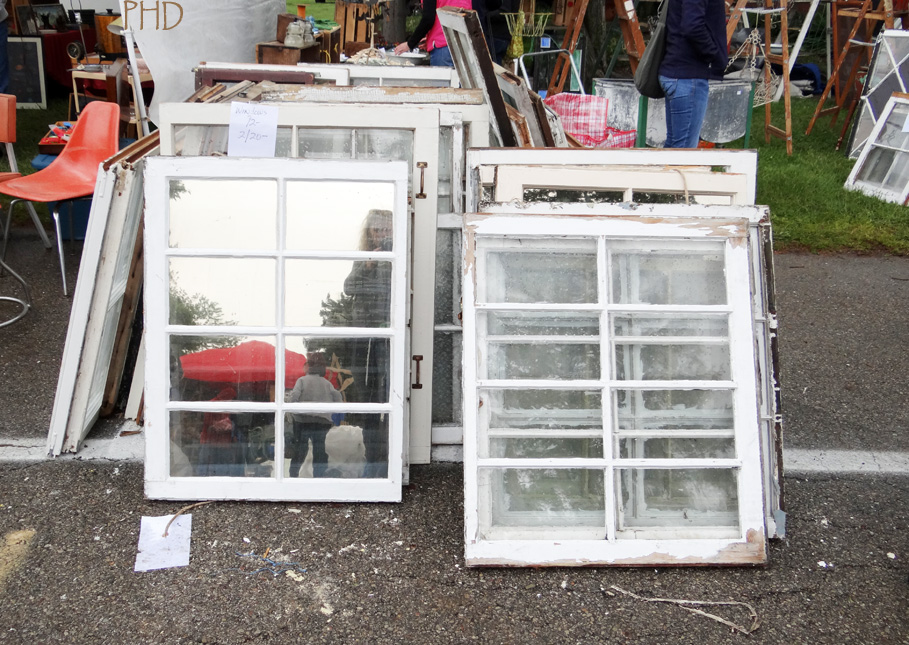
In the synopsis of my Springfield Antique Show experience I mentioned that I saw a lot of these old, used window panes there.  Many of them were well priced at $10 a piece.  I’m sure if you surveyed your local antique stores and flea markets that you would be able to find a selection too.  If not, there are plenty on Ebay just search “window panes”.

There are several fun ways to repurpose a window pane.  I will teach you one way today and share another idea with you later this week!


springfield antique show extravaganza

Around 2 years ago I was at a garage sale where I spotted a plain, large skinny box with a 50 cent tag on it.  I asked the owner what was inside and she pulled out a window frame (without the glass) and explained that she had bought it online and was going to use it as a photography prop but never did.  For 50 cents I knew I could come up with some kind of decorative use for it.

Sure enough just before we moved into our house a couple of years ago I was ‘studying’ a Pottery Barn Magazine when the light bulb went on.  In examining a similar mirror to the ones below I realized the fate of my wooden window frame.


Pottery Barn-$269


Pottery Barn-$299


Jill Mirror

Ballard Designs-$399


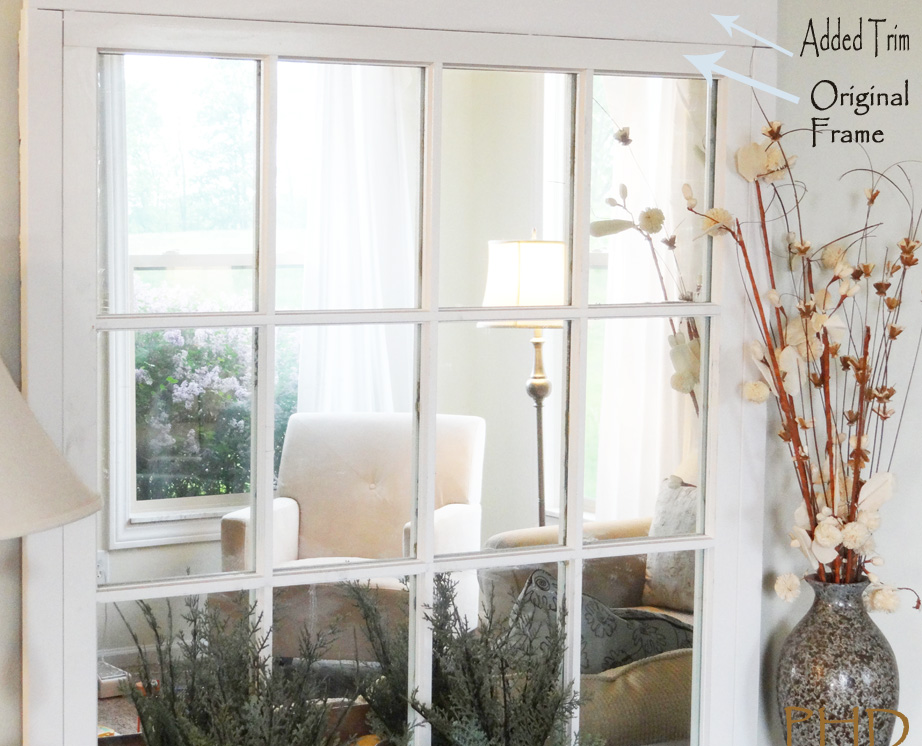
Of course a big decorative mirror!  All I would need was a mirror to which I could adhere my frame on.  I remembered that I had seen several frameless mirrors on Craigslist for sale.  When people remodel their bathrooms they often will switch out their builder mirror and sell it on Craigslist.  So I measured my frame to see what mirror size I should look for.  Right away I found a mirror for $10 that was just a few inches wider and taller than my frame.  I simply added plain white trim around the window frame to hide the excess mirror.

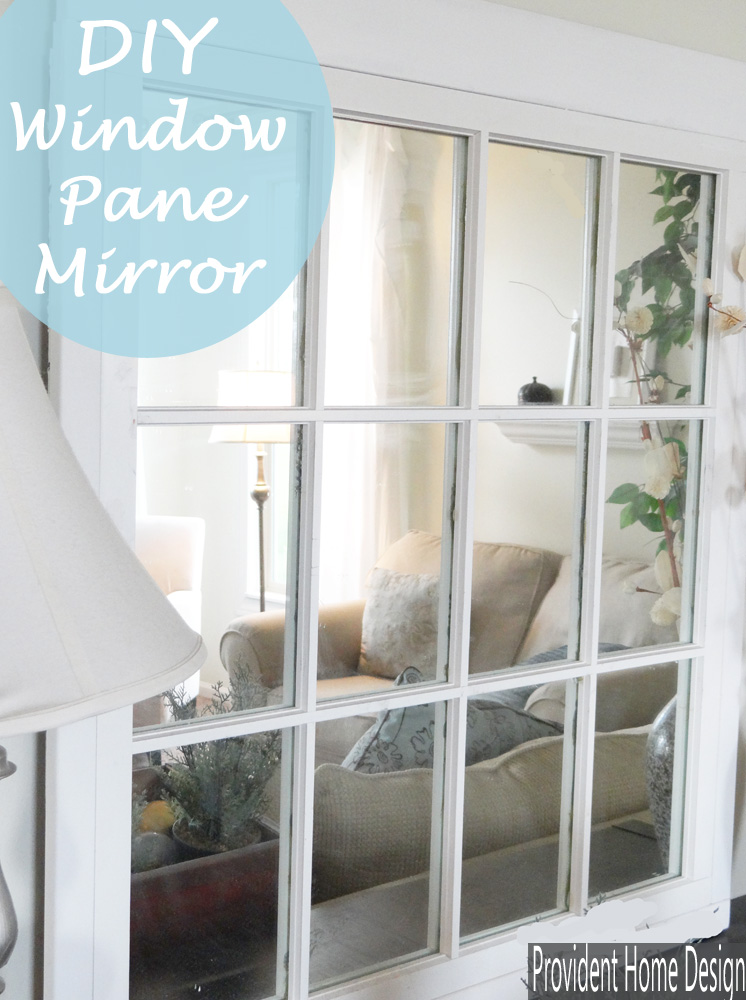
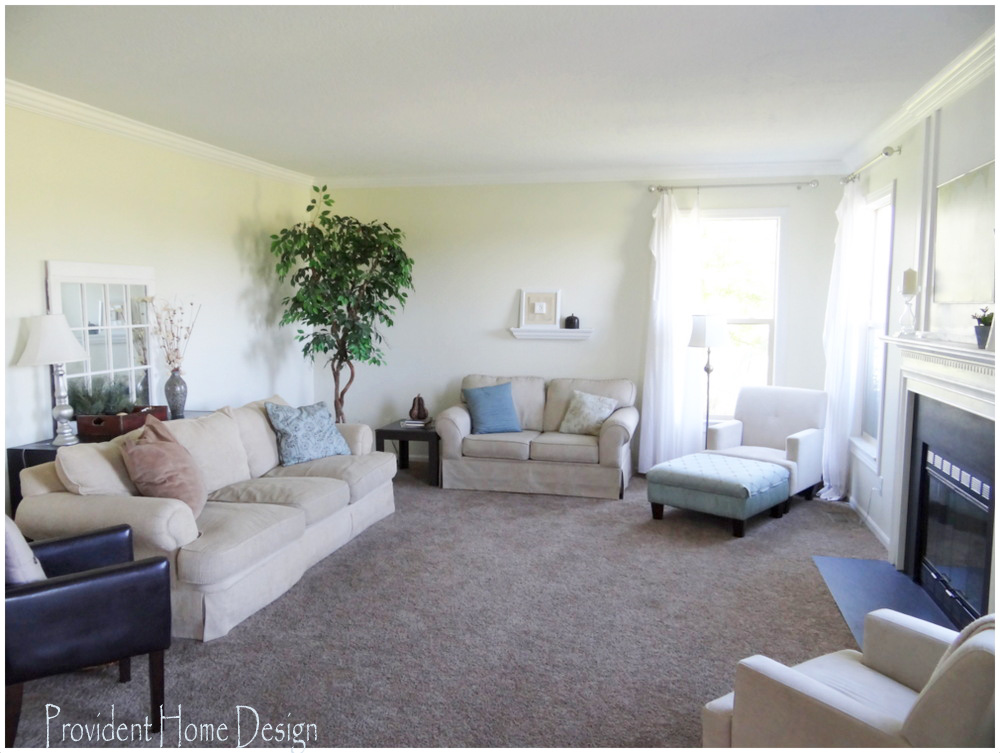
Here is the final result!

DIY Window Pane Mirror

DSC00579


I think it dresses up the room and balances the visual weight of the fireplace and mantle.  Right now I have it propped up on my sofa table against the wall, however, I think in the future I will hang it about 6-8 inches above the sofa table to balance the height of the mantle across from it.

mirror view

Family Room

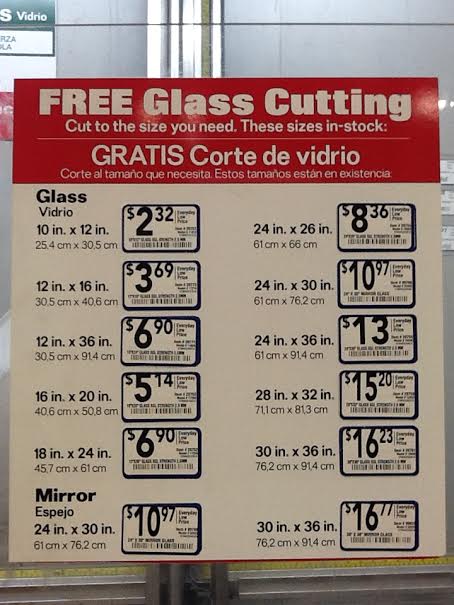
If you can’t find a mirror on craigslist, no problem, I learned about another source for getting frameless mirrors when I installed glass in my kitchen cabinet door.   Lowes not only carries and cuts glass but also mirror.  Below (at the bottom) there are the sizes and prices of mirrors that they carry and they can cut them to any size you want!


DIY Window Pane Mirror


Easy Steps to Creating a Window Paned Mirror:

1.  If your window frame still has glass in it, cover the glass with duct tape (this keeps glass from shattering all over the place).  Lay down a drop cloth to work over.  Then use a putty knife to cut the caulk off around the perimeter of the whole frame.  Once the caulk is cut sometimes the glass will wiggle out in one piece.  If not, tap the glass with a hammer (be sure to wear thick gloves and eyewear).  Apply pressure on the glass with hammer until all the glass has come free from the frame.  Pick up the corners of the drop cloth and throw away the glass.

2.  If you will be painting the window frame now is the time to do it.

3.  Lay the mirror down on a clean workspace face up.

4.  Turn the window frame on it’s back and apply a thin line of clear Gorilla Glue onto the entire backside of the frame.

5.  Use a Q-tip to spread the glue around evenly.  You will need to work quickly enough so that the glue does not dry out before you adhere it to the mirror.

6.  Pick up the window frame and carefully turn it over placing it on the mirror in the exact spot intended.

Tip:  Before placing it down hover a few inches over the mirror to ensure exact placement.  This is important because if you have to move the frame once it is down it will smear the glue on the mirror.  This glue is very difficult and sometimes impossible to get off so try hard to place it exactly the first time (no pressure)!:-)

7.  Let it dry untouched for a couple of hours.  If you need to add trim around the frame like I did then just apply the glue to the back of the trim and place the trim around the mirror.

8.  I you plan to hang the mirror on the wall you will need to make sure that the wood frame or wood trim is wider OR longer than mirror so that there is a place to install brackets or hooks for hanging.

I love this project because you can get the look of a Pottery Barn or Ballard Designs decorative mirror at a fraction of the price.  My came to only $12!  I hope you feel inspired to try it and/or share it!

Be back soon with another window pane DIY idea!:-)

DIY Window Pane Mirror

Related Posts From the Blog:

  • Restoration Hardware Knockoff MirrorRestoration Hardware Knockoff Mirror
  • DIY Brinkley Beveled Mirror KnockoffDIY Brinkley Beveled Mirror Knockoff
  • Easy Dresser Makeover + Progress in the BedroomEasy Dresser Makeover + Progress in the Bedroom
  • Springfield Antique Show- Take AwaysSpringfield Antique Show- Take Aways
  • DIY Large Wooden Planters & Porch MakeoverDIY Large Wooden Planters & Porch Makeover
  • Powder Bathroom Makeover RevealPowder Bathroom Makeover Reveal
  • Painting Wood Furniture (without sanding or priming)!Painting Wood Furniture (without sanding or priming)!
  • A Powder Bathroom Makeover for LollyA Powder Bathroom Makeover for Lolly

budget decor// decorating// DIY// mirrors// money saving tips// tutorials// woodwork17 Comments

Subscribe

GET NOTIFIED VIA EMAIL WHEN THERE IS A NEW POST!

« Springfield Antique Show- Take Aways
Girl’s Bedroom Mood Board and Some Deals »

Comments

  1. Emily, our house now a home says

    Wednesday, May 21, 2014 at 2:21 pm

    I love this idea, I have two old window panes that I use to display pictures or my kids art work. This is a very creative way of using them. I have seen the mirrors from other stores and it is crazy how much they are. Then you see how much you did it for. DIY all the way!

    Reply
    • Tamara says

      Wednesday, May 21, 2014 at 3:15 pm

      I love the idea of using it to display kids’ artwork!

      Reply
  2. Lisa - A Merry Mom says

    Wednesday, May 21, 2014 at 3:23 pm

    Your mirror is lovely! It looks just like the pricey designer ones. Great DIY. Pinned in case I come across a nice window frame. 🙂

    Reply
    • Tamara says

      Wednesday, May 21, 2014 at 7:15 pm

      Thanks, Lisa! I appreciate you stopping by!

      Reply
  3. Julia@Cuckoo4design says

    Thursday, May 22, 2014 at 7:18 am

    Looks really really pretty behind your sofa and such a great idea

    Reply
    • Tamara says

      Thursday, May 22, 2014 at 8:27 am

      Thanks, Julia! Thanks so much for stopping by!:-)

      Reply
  4. Debbie says

    Thursday, May 29, 2014 at 9:40 pm

    I love this!! I have several old
    Window panes and would love to do this!!

    Reply
    • Tamara says

      Friday, May 30, 2014 at 3:02 pm

      Exciting that you’ll have a home to decorate soon!:-)

      Reply
  5. Sarah @ Backwoods Babies says

    Monday, September 8, 2014 at 4:22 pm

    What a great idea. I have an old window similar to that just laying around. I love the polish of the glass along side the shabby of the old window. Really spectacular!

    Reply
    • Tamara says

      Tuesday, September 9, 2014 at 1:16 am

      Thanks, Sarah! I’m excited for you do this project! I recently helped a friend do it and it was quite fun smashing the glass of the old window. I know strange way to get your kicks!:-)

      Reply
  6. Allison says

    Monday, June 15, 2015 at 2:39 pm

    As far as mirrored glass goes-I bought 2 really cheap floor length mirrors and a glass cutter. I found the paned window in someone’s trash. (already distressed) The whole project didn’t even cost me $10. The window pane was approximately 2′ x 6′. Also, did one window pane for photographs. Left the old glass in it and attached wire to the front. I bought mini-clothespins and can change out the pictures whenever I want.

    Reply
    • Tamara says

      Monday, June 15, 2015 at 3:13 pm

      What a creative idea, Allison! Thanks so much for sharing!!:-)

      Reply
  7. Shirley says

    Thursday, October 1, 2015 at 8:41 pm

    Did you remove the wood molding on the back that surrounds the glass. How did you fit the glass to the window. I have a large arched window I want to make into a mirror for my foyer. Can’t figure it out yet.

    Reply
    • Tamara says

      Friday, October 2, 2015 at 3:09 pm

      Hi Shirley! The mirror I found for it was bigger than the window frame so after I glued it to the mirror I added wood trim to the excess part of the mirror to cover it up. I’m assuming you could do a similar thing for an arched window. Find or cut down a mirror that is close to the to the size of the mirror and then find flexible molding to go around the arch and cover up the excess mirror. Best of luck, Shirley, It sounds like it could be an awesome mirror!!

      Reply
  8. Kylee says

    Friday, October 13, 2017 at 9:55 pm

    So the Gorilla Glue is all you used to secure the mirror to the window frame?

    Reply

Leave a Reply Cancel reply

Your email address will not be published. Required fields are marked *

Hello and Welcome!! My name is Tamara and this is where I share my tips and tricks to creating a beautiful home! If you are new, feel free to start HERE.

Subscribe

Get notified via email when there's a new post!

Join me on Instagram!

Load More...Follow on Instagram

More Blog Inspiration:-)

  • Icon Caroline on Design

    Close preview

    Loading...
  • Icon Centsational Girl

    Close preview

    Loading...
  • Icon Decorating Delirium

    Close preview

    Loading...
  • Icon Lauren Liess

    Close preview

    Loading...
  • Icon Life on Virginia Street

    Close preview

    Loading...
  • Icon Remodelaholic

    Close preview

    Loading...
  • Icon The Creativity Exchange

    Close preview

    Loading...
  • Icon Thrifty Decor Chick

    Close preview

    Loading...

Categories


Disclosure & Privacy Policy

You might also like

New Build Update-Paint, Lighting, and Floors oh My!

New Build Update-Paint, Lighting, and Floors oh My!

New Home Update

New Home Update

New Build Update- Cabinets are in!

New Build Update- Cabinets are in!

House Update–We Have Walls!

House Update–We Have Walls!

How to Paint Furniture to look Bleached out and House Update

How to Paint Furniture to look Bleached out and House Update

Join Me on Instagram!

Follow on Instagram

Copyright © 2019 · Savory theme by Restored 316

Enter your name and email to get my weekly post sent to your inbox... it's FREE!
Want to learn more about DIY, decorating, and making your home beautiful? Sign up below!
Your information will *never* be shared or sold to a 3rd party.